Boards & sprints
A board shows your team's work. Each column is a step in your process, each card is an issue. Moving a card moves the issue one step on.
You do not have to set anything up. If your project already has a board, open it and start.
Open a board
Choose Board in the sidebar. You see every board you can access, across all projects. The menu at the top narrows the list to one project. Tap a board to open it.
If the list is empty, use New board to make one.
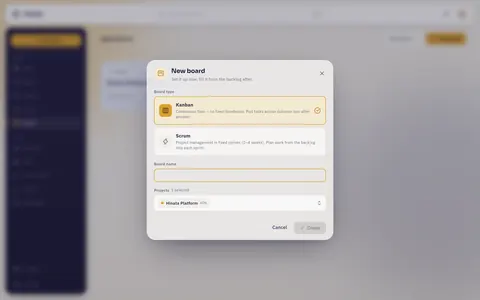
When you create a board:
- Type: Kanban or Scrum. The app has no way to switch this later, so read Kanban or Scrum first.
- Name: what your team calls the board. It does not have to match the project name.
- Projects: pick several and their equivalent columns merge into one wall. Two teams can then work side by side, each in their own project.
One project can have several boards
Boards are views. The same issue can appear on several boards without being copied. Issues belong to projects, not to boards.
Columns are your workflow states
Each column maps to one or more workflow states of your project, like To Do, In Progress, In Review, Done. The colored dot next to the column name is the state's color. You see the same color on the card, in the issue and in reports.
When you move a card, the issue takes the column's state. Every other view in Hinata shows the change right away.
The badge on the right of a column header counts its cards.
Who decides what the columns are
States live in Project settings. A project lead can rename, recolor and reorder them there. If a column has an unhelpful name, fix it there, not on the board.
What appears as a card, and what does not
Boards use the same three-level hierarchy as the rest of Hinata (see Working with issues):
- Stories, tasks, bugs and features are always cards.
- Epics never are. An epic contains other work and would otherwise count twice. Epics appear as swimlane headers and as a filter.
- Sub-tasks are hidden by default. Group by sub-task and they appear under their parent.
What a card tells you without being opened
Every card shows a status stripe, type glyph, issue key, priority arrow, title, labels and the assignee's avatar. Worth knowing:
- The due date turns red once it has passed.
- Time spent only appears if the issue has an estimate. No timer chip means nobody estimated it. Someone may still have worked on it.
- The sub-task strip at the bottom expands right on the card, so you can check progress without leaving the board.
Move an issue through the board
On a computer, drag the card into the column you want. The target column lifts and glows amber. The card leaves a gap where it was until you let go. Drag to the edge of the screen and the wall scrolls with you.
On a phone or tablet, cards do not drag, because dragging and scrolling would be the same gesture. Open the issue and change its status there instead. The result is the same.
A move only changes the status. Assignee, sprint, dates, story points and everything else stay. It saves when you let go, with no confirm step. The change is recorded in the issue's history with your name. Others see it the next time their board loads.
When a column refuses a card
On a board with several projects, a column can hold states from projects A and B but none from project C. Drag a C card onto it and the column outlines in red. The drop is refused while you are still dragging, and a message names the project that has no status there.
Create an issue right where it belongs
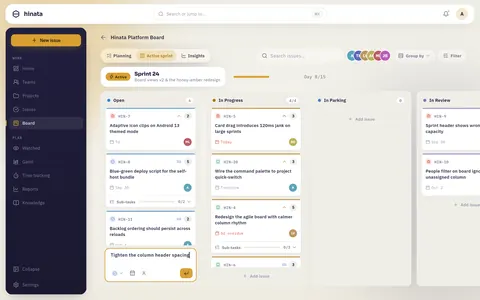
Tap Add issue at the foot of a column, type a title and press Enter. The issue is created in that column's project and status.
It also inherits whatever the column sits in: the epic of the swimlane, the person of the lane or the sprint of the board. This is much faster than the full form.
Kanban or Scrum
Both types share the same cards, filters and swimlanes. They differ in how they handle time.
| Kanban | Scrum | |
|---|---|---|
| Shape of the work | Continuous flow | Fixed timeboxes (sprints) |
| Views | Board and Timeline | Planning, Active sprint and Insights |
| Where unstarted work waits | In the first column | In the backlog, on the Planning tab |
| Estimation | Optional | Story points, per sprint |
On Kanban, the switcher next to the board name offers Board and Timeline. Timeline shows the same issues on a calendar, see Timeline & dependencies.
On Scrum, three tabs replace the switcher. The backlog lives on the Planning tab.
Narrow the board down
Three controls above the columns make a crowded board readable. They work together.
The people strip
The avatars in the top right are everyone with work on this board.
- Click an avatar: only their cards.
- Click another: add them.
- Click again: remove.
This is the same setting as the Assignee facet in the filter popup.
The filter popup
Filter opens a panel with eight facets:
Status · Type · Priority · Assignee · Sprint · Author · Label · Epic
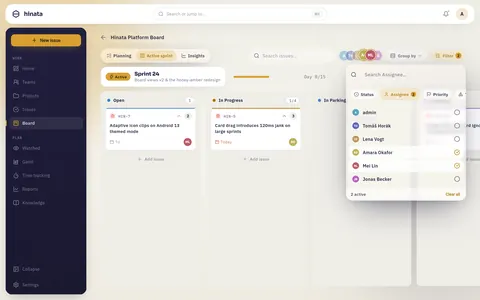
Each facet is searchable and allows several choices. The rule:
Choices within one facet are an OR. Facets between each other are an AND.
Example: Bug and Story under Type plus Ana under Assignee gives "bugs or stories assigned to Ana". A facet with nothing picked does not filter.
The Sprint facet has a No sprint entry. Use it to see backlog items.
The filter is yours, not the board's
Filtering only changes what you see. Nothing changes for anyone else, and nothing is saved onto the board.
Swimlanes
Group by splits the wall into horizontal lanes. Each lane has all the columns.
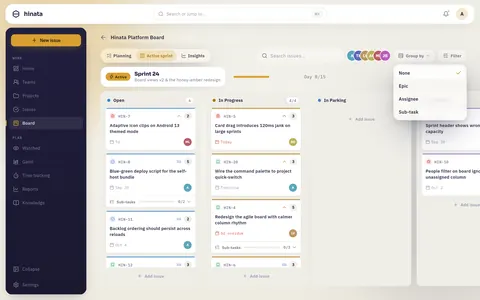
| Group by | You get | Use it when |
|---|---|---|
| None | One flat board | The default, fewer than ~40 cards |
| Epic | A lane per epic, plus No epic | You want to see how a large piece of work is progressing |
| Assignee | A lane per person, plus Unassigned | Running a standup or checking the load |
| Sub-task | A lane per parent issue, with its sub-tasks as cards, plus Stand-alone | A few big items run in parallel and you need the detail |
| Project | A lane per project | Only on a board that spans several projects |
Each lane can be collapsed.
Epic swimlanes plus the epic filter
Group by Epic and filter to one epic. The whole board then shows only that epic. Handy for a focused review without creating a separate board.
WIP limits
A column can have a work-in-progress limit: the maximum number of cards in it. The badge then reads 3/5 instead of 3. Go over it and the badge and its background turn red.
Hinata does not block extra cards. The red badge is there to show that work is piling up.
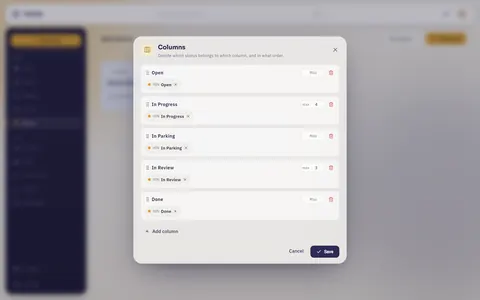
To set limits you need to be the board's owner, a lead on one of its projects or a team lead.
The backlog
The backlog is every issue in the board's projects that is not in a sprint, ordered by priority. An issue stays there until a sprint takes it.
On Scrum you find it at the bottom of the Planning tab, paginated, with its own search box.
Kanban boards have no backlog tab
Without timeboxes there is no "outside". Unstarted work sits in the first column.
Run a sprint
A sprint is a fixed stretch of time, usually one to four weeks, with an agreed set of work. You plan, start, work through and complete it, all on a Scrum board's three tabs.
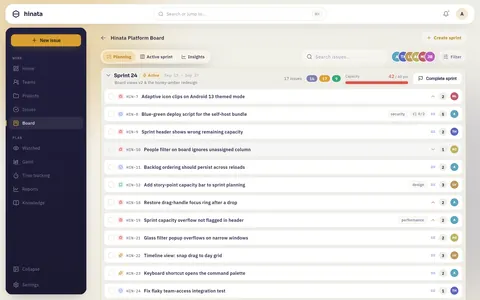
1. Plan the sprint
On the Planning tab, choose Create sprint. The dialog asks for:
- Sprint name: prefilled with the next number (Sprint 24, Sprint 25…), editable.
- Sprint goal: optional. One sentence about the outcome. It shows in the sprint header for the whole sprint.
- Duration: one to four weeks. The end date is calculated from the start date.
- Start date: prefilled. Tomorrow for your first sprint, then shortly after the previous sprint's end date.
The new sprint appears as an empty container above the backlog.
2. Fill it from the backlog
Drag issues from the backlog into the sprint. On a phone, tick the circles on the rows. A bar appears at the bottom with the count and Move to….
This also moves issues between planned sprints.
3. Estimate with story points
Tap the points area on a sprint row to open the estimate picker.
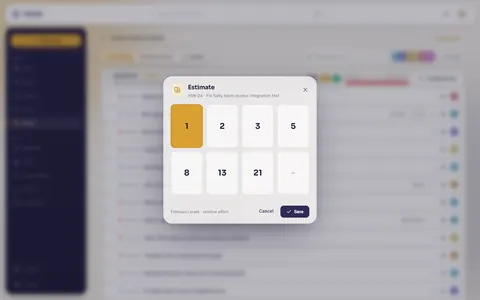
The key and title under the heading show which issue you are estimating.
Story points measure relative effort, not hours. A 5 is clearly bigger than a 3 and roughly half of a 13. What counts is the total. The sprint header shows it in two ways:
- Point buckets: three pills for to-do, in-progress and done.
- Capacity: committed points against the team's capacity, like
42 / 40 pts, with a bar. Go over and both turn red.
Capacity is optional
Without a capacity figure you only see the committed points, with no bar. Capacity is set through the API or an admin tool, not in the create dialog.
4. Start it
Press Start sprint on the sprint. The button stays disabled while the sprint is empty.
The dialog shows the issue count, the committed story points and a warning if that is over capacity. Confirm the goal and end date, and the sprint becomes Active.
Everyone who is a member of the board's projects is notified.
5. Work through it
The Active sprint tab is a normal board wall, scoped to the sprint. Dragging, filters and swimlanes work as usual.
The header shows an amber Active badge, the sprint name and goal, and a day counter like Day 8/15 with a progress bar. It helps you notice early when many points are still open.
6. Complete it
Press Complete sprint when the timebox ends.
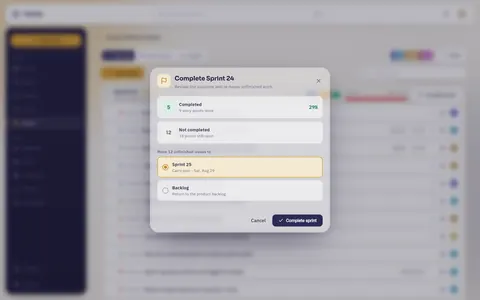
In the dialog you choose where unfinished issues go. Every planned sprint is offered, with Backlog below. With no planned sprint, only Backlog is left.
When you confirm:
- The sprint is archived.
- Finished work stays attributed to it, so its history and numbers stay correct.
- Every unfinished issue moves to the destination. The sprint change is recorded in its history, and its watchers are notified.
Completing a sprint moves other people's work
Unfinished issues really change sprint. Watchers are told, and the move shows in the issue's history. Choose deliberately and tell the team.
Nothing is ever lost at a sprint boundary
You cannot complete a sprint without giving every unfinished issue a new destination.
Read the sprint's numbers
The Insights tab shows four charts:
- Sprint burndown: a dashed Guideline from the committed points to zero, and a solid Actual line up to today.
- Velocity: committed and done points for this and previous sprints, with an average.
- Work breakdown by assignee: where the estimated effort sits.
- Scope changes: net points added or removed since the sprint started.
For trends across many sprints, cycle time and exports, see Reports & dashboard.
On a phone
Everything works on a phone too, just more compact.
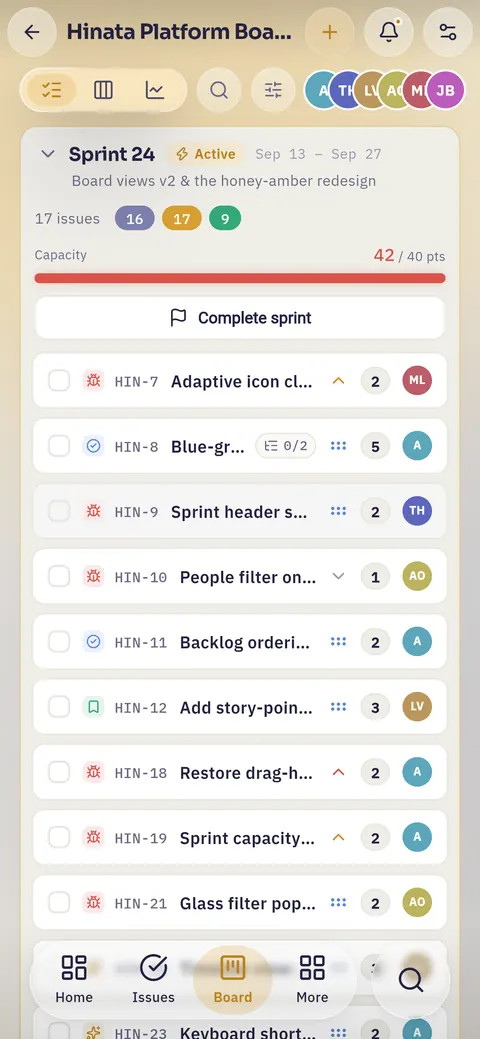
The differences:
- The Board/Timeline switcher, the Planning/Active sprint/Insights tabs and Filter are icon-only buttons.
- Cards do not drag. Change a status inside the issue. Move issues into a sprint by selecting them and using Move to….
- The wall scrolls sideways one column at a time, so a column always sits squarely on screen.
More in On your phone.
Look after the board
The ⋮ button on each board in the list opens Board options. You also find it on a project's Boards page.
- Rename board: only the name changes.
- Projects: choose which projects the board covers. Equivalent statuses merge into shared columns automatically.
- Columns: the editor shown above. If two projects name the same step differently, fix the mapping here.
- Delete board: removes the board. The issues stay, because they belong to their projects.
You need to own the board, lead one of its projects or lead a team with access to it. If you do not see the menu, you have none of these roles.
Every status needs a column
Each workflow state must end up in exactly one column. A state with no column means its issues are missing from the wall. The editor warns you before you save.
Where to go next
- Working with issues: what is on the cards, and how epics, stories and sub-tasks fit together.
- Timeline & dependencies: the same work on a calendar, with the links between it.
- Tracking your time: logging effort against issues.
- Reports & dashboard: velocity, cycle time and numbers across several sprints.