Working with issues#
Almost everything you do in Hinata happens on an issue. A bug someone just reported, the feature you are building this sprint, the epic that spans the next quarter, the two-minute chore on a checklist — they are all issues, and they all behave the same way. Learn this page and the board, the timeline and the reports all make sense, because they are just different views of the same thing.
What an issue is#
An issue is one piece of work, with a name, a status, and a place to talk about it. It belongs to exactly one project, and it carries that project's key plus a number: HIN-42, WEB-7. That key is how you refer to it everywhere — in a chat message, in a commit, out loud in a stand-up.
The key never changes
A number is handed out once and never reused, even if the issue is deleted later. So a key you paste into a document today still points at the same thing in two years. If the issue moves to another project it gets a new key there, and the old one stops resolving — which is the only time you need to think about it.
Create an issue#
There are four ways in, and they all open the same form:
- The amber New issue button at the top of the navy sidebar — always there, whatever page you are on.
- The New issue button in the top-right corner of the Issues page.
- The command palette: press ⌘K (Ctrl+K on Windows and Linux), type "new", pick Create new issue.
- Add sub-task or Add child issue on an issue you already have open — this creates the new issue and attaches it to the parent in one step.
On the board there is a fifth: the inline composer at the bottom of a column, which drops a new issue straight into that column's status.
What the fields mean#
Only a project and a title are required — everything else can stay empty and be filled in later, by you or by whoever picks the work up.
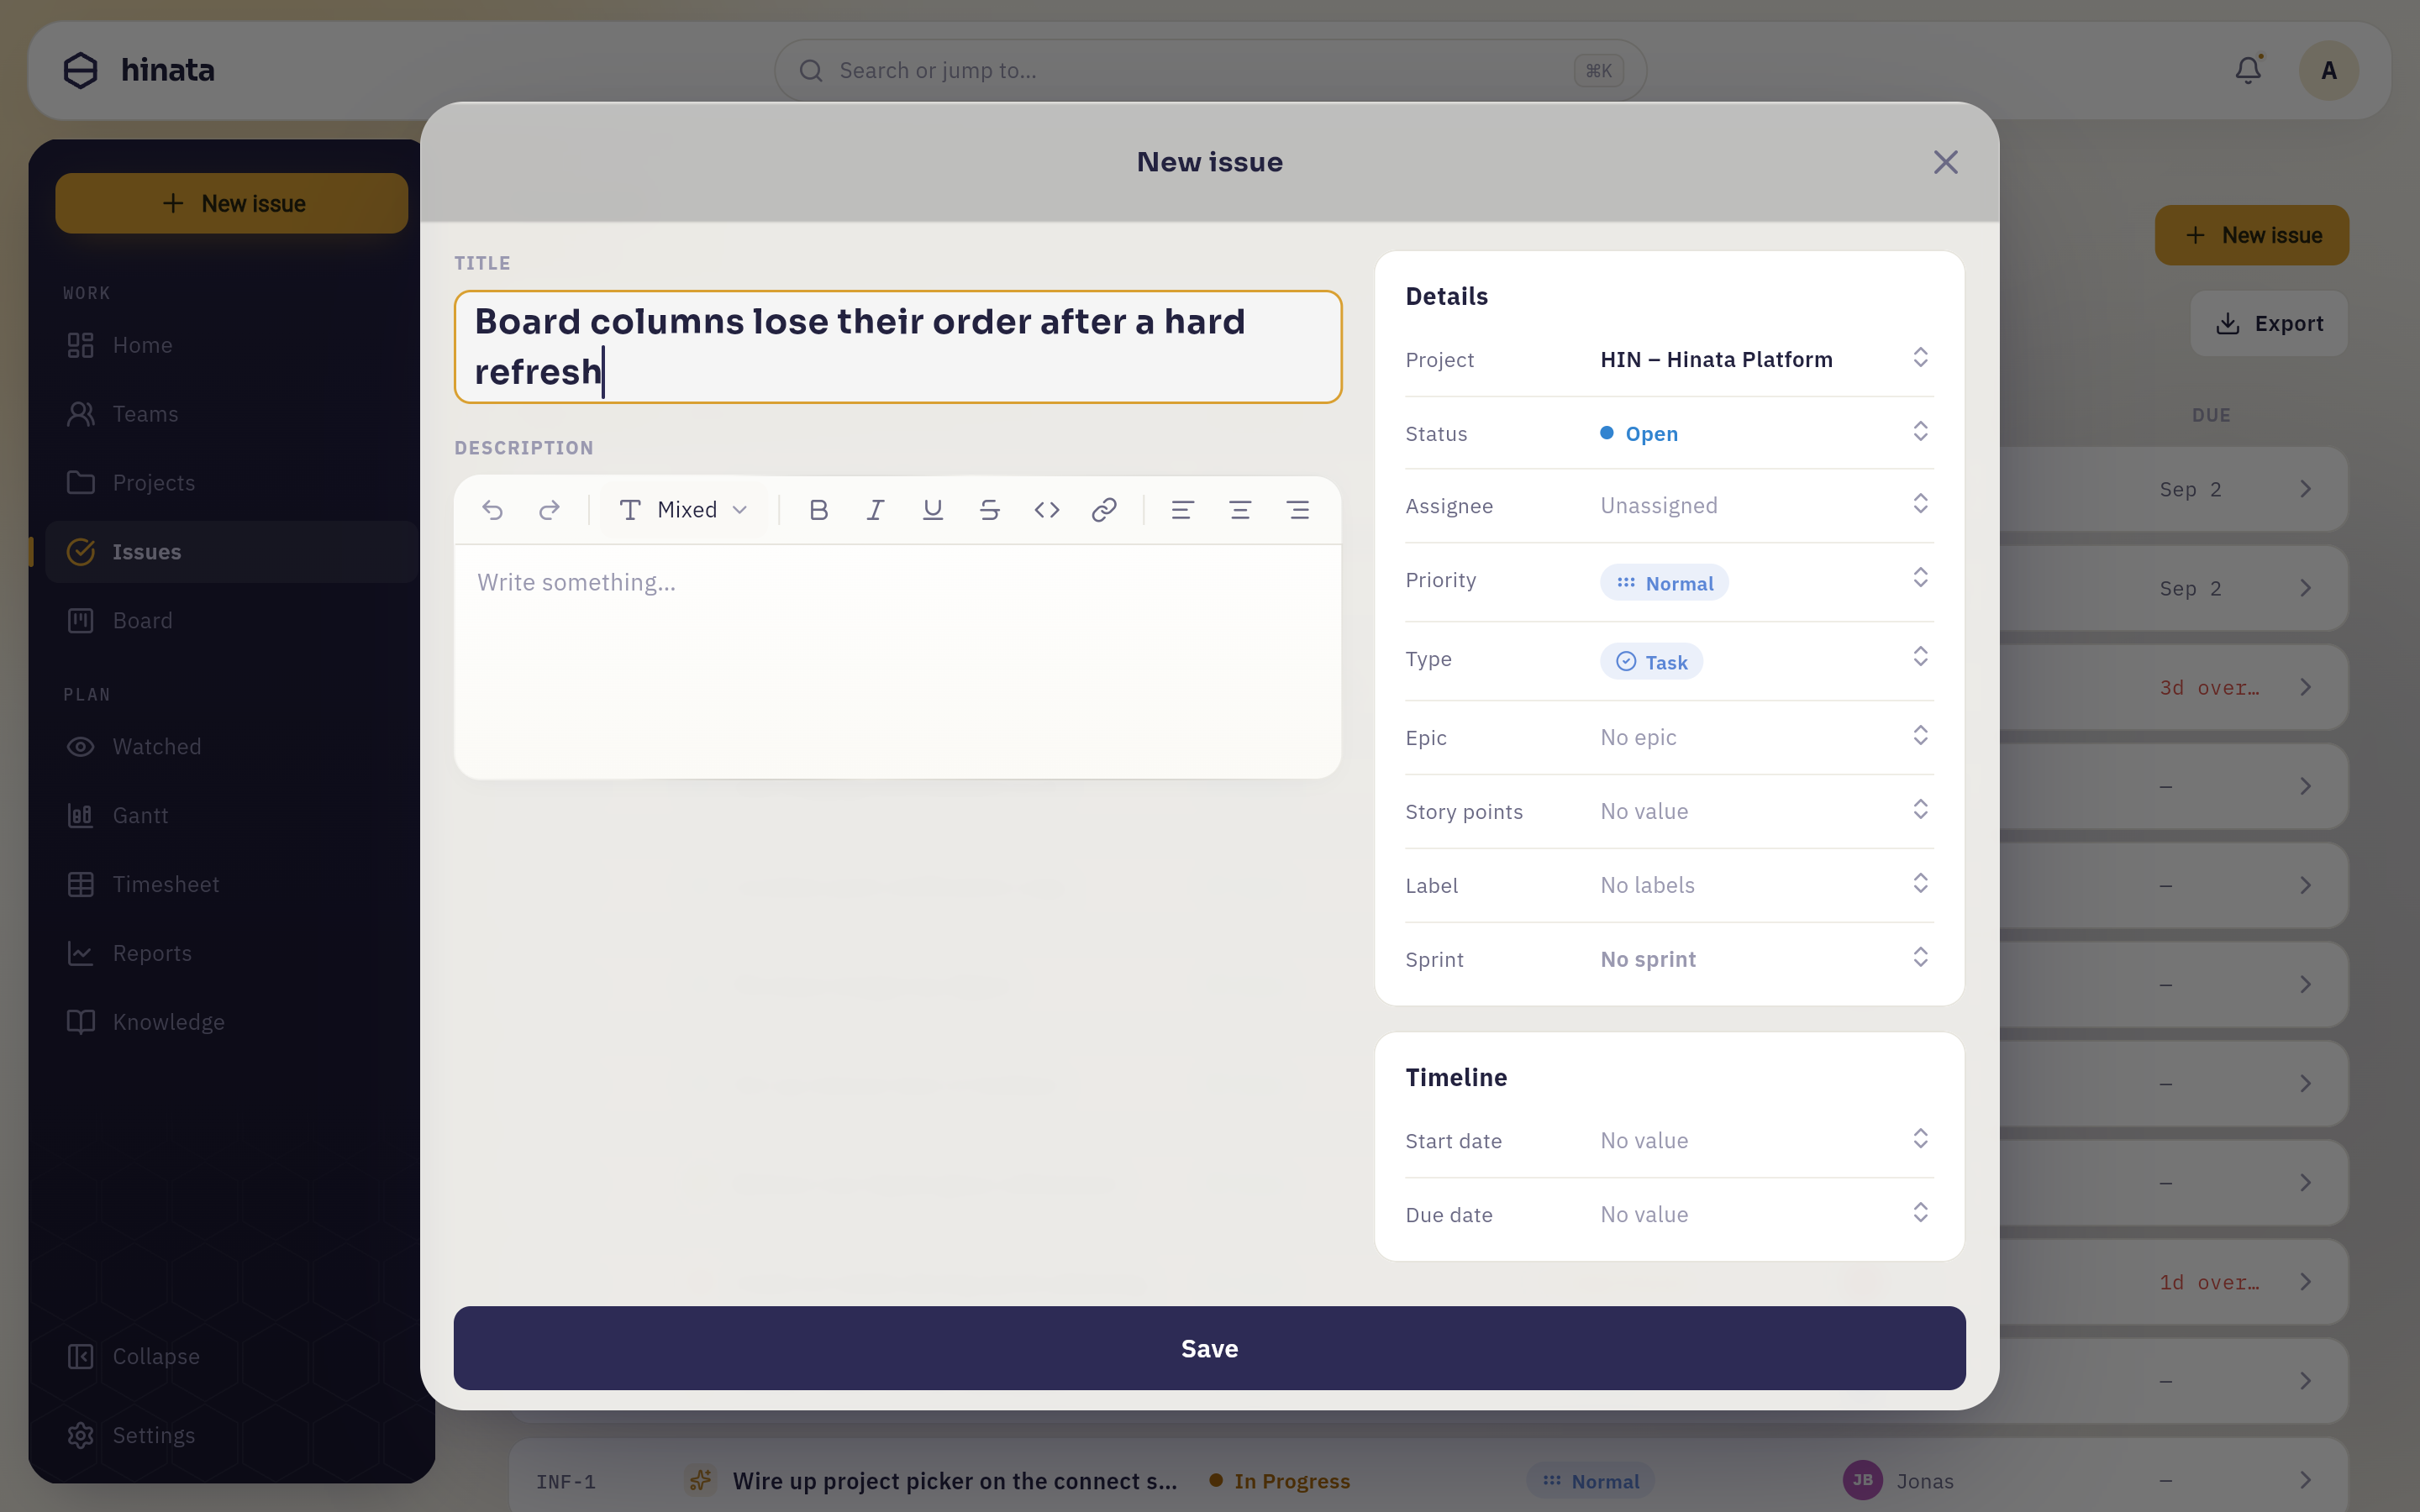 New issue: title and description on the left, Details and Timeline stacked on the right. Project, Status, Priority and Type arrive already set; assignee, epic, story points, label, sprint and both dates stay empty until someone fills them in. Save is the only button at the foot.
| Field | What it does |
|---|---|
| Project | Which project the issue lives in. Decides the key, the available statuses and the label set. You only see projects you are a member of. |
| Title | One line, written so a stranger can tell what it is. This is what shows up in lists, on cards and in search results. |
| Description | The full story: what, why, how you know it is done. Rich text — see Writing with the editor. |
| Status | Which column of the board the issue sits in. The choices come from the project's own workflow, so one project's "In Review" may be another's "QA". |
| Assignee | The person doing the work. Leave it empty and the issue shows as Unassigned; there is an Assign to me shortcut on the detail view. |
| Priority | Showstopper, Critical, High Priority, Normal, Minor or Very Low. New issues start at Normal. |
| Type | Epic, Story, Task, Bug, Feature or Sub-task — see Choosing a type. |
| Story points | Your estimate of size, not of hours. Feeds sprint capacity and the velocity report. |
| Label | Reusable, colour-coded tags from the project — frontend, needs-design, regression. You can create a new one right from the picker. |
| Sprint | Which sprint the issue is planned into. Left empty, it sits in the backlog. |
| Epic / Parent | The issue above this one in the hierarchy. Reads "Epic" for a normal issue and "Parent" for a sub-task. |
| Start date / Due date | The bar this issue draws on the timeline. A due date in the past shows up red in every list. |
Write the title for the person who finds it in six months
"Login broken" is a title you will not recognise in a search result. "Login fails with 500 when the e-mail contains a plus sign" is one you will. The description can be as long as it needs to be — the title is the part that has to work at a glance.
Choosing a type#
The type decides the icon, the colour, and — more importantly — where the issue is allowed to sit in the hierarchy. Hinata uses three levels:
Epic
└─ Story · Task · Bug · Feature
   └─ Sub-task
| Type | Use it for | Sits |
|---|---|---|
| Epic | A theme that takes many sprints — "Self-service onboarding" | Top. Groups the issues that deliver it |
| Story | A slice of value described from the user's side | Middle. Can hang off an epic, can hold sub-tasks |
| Task | Work that is not user-facing — a migration, a spike | Middle |
| Bug | Something that is broken | Middle |
| Feature | A capability to build, when "story" feels too ceremonial | Middle |
| Sub-task | One step inside a middle-level issue — "write the migration" | Bottom. Always has a parent |
The practical rule: if you would put it on a board and move it through a workflow on its own, it is a middle-level issue. If it only makes sense as part of something else, it is a sub-task. If it is too big to finish and you want to see progress across many issues, it is an epic.
Sub-tasks travel with their parent
A sub-task cannot stand alone. Archive its parent and it is archived too; restore the parent and it comes back. That is deliberate — it is why sub-tasks are the right home for checklist-shaped work and the wrong home for anything you might want to reprioritise separately.
Building the hierarchy#
You never have to plan the whole tree up front. Attach things as they become clear:
- From below: open an issue and set Epic (or Parent, on a sub-task) in the details column. A searchable picker opens, showing recent epics first.
- From above: open an epic and use Add child issue, or open a story and use Add sub-task. The new issue is created already attached, in the same project.
- Detaching: the same picker has a No epic entry. The child does not disappear — it just becomes a top-level issue again.
Once a hierarchy exists, it starts working for you. The sub-tasks card shows a "3 of 7 done" progress line, so an issue's real state is visible without opening anything. Lists show a small badge next to a title with the same count. And the board can group into swimlanes by epic, or filter down to one epic, which turns a crowded board into just the work that belongs to one theme.
Finding the issue you want#
The Issues page lists everything you can see across your projects. The count under the heading tells you how many issues are in the current view, and the toolbar narrows it down.
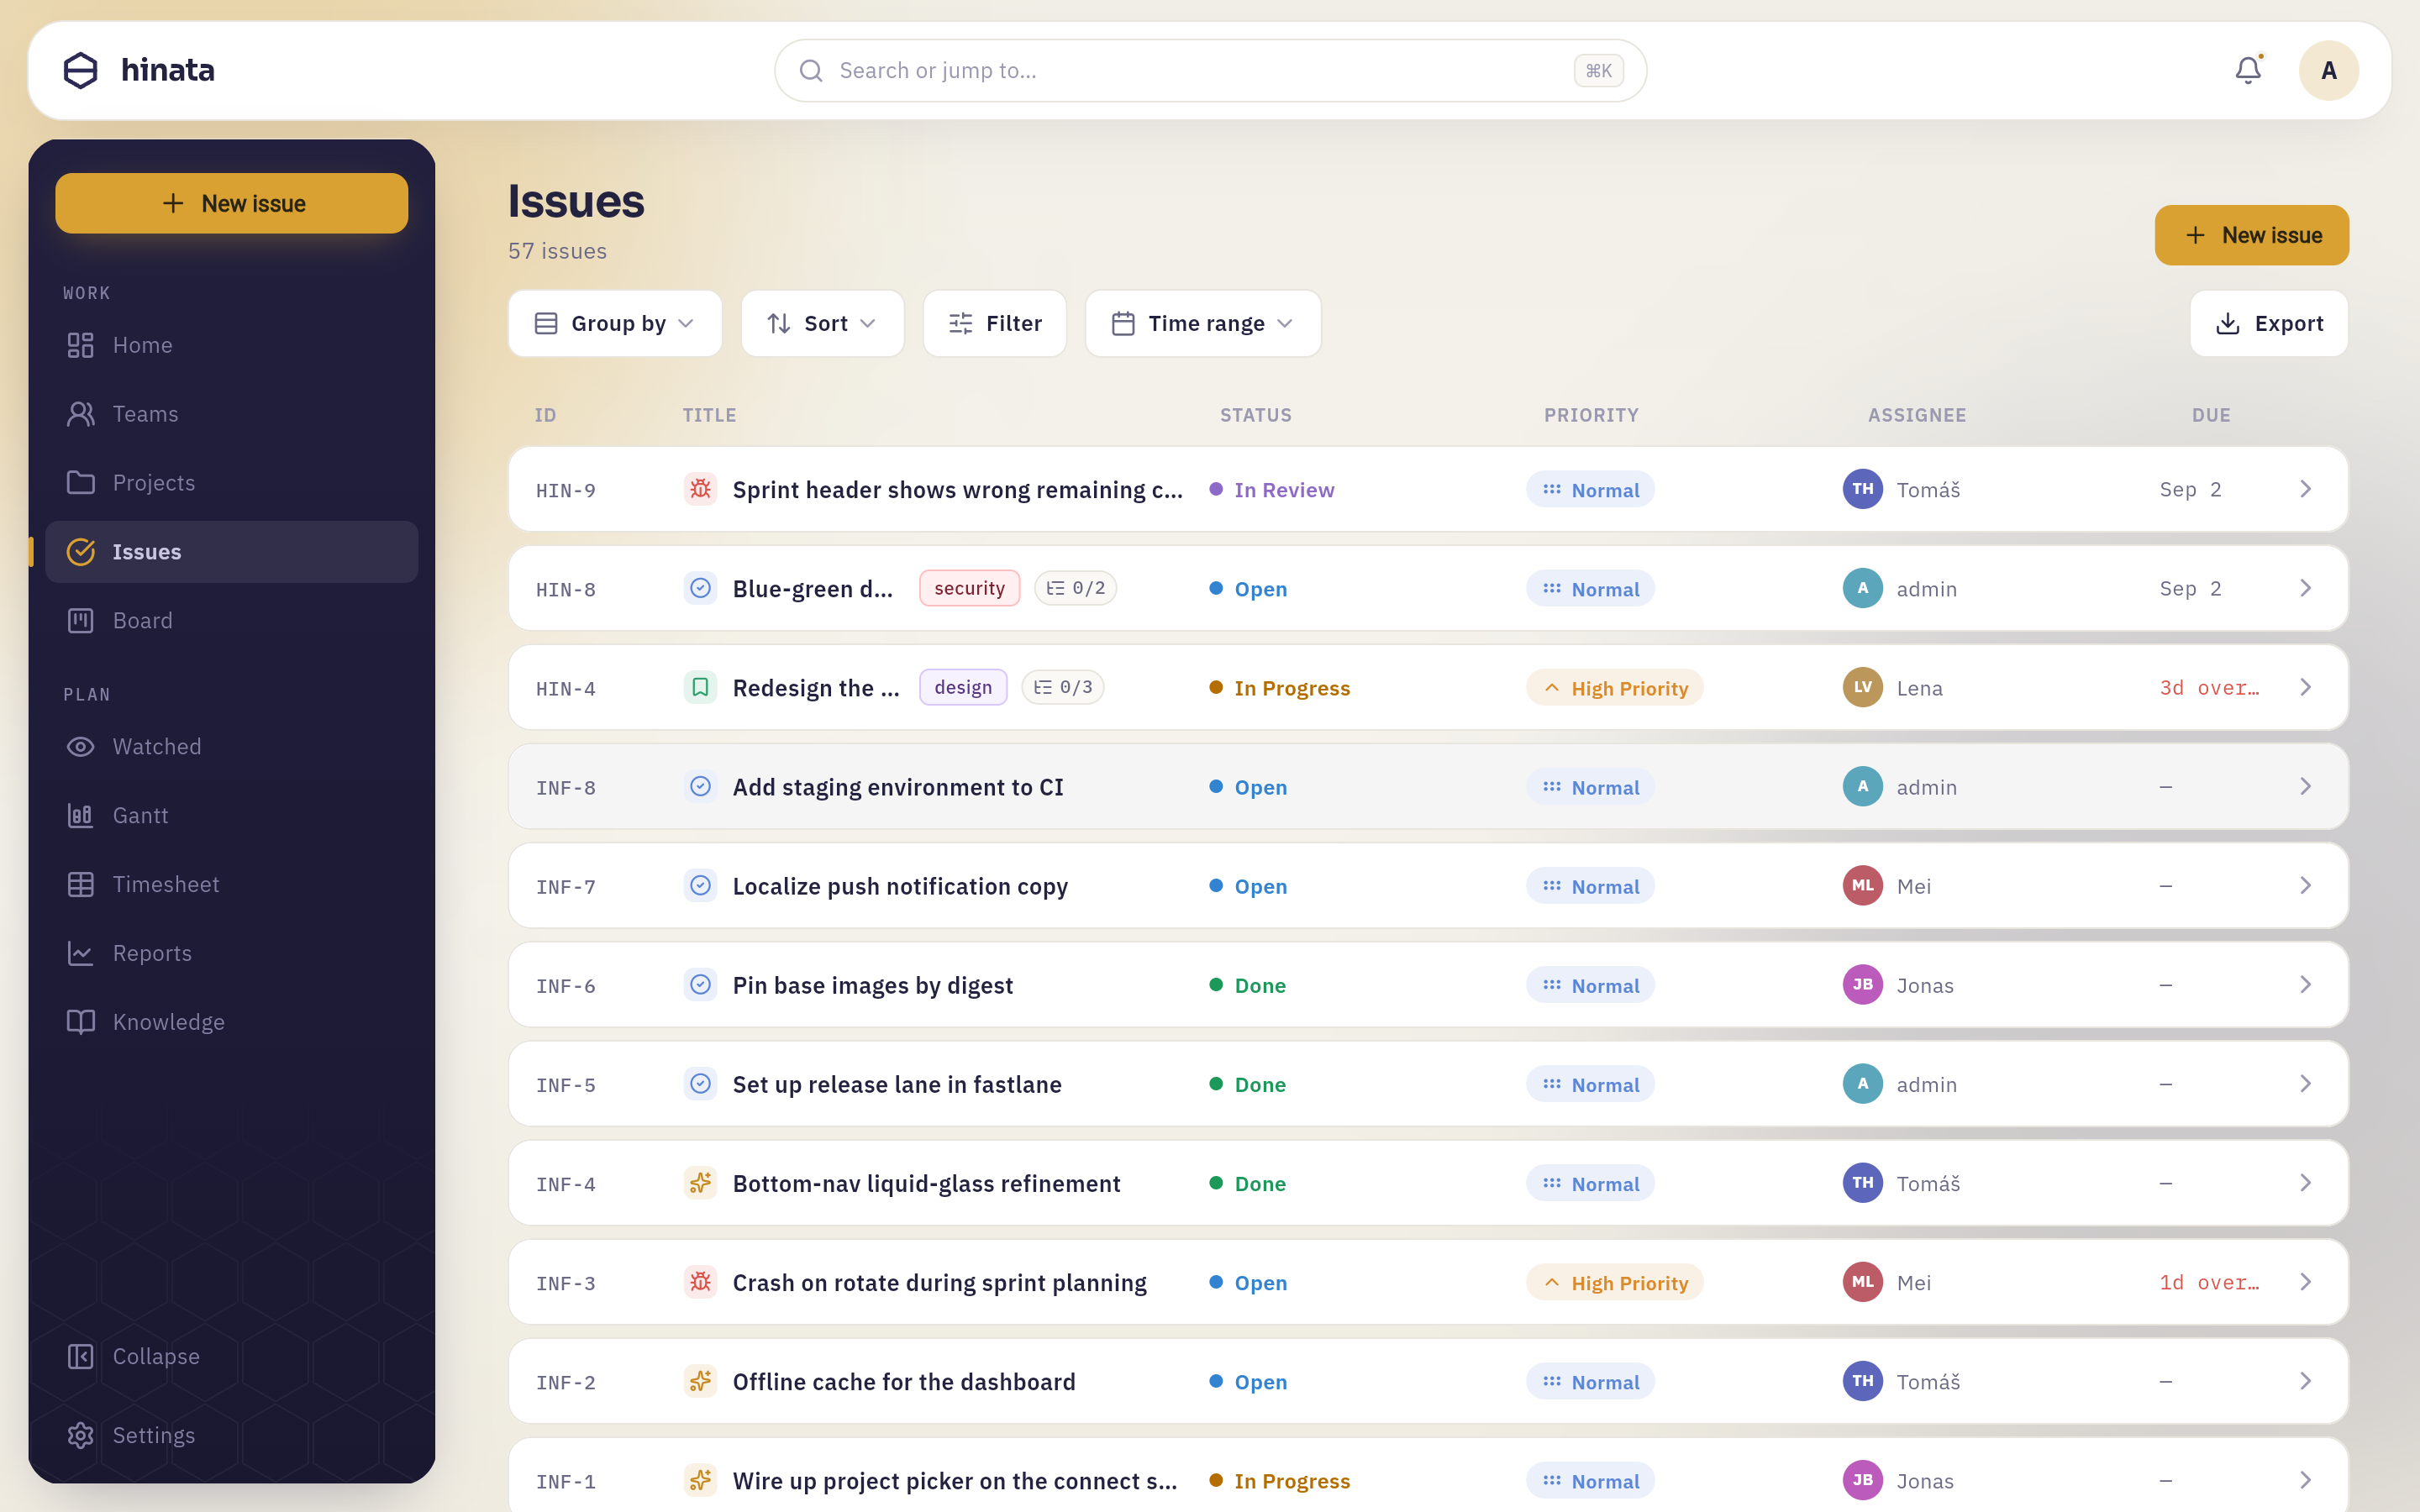 The list view: ID, Title, Status, Priority, Assignee and Due, with Group by, Sort, Filter and Time range along the top and Export pinned to the right. The small badge next to a title (here
 0/1) counts finished sub-tasks; a red due date is overdue.
- Group by — None, Status, Priority, Assignee, Project or Type. Grouping turns the flat list into labelled sections, which is the fastest way to see where a project is lopsided.
- Sort — newest or oldest first, or by when the issue was last modified.
- Filter — five facets, each multi-select, plus an Archived switch that brings soft-deleted issues back into view.
- Time range — Overdue, Due by today, This week, Next 7 days, a custom range, and so on.
- Export — writes the current, filtered list to PDF, CSV or JSON. It pages the whole result set, not just the rows on screen.
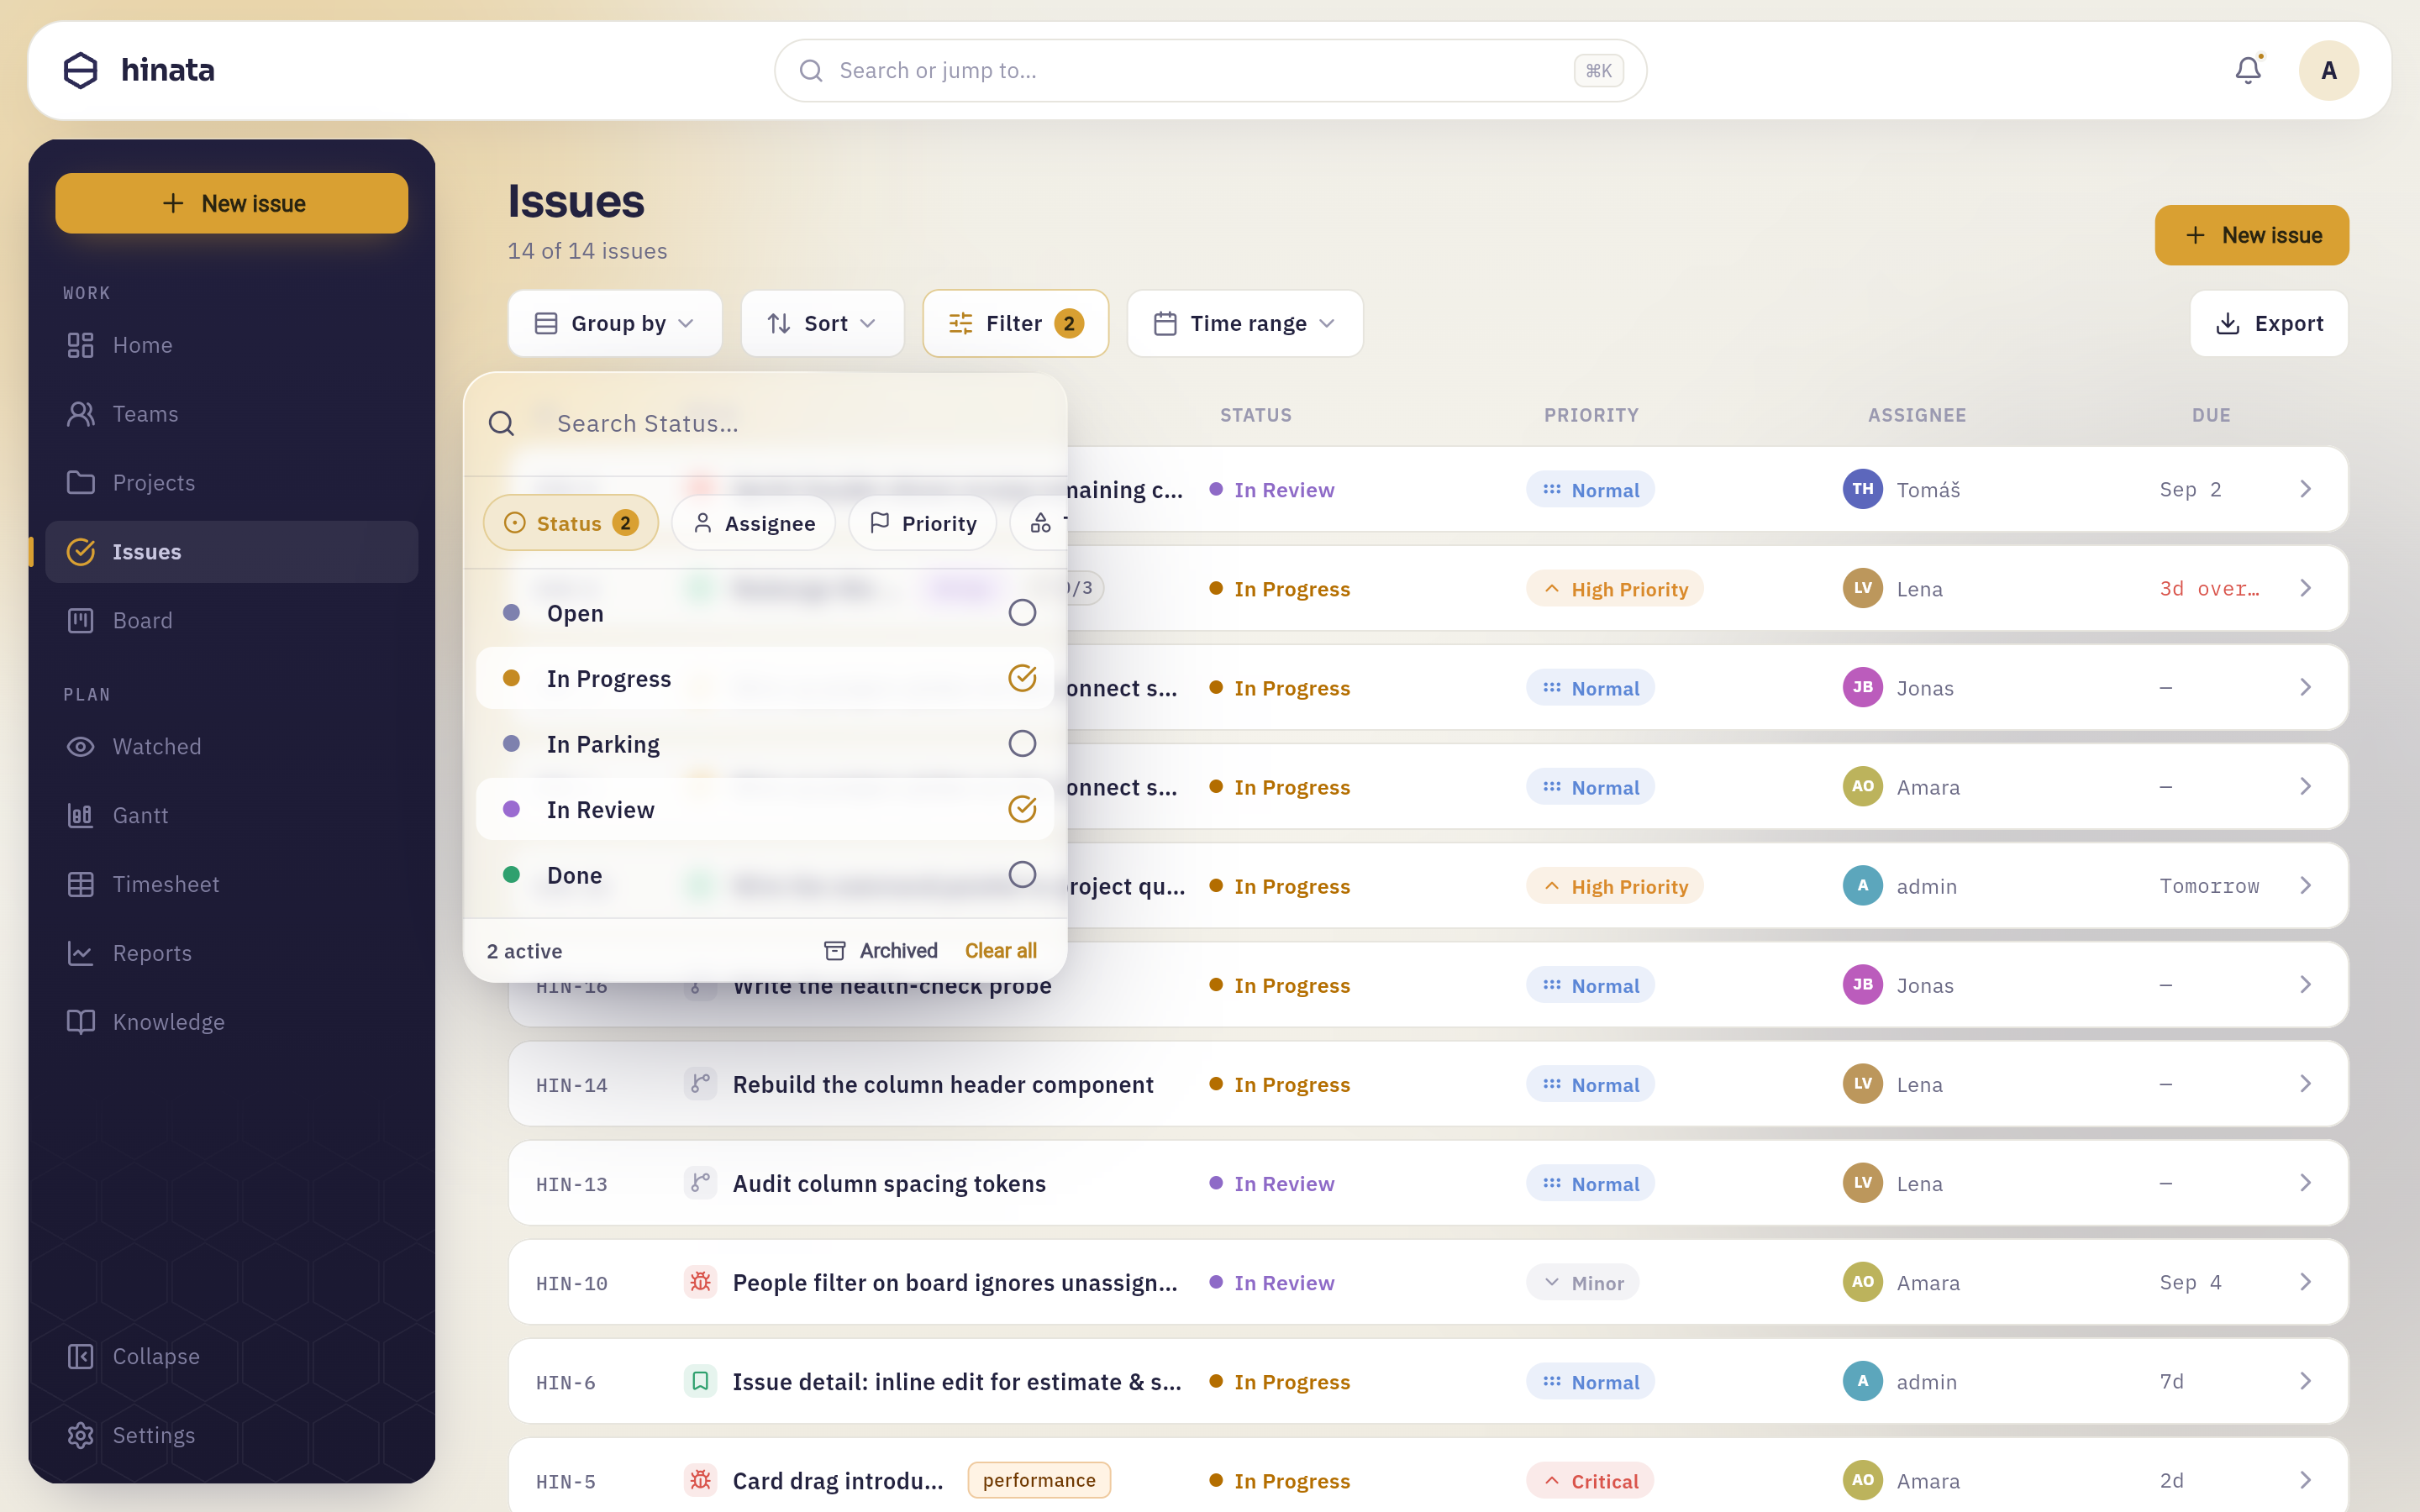 Filter is one popover, not five controls: a tab per facet, the options of the active one below it, a tick on each chosen value. Two are on here, so the toolbar button carries a 2 and the foot of the popover reads "2 active" beside Clear all and the Archived switch. The subtitle under the page title counts what the filter left — 14 of 14 issues, against the 57 an unfiltered list shows.
Click any row to open it. For finding a specific issue by key or by words in its text, the command palette is faster than any filter.
The issue in detail#
Opening an issue gives you the same layout everywhere: a wide main column for the content, a narrow right column for the facts.
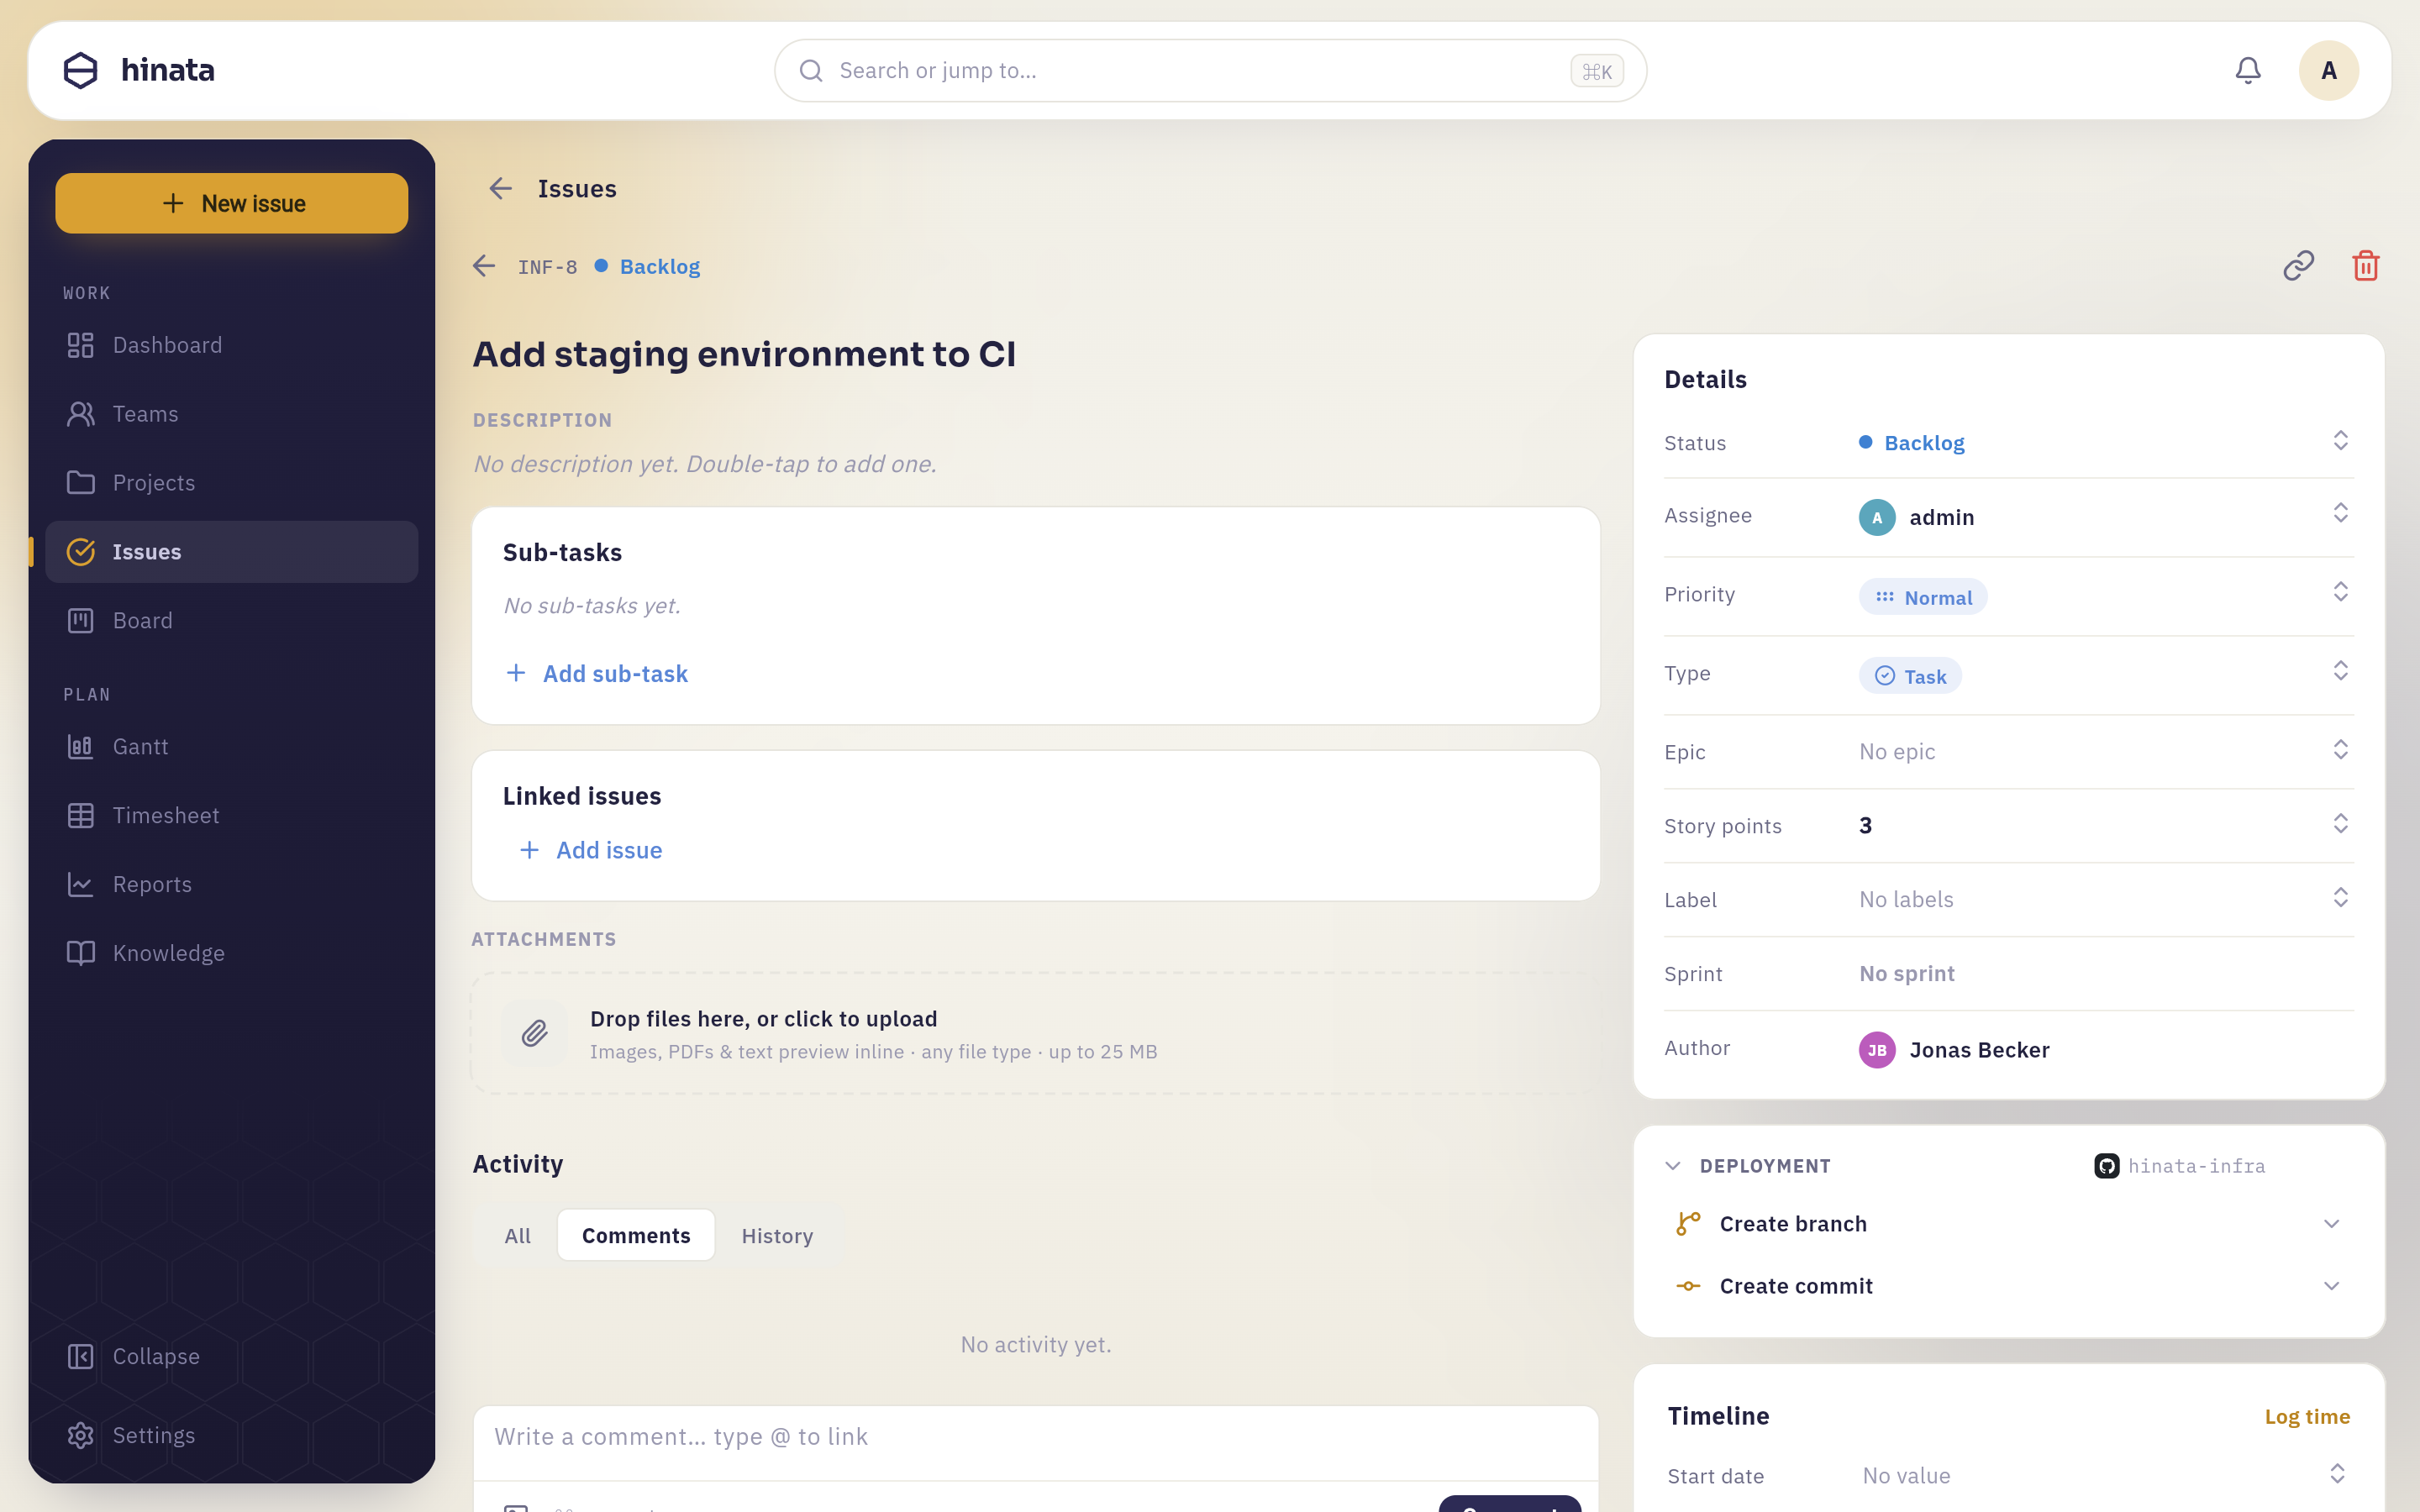 Left: the title, then the description — a heading, a list, a code block, a table and a quote, all rendered in place — with the Sub-tasks card under it and the comment composer floating over the lot. Linked issues and the attachments grid follow further down the same column. Right: the Details card, a Deployment card for the connected repository, and the Timeline card with its "Log time" link.
The top bar#
The back arrow, the issue key, and the current status as a coloured chip.
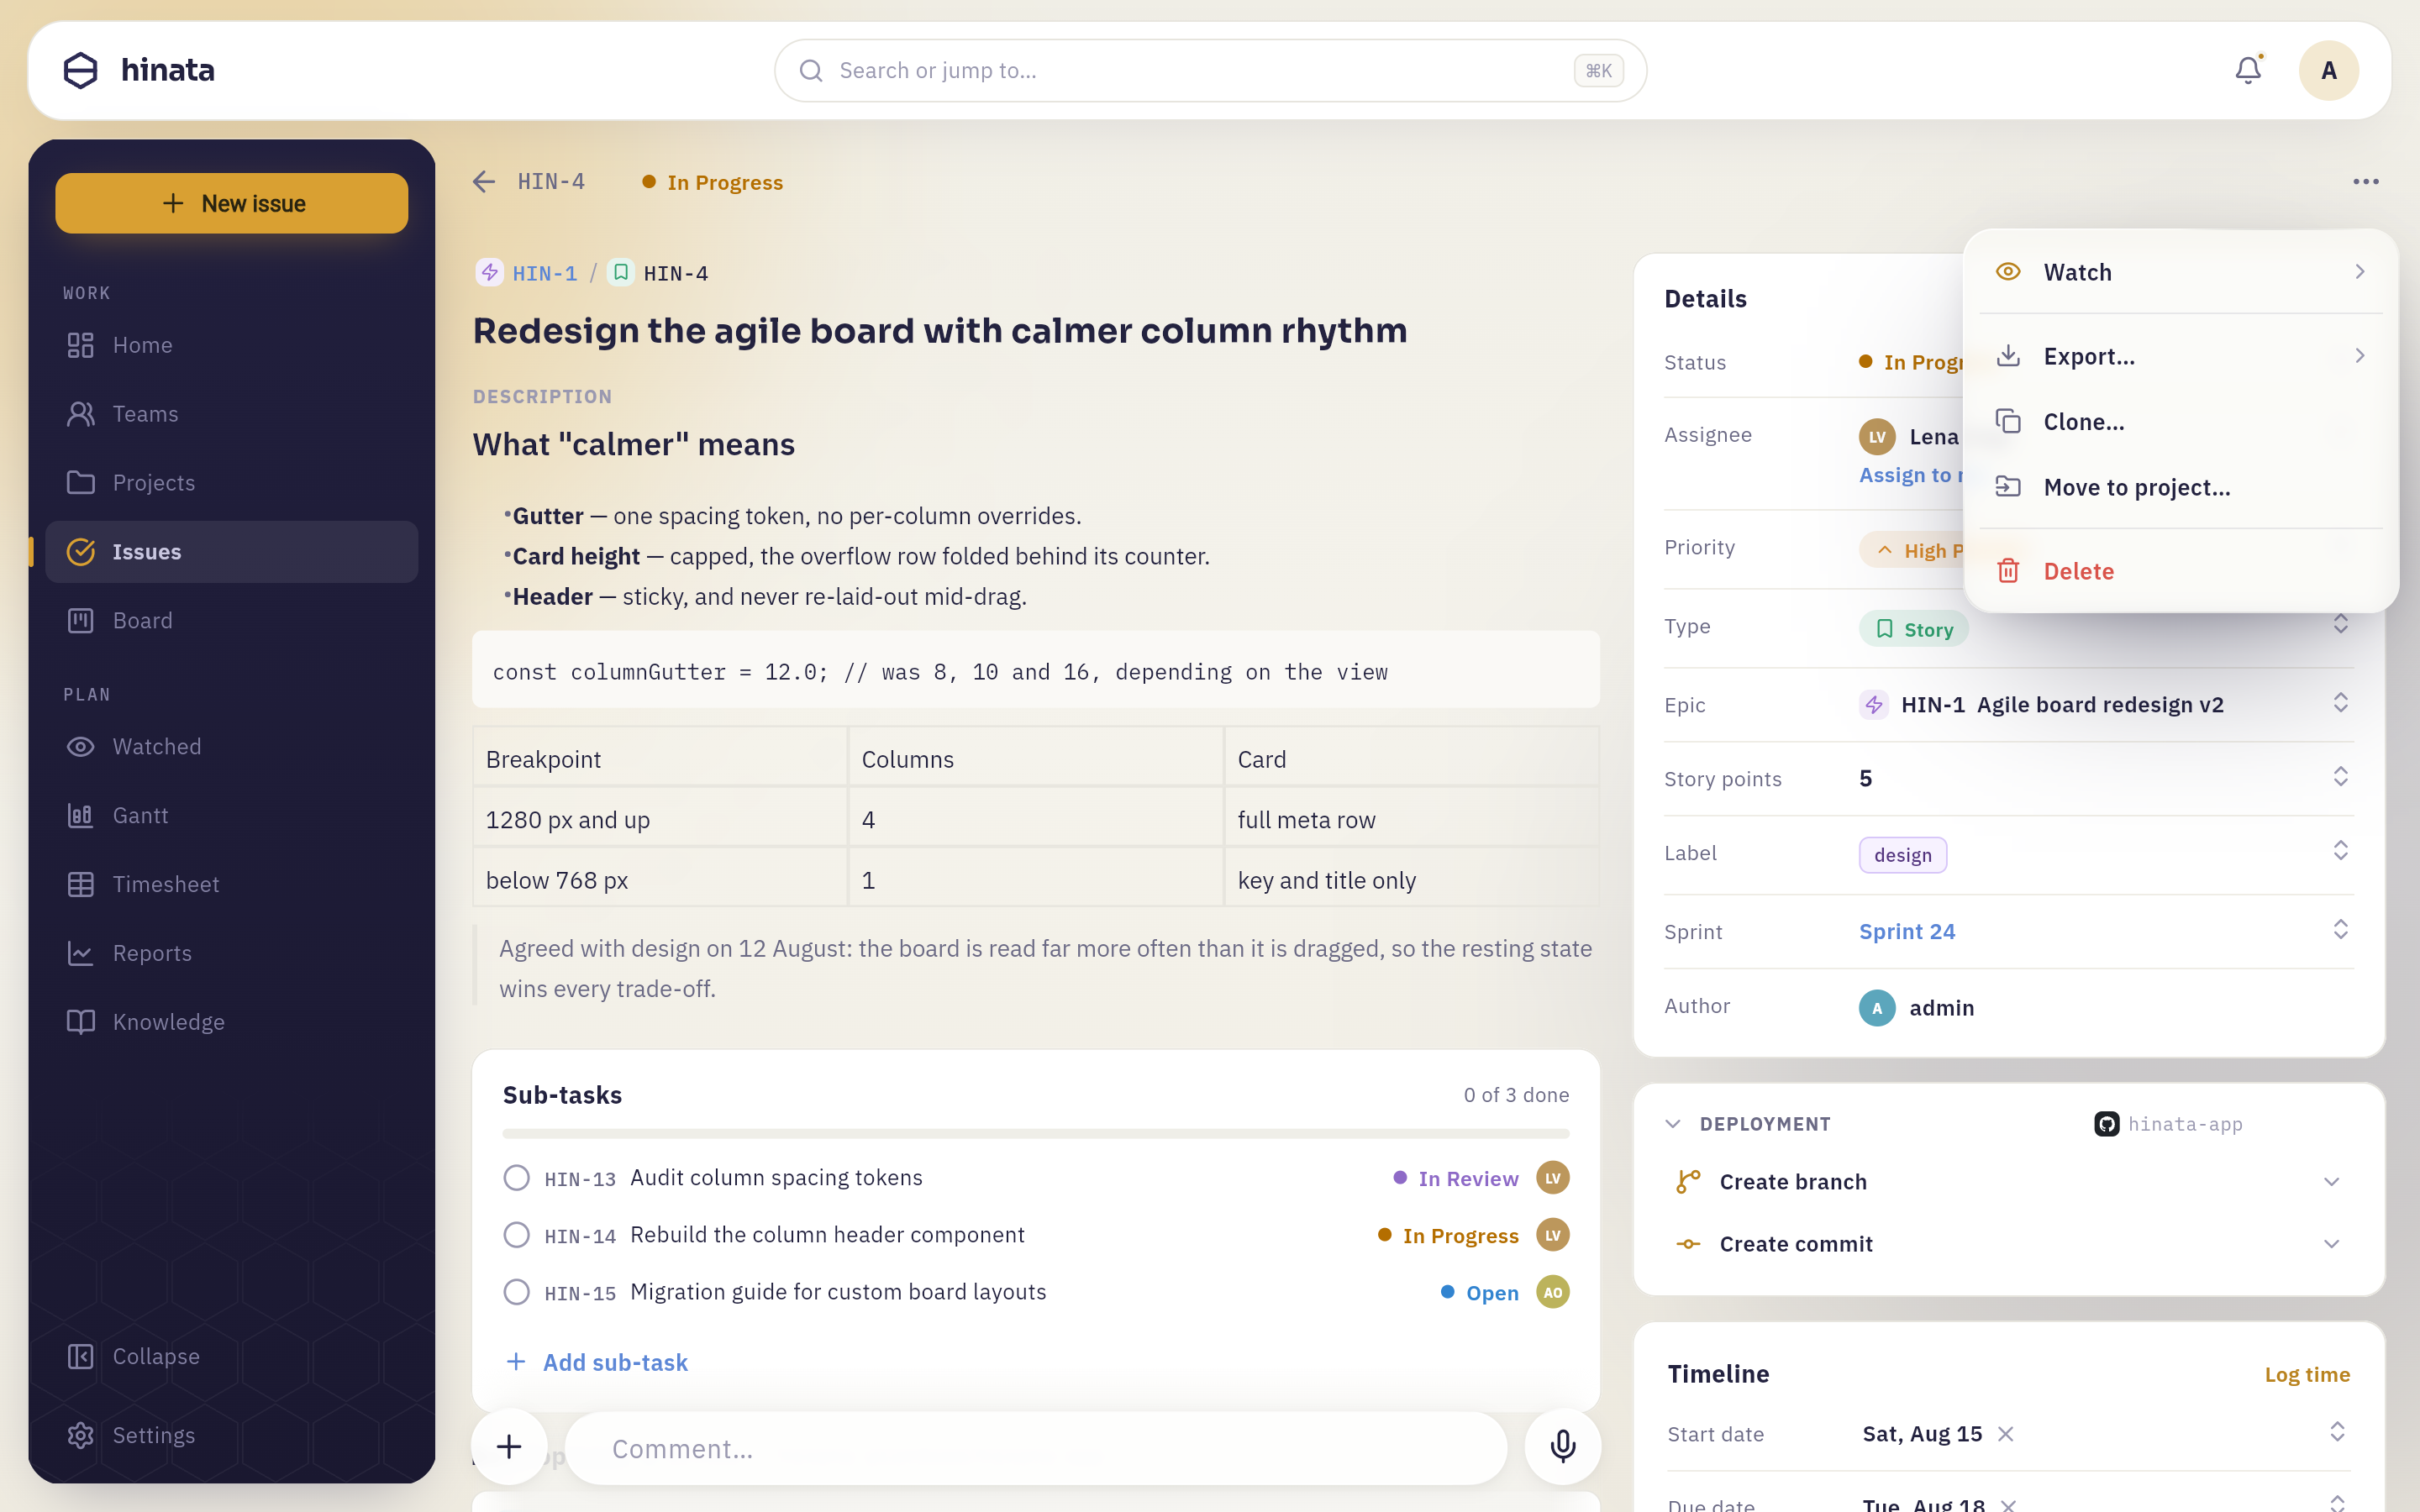 The … menu at the top right holds every action that is not a field: Watch, Export…, Clone…, Move to project… and, alone in red, Delete. Four of the sections below this one start here.
The main column#
- Title — double-tap (double-click) it to edit in place.
- Description — the same, and it renders everything the editor can produce: headings, lists, tables, code blocks, callouts, images and live links to other issues.
- Sub-tasks (or Child issues on an epic) — a card listing what is underneath, with a progress line reading "2 of 5 done" and an inline field to add another without leaving the page.
- Linked issues — the relationships to other issues; see Linking issues.
- Attachments — a drop zone and a grid of files. Comments & attachments covers this in full.
- Activity — the conversation and the audit trail, on three tabs: All, Comments and History.
The details column#
Every row is editable: click the value and a searchable picker opens.
Status, Assignee (with the Assign to me shortcut), Priority, Type, Epic or Parent, Story points, Label, Sprint, and Author — who created the issue, which is the one row you cannot change.
Under it, the Timeline card carries Start date, Due date, a Log time link and a "Spent 1h 30m of 4h" line once anyone has logged work. Tracking your time explains that side.
At the very bottom sits a quiet "Created 3 days ago" line, which flips to "Updated …" after the first change.
The Deployment card only appears when a repo is connected
If your project is linked to GitHub, GitLab or Bitbucket, a Deployment card shows branches, commits and pull requests that mention this issue's key, plus shortcuts to create a branch or a commit message. No repository connected means no card — nothing is broken. Connecting one is an operator or project-lead job, described in Git integration.
Editing an issue#
There is no edit mode and no save button for the fields on the right: pick a new value and it is stored immediately. The same goes for dragging a card into a different column on the board — that is the Status field, changed from somewhere else.
Title and description are the exception, because you are typing rather than picking: double-tap either one, make your changes, then Save or Cancel.
Every change is recorded. Open Activity → History to see who changed the status, the assignee, the dates or the labels, and when. And because the issue is live, a colleague editing the same issue does not overwrite your view — their change appears where you are looking, without a refresh.
Watchers hear about it
Changing a field notifies the people who watch the issue, plus its assignee and reporter — so you do not need to write "changed the due date, FYI" in a comment. Notification routing is explained in Staying informed.
Reading the activity trail#
The Activity section at the bottom of an issue has three tabs:
- All — the conversation and the changes woven together in one timeline. Use it when you are catching up on an issue you have not looked at in a while.
- Comments — only what people wrote. This is the tab an issue opens on, because the discussion is usually what you came for.
- History — only what changed: "changed the status", "changed the assignee", "changed the due date", with who and when.
History is written automatically and cannot be edited, which is what makes it worth trusting. If someone asks "when did this become urgent?", the answer is on that tab.
Share a link to an issue#
Click the issue key in the top bar — HIN-42 — and a link to it is copied to your clipboard, confirmed by a green tick and a small toast. Paste it into chat, an e-mail or a document.
The link is a deep link. If your colleague has the app installed, it opens the issue in the app; otherwise it opens in the browser. Either way, whoever follows it needs an account on your server and access to the project — a link is a shortcut, not a key.
Writing with the editor#
The description and every comment use the same rich text editor, so learning it once is enough.
The toolbar gives you a Text style dropdown (Body text, Heading 1–3), Bold, Italic, Underline, Strikethrough, Inline code, Bullet list, Numbered list, Task list, Quote, Link, Code block (with a language picker), Table, Divider, Insert image, callouts — Info panel, Warning, Note, Tip — and undo/redo.
Two things are worth knowing beyond the buttons:
- Type
@to link something. A menu opens and searches across issues, knowledge base articles and people at once. Picking an issue drops in a live chip that shows the issue's key and its current status — if the issue is renamed or moves to Done, the chip follows. Picking a person makes it a mention, which notifies them. - Images can be pasted or inserted, and they upload to your server's storage as you write. On mobile the composer's + button offers your camera and photo library directly.
Markdown shortcuts still work
Start a line with a dash for a bullet, 1. for a numbered list, # for a heading, or wrap a word in backticks for inline code. If you already think in Markdown, you can ignore the toolbar entirely.
Linking issues to each other#
The Linked issues card records how this issue relates to others.
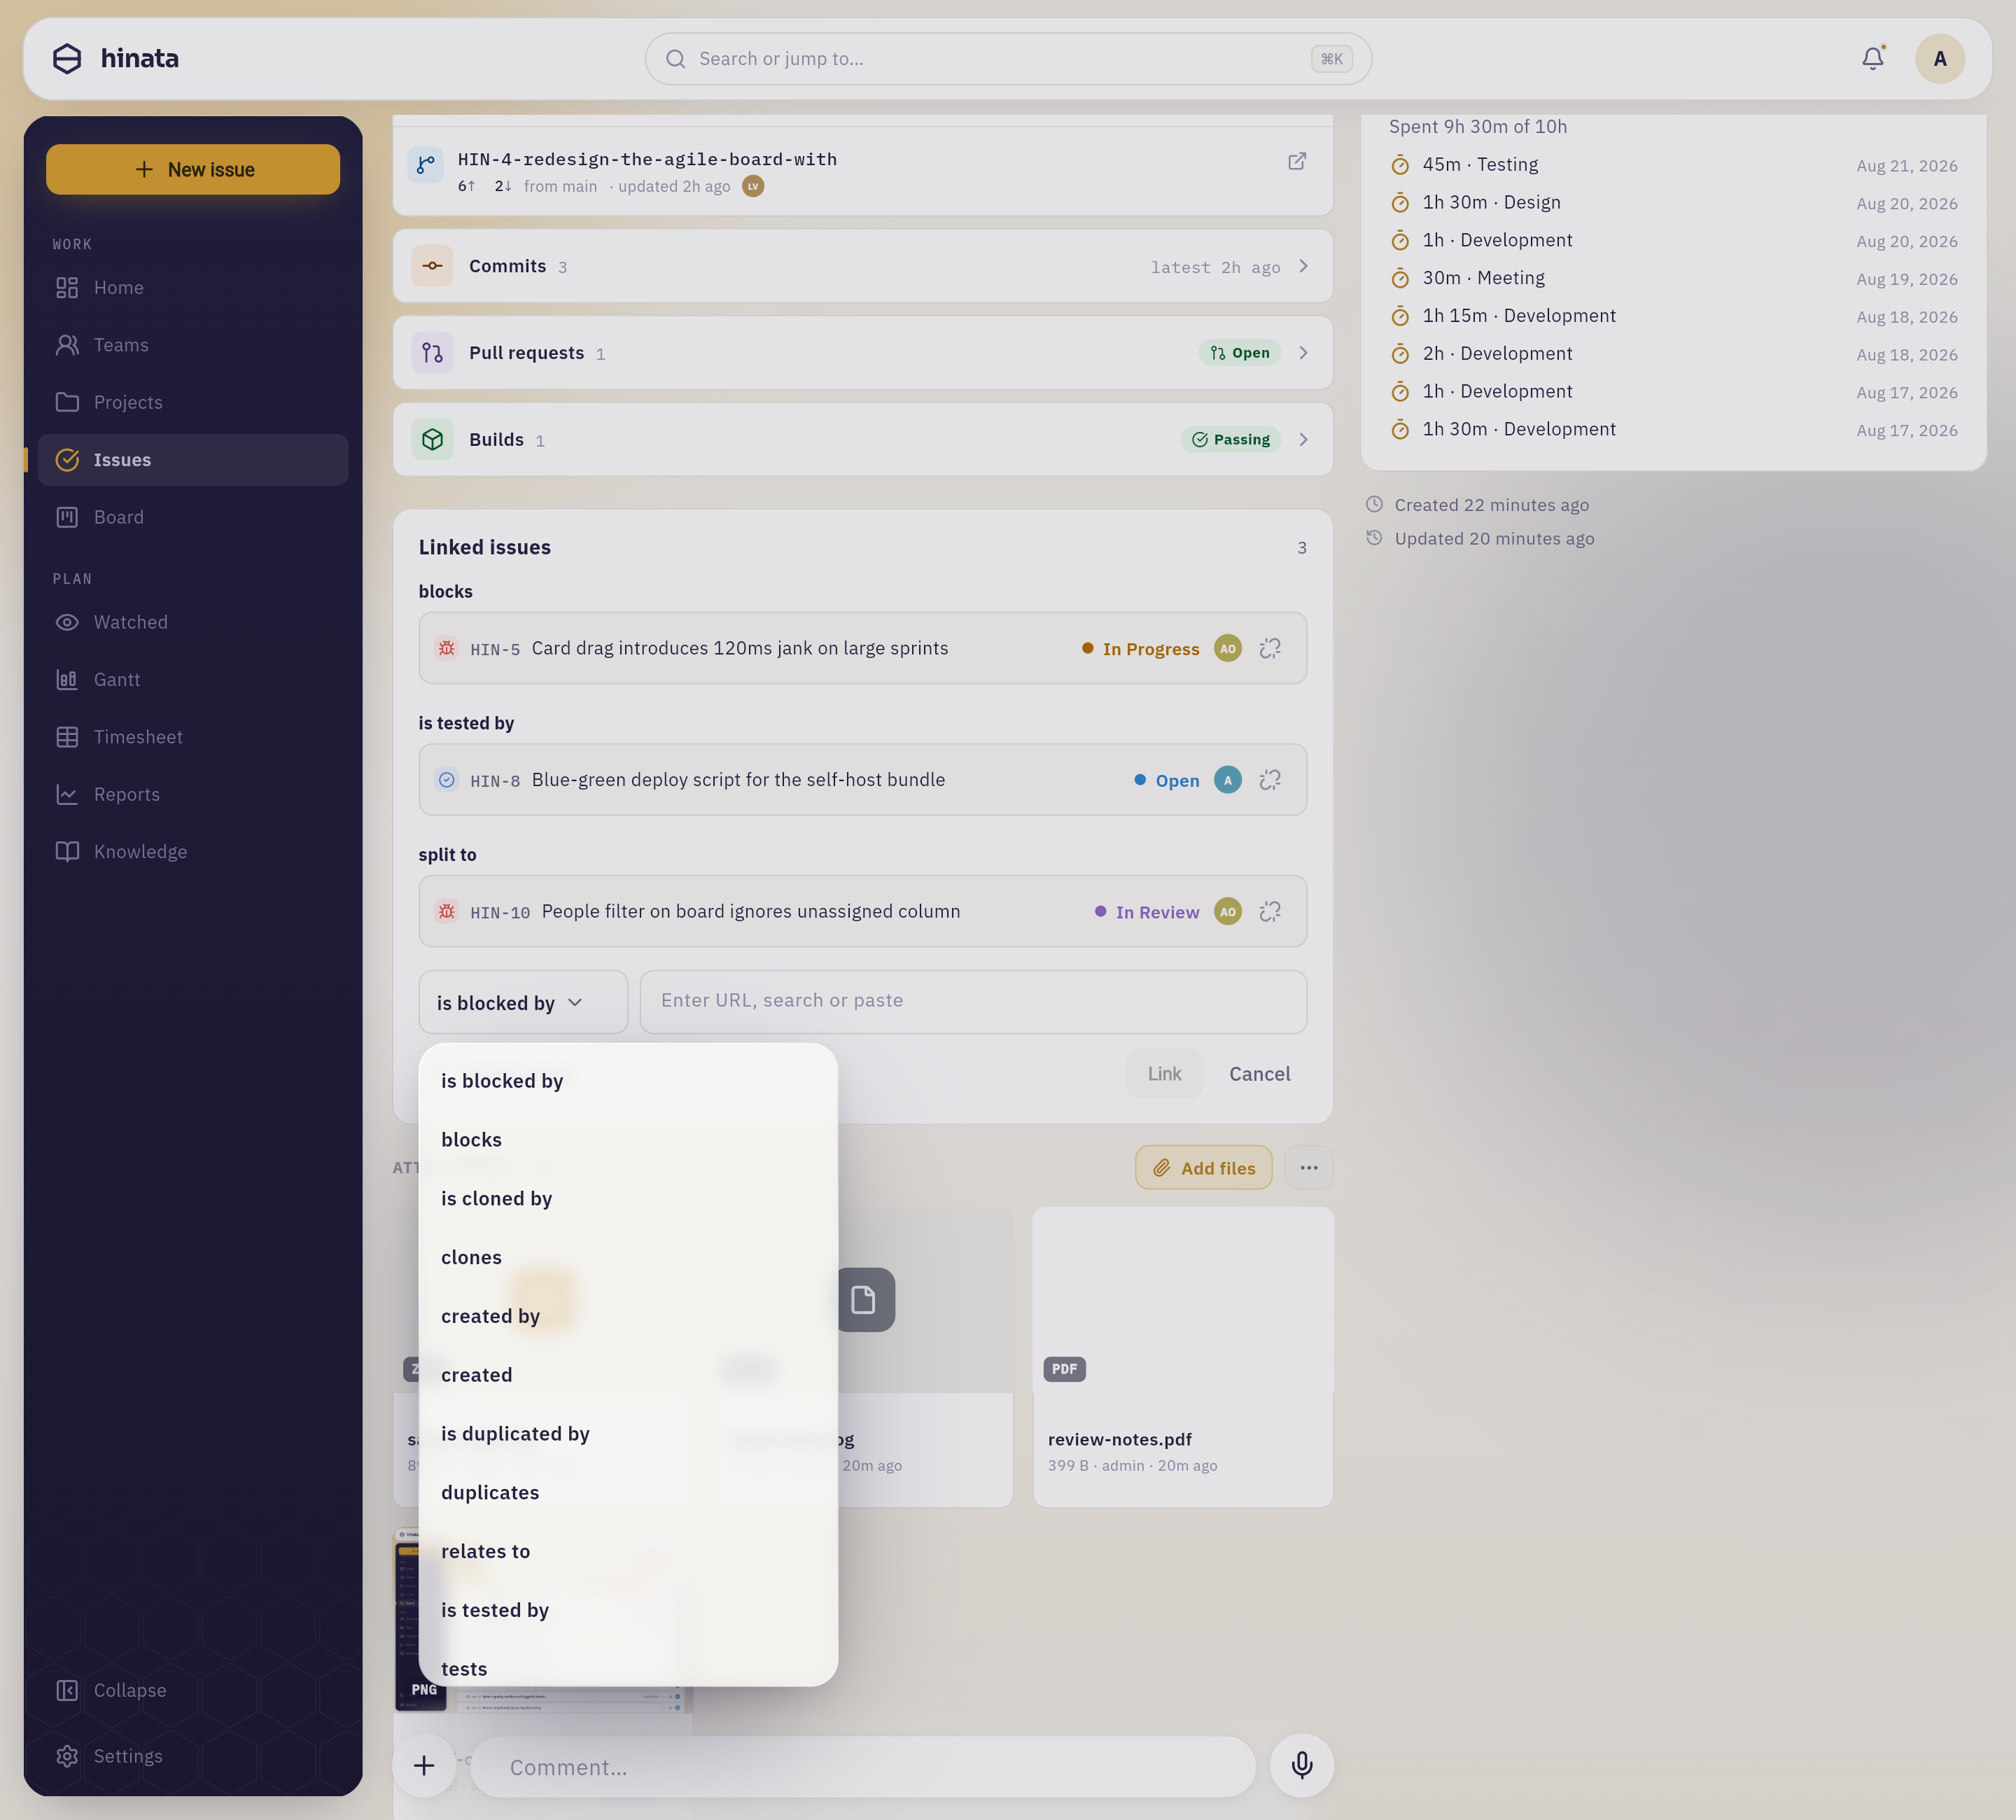 Add issue opens an inline row: the relationship on the left, and a field on the right that takes part of a title, an issue key or a pasted URL. The relationship menu holds thirteen verbs — it scrolls past the eleven shown — and the links already on this issue sit above it, grouped by verb.
You can select several issues at once, and Link commits them.
| Relationship | Reads as | Use it when |
|---|---|---|
| is blocked by / blocks | "HIN-42 is blocked by HIN-40" | Work genuinely cannot start until the other one is done |
| duplicates / is duplicated by | "HIN-42 duplicates HIN-11" | The same problem was reported twice; keep one, link the other |
| relates to | Reads the same from both ends | Loosely connected — worth knowing about, not a dependency |
| clones / is cloned by | Set automatically by cloning | A copy and its original |
| tests / is tested by | "HIN-90 tests HIN-42" | A test or QA task covering a piece of work |
| split to / split from | "HIN-42 split to HIN-55" | One issue got too big and became several |
| created / created by | Provenance | One piece of work produced another |
Links are directional and both ends stay in step: add "blocks" here and the other issue immediately shows "is blocked by", live, with no refresh.
Only blocks affects scheduling
blocks is the one relationship the timeline draws as a connector between bars and counts when it works out a critical path. The rest are documentation for humans — valuable, but they never move a date.
Watching an issue#
Open the … menu and choose Watch. You will get notified about comments and changes on that issue until you turn it off again, and the same popover lists everyone else who is watching, so you can see who else is paying attention.
Two things save you a click:
- If you are the assignee or the reporter, you are already notified — the popover says so rather than letting you subscribe to something you already get.
- Everything you watch is collected on the Watched page in the sidebar.
Cloning an issue#
… → Clone copies an issue into the same project — useful for recurring work, or as a template for a series of similar tickets.
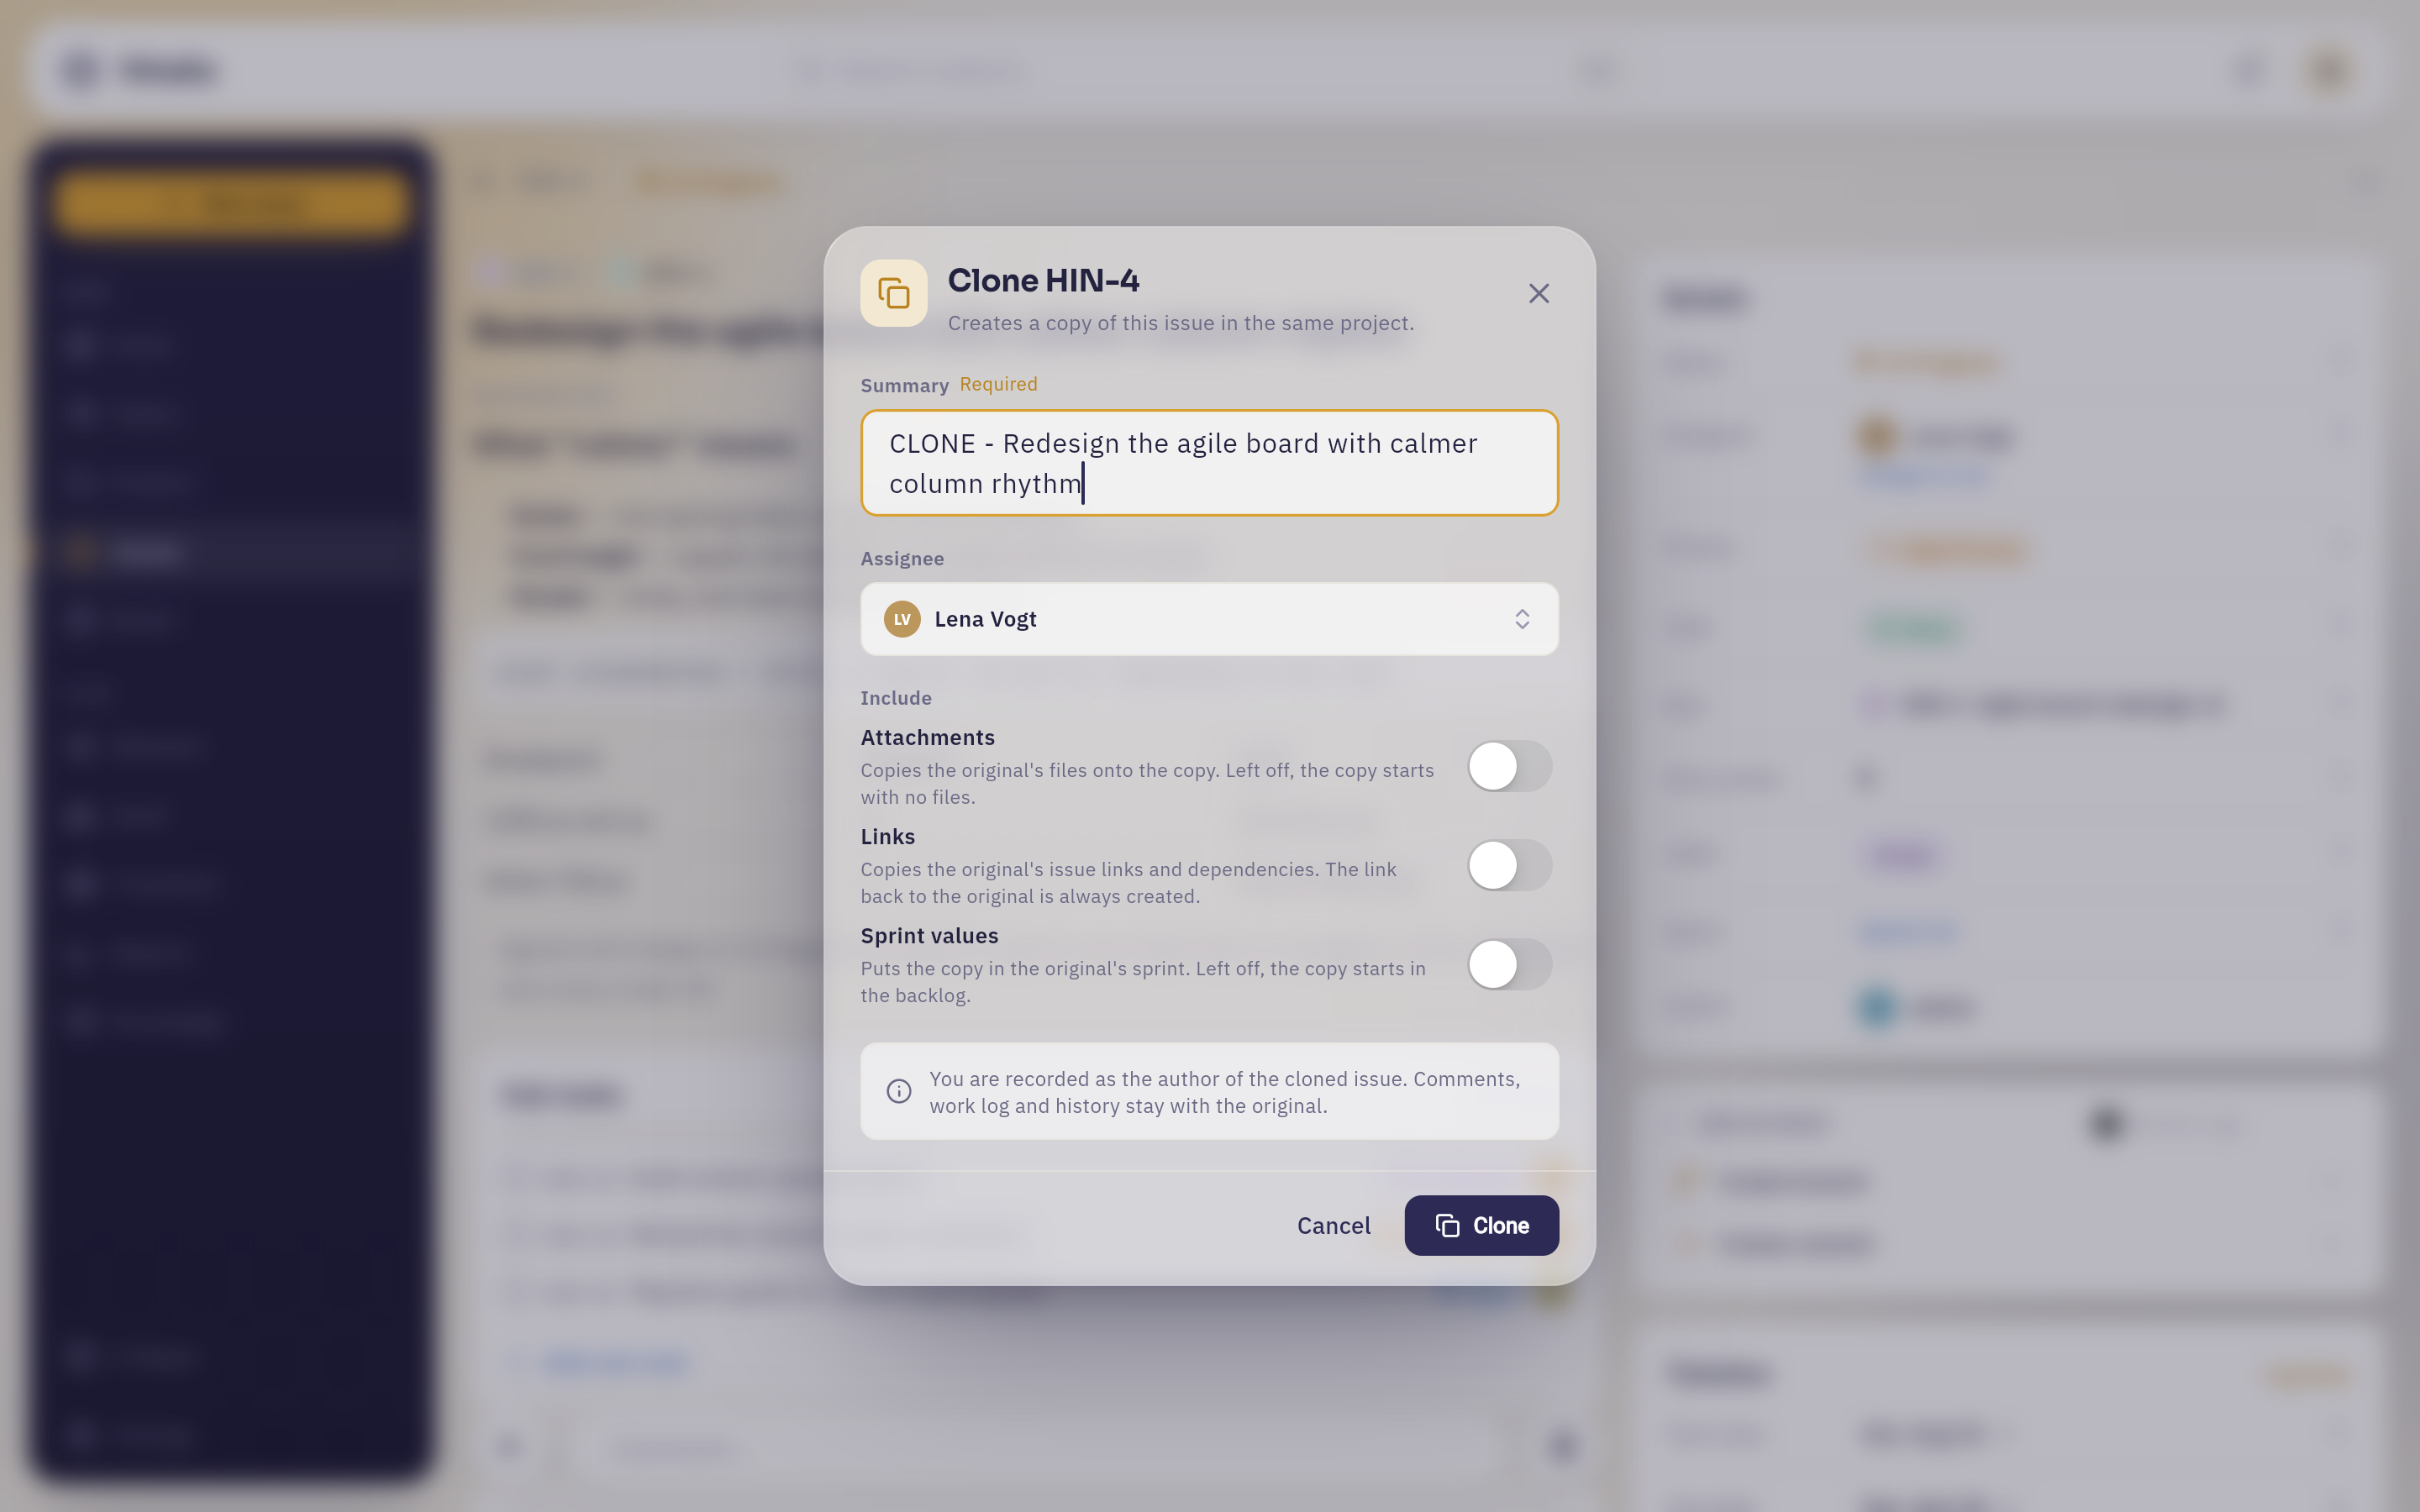 Clone: the summary arrives prefixed with CLONE -, and what comes along is three switches — Attachments, Links, Sprint values — all off, each with the line that says what turning it on does.
Attachments that do come along are copied as their own stored files, so removing one later does not touch the other. Whatever you choose, a clones link back to the original is always created, and you are recorded as the author of the copy.
Discussion stays with the original
Comments, work logs and history never travel to a clone. That is the point: a clone is a fresh start with the same shape, not a snapshot of a conversation.
Moving an issue to another project#
… → Move to project… relocates an issue. It is a two-step wizard because a move is rarely lossless: first the target project, then everything that cannot simply come along with it.
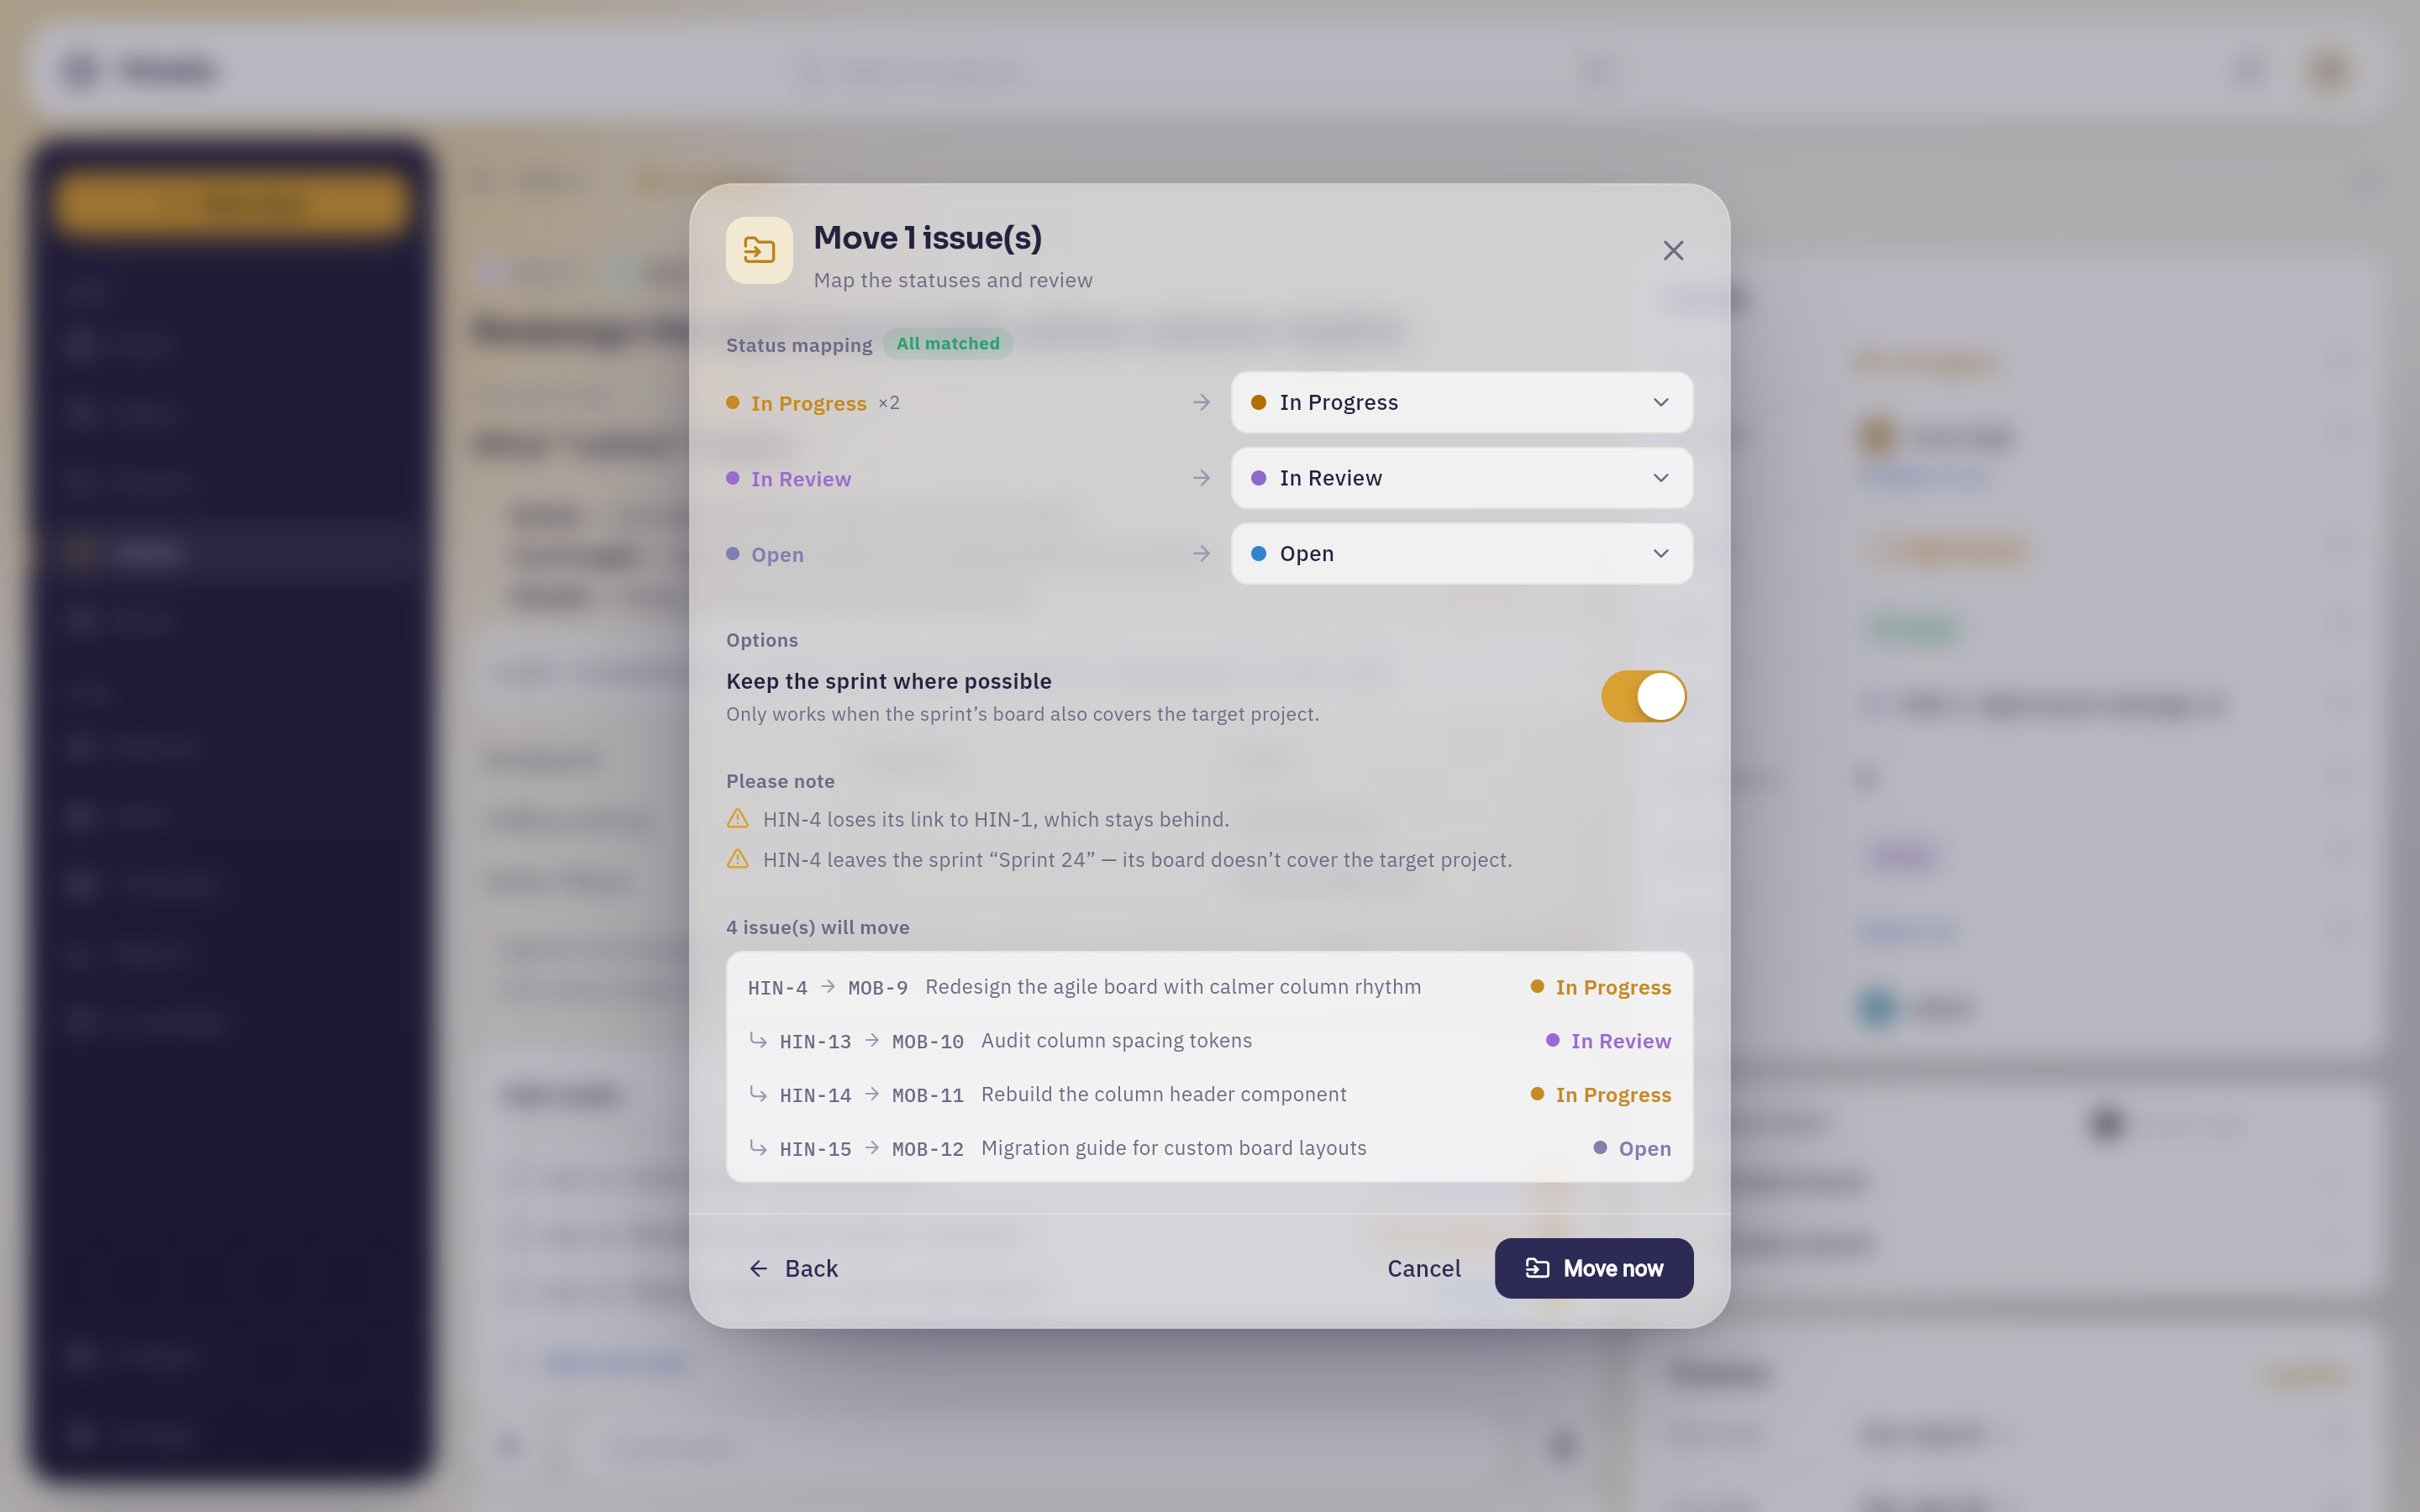 Step two. Every status in play is mapped onto one the target project has — all of them matched here, so nothing needs a decision — then the consequences Hinata worked out for itself, then the new keys: HIN-4 becomes MOB-9, and its three sub-tasks follow with it.
Hinata pre-matches every status it can and asks only about the rest. The issue gets a new key in its new project, and its old key stops resolving.
Restore an archived issue before moving it
The move entry is disabled for archived issues. Restore it first, then move it.
Archiving and deleting#
These are two different things, and Hinata pushes you towards the reversible one.
Archiving is a soft delete available to every project member. The issue vanishes from lists, boards, sprints and search, but nothing is destroyed — the Archived filter finds it again and Restore brings it back exactly as it was. Archiving a story, task, bug or feature archives its sub-tasks with it, and restoring brings them back too.
Deleting is permanent and role-gated: platform admins, project leads and the admins of a team that owns the project. If you are not one of those, the menu offers you Archive and nothing else — not as a punishment, but because there is no undo behind the other button. If you are allowed to delete, the confirmation dialog offers both, with Archive as the calm choice and Delete in red.
Deleting cannot be undone, and it takes things with it
Deleting an issue also removes its comments, its work logs, its links and its history. Deleting a story, task, bug or feature deletes its sub-tasks too. Deleting an epic does not delete its children — they survive as ordinary top-level issues and simply lose their epic link. When in doubt, archive: an archived issue costs nothing and can always be brought back.
Exporting or printing one issue#
Sometimes an issue has to leave the app — for a report, an audit, a customer, or a meeting where somebody insists on paper. … → Export… offers:
- Print — sends the issue to your platform's print dialog.
- Export as PDF
- Export as Excel
- Export as Word
- Export as XML
The server renders all of them, so the layout — headings, tables, code blocks, the details — is identical no matter which device you asked from. Printing is not a separate format: it prints exactly the PDF that the PDF entry downloads, so a printed issue and a saved one can never disagree.
An export is the whole ticket, not just the description: the fields, the formatted description, the comments, the linked issues, the list of attached files and the change history. PDF and Word give you a document to read; Excel gives you two sheets — one of fields, one of comments — for anyone who wants to work with the content rather than read it; XML is the machine-readable version.
Where the file lands depends on your platform: iOS, Android, macOS and Windows open the system share sheet so you can pick Files, Downloads, AirDrop or mail; Linux saves straight into your Downloads folder and tells you the file name; the web build hands it to your browser.
Exporting a whole list instead
The Export button on the Issues page exports the list you are currently looking at — filters, grouping and all — as PDF, CSV or JSON. Use the issue's own export when someone needs the full text of one ticket, and the list export when they need an overview.
Related pages#
- Boards & sprints — move issues through your workflow, plan sprints, work the backlog.
- Comments & attachments — the conversation, files and voice notes on an issue.
- Timeline & dependencies — what start dates, due dates and blocks links draw.
- Tracking your time — logging work against an issue and filling your timesheet.
- Staying informed — who gets told what, and how to turn it down.
- Finding things — the ⌘K palette, saved filters and search syntax.