Writing documentation#
Issues describe work that is happening. Documentation describes how things are — the runbook you follow at three in the morning, the decision nobody remembers making, the onboarding page that saves a new colleague a week of asking.
Hinata's knowledge base is where that lives. It is a wiki, in the honest sense: pages nest inside pages, everyone who can read a page can improve it, and every article can point at the issues and people it is about, so the documentation and the work stay attached to each other.
Spaces, articles and sub-pages#
Three levels, and no more than three, because a filing system deeper than that is one nobody maintains:
- A space is a shelf — Engineering, Product, Design, Operations. It has a name, an icon, a colour and a one-line description of what belongs in it.
- An article is a page in a space.
- Any article can have sub-pages, and those can have sub-pages of their own. This is where the real structure lives: a handbook at the top, its chapters beneath it.
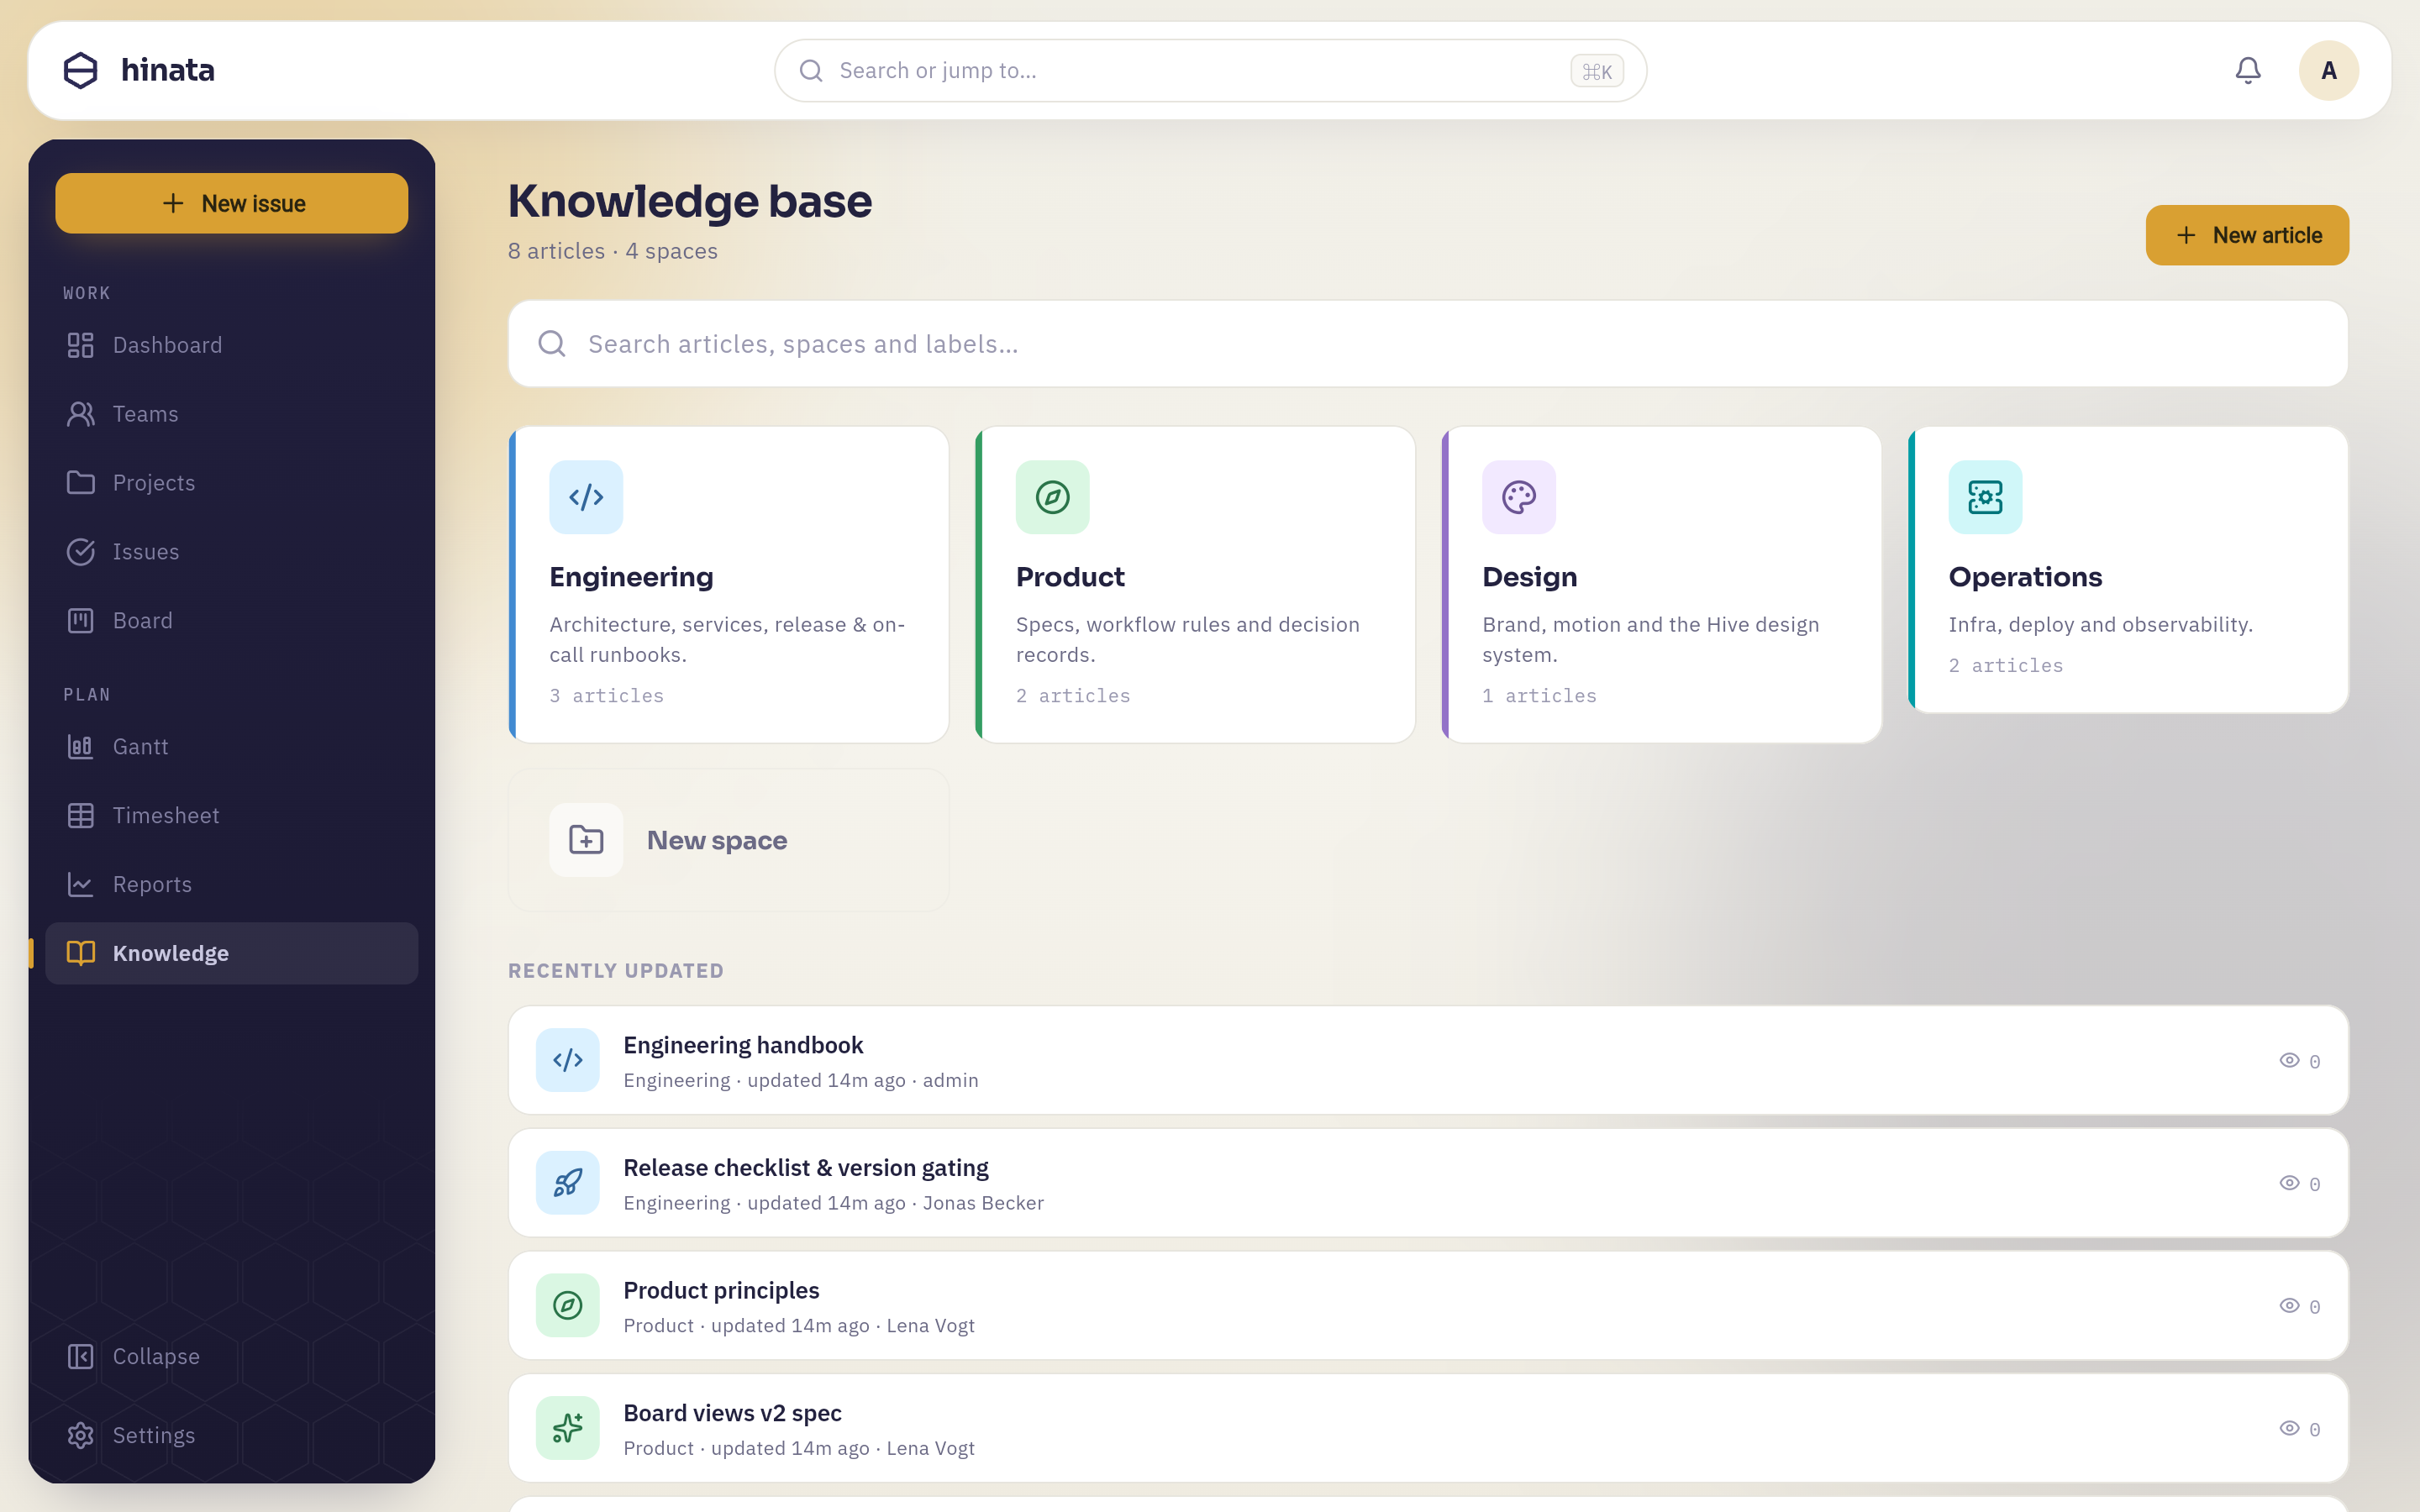 The knowledge base home. Each card is a space with its own colour, description and article count; the New space tile beside them creates another. Below, Recently updated shows what the team has been writing, with the space and author on every row.
The home screen shows every space as a card, plus a Recently updated list — which is, in practice, how most people re-find a page they read last week.
Creating a space#
Click the New space tile.
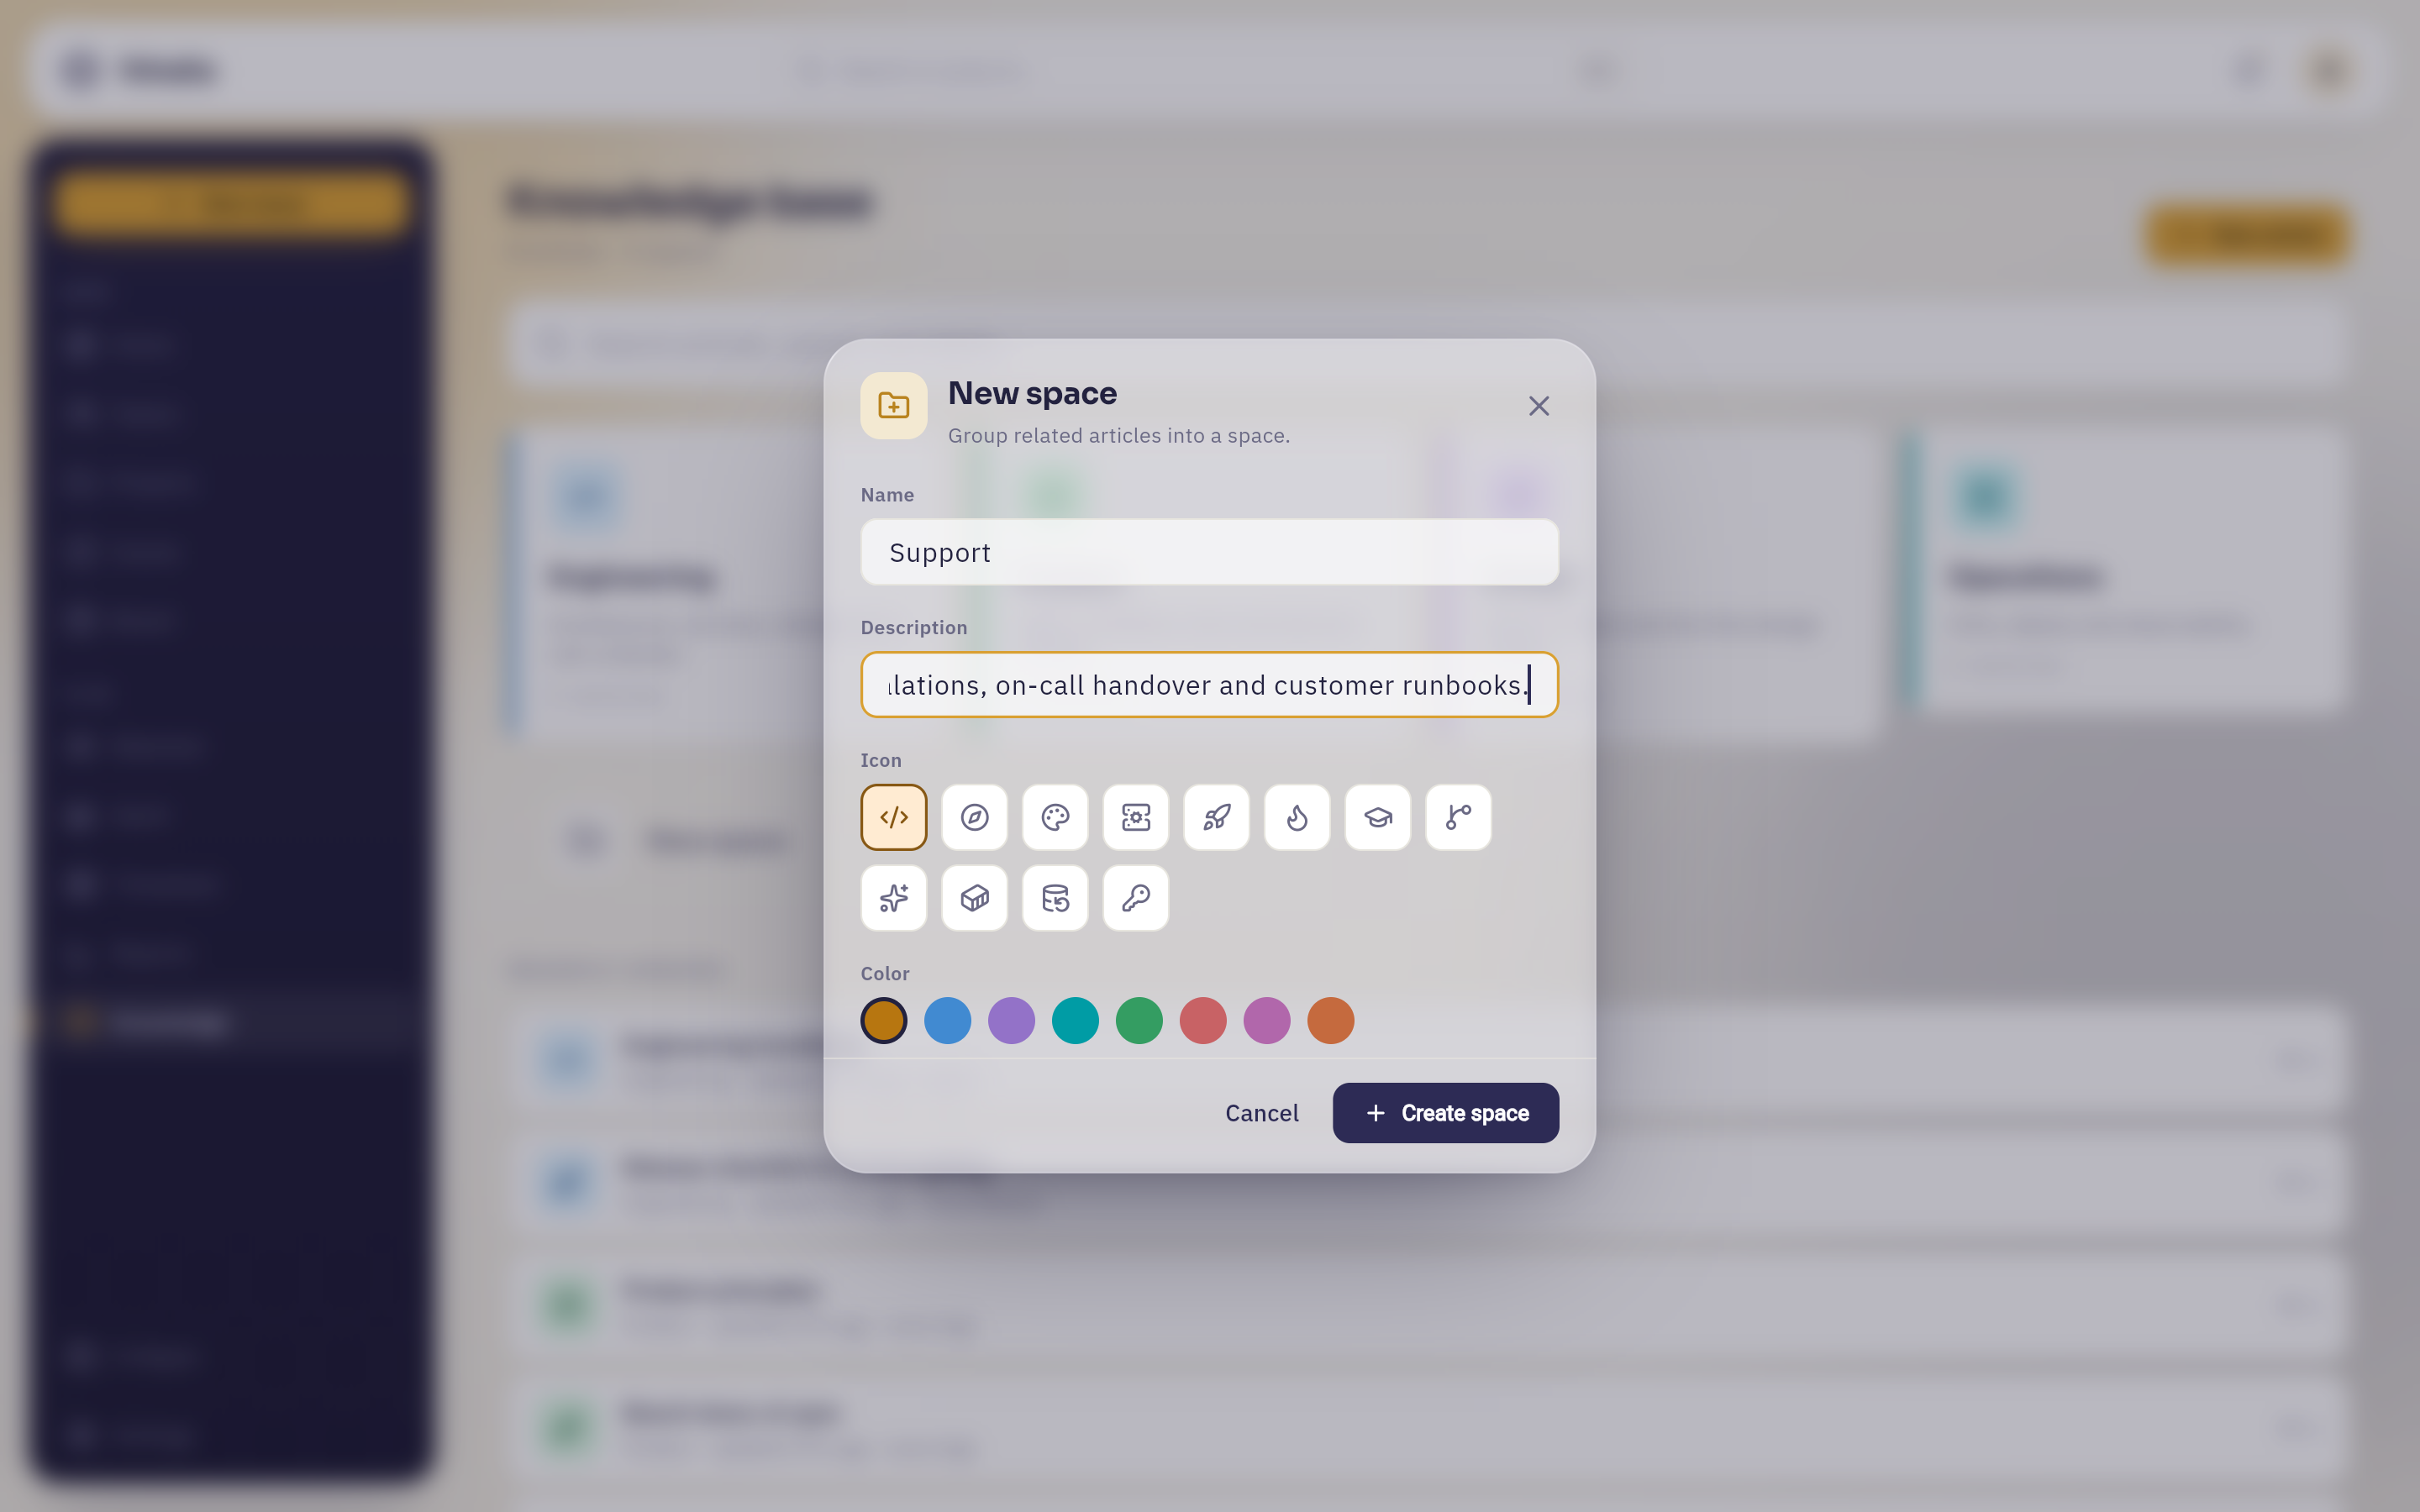 Name, description, an icon grid and a colour row in one dialog. Create space stays dead until the space has a name; the space then appears on the grid immediately, empty and ready.
Keep spaces few and broad. A space per team or per discipline works; a space per project usually does not, because most documentation is about a subject that outlives any single project.
A space can only be deleted while it is empty
Delete space is offered on a space that still has no articles. Once it holds pages, move or delete them first. This is deliberate: deleting a shelf should never quietly delete the books on it.
Write an article#
Press New article — from the knowledge base home, or from the article view where it sits next to All spaces.
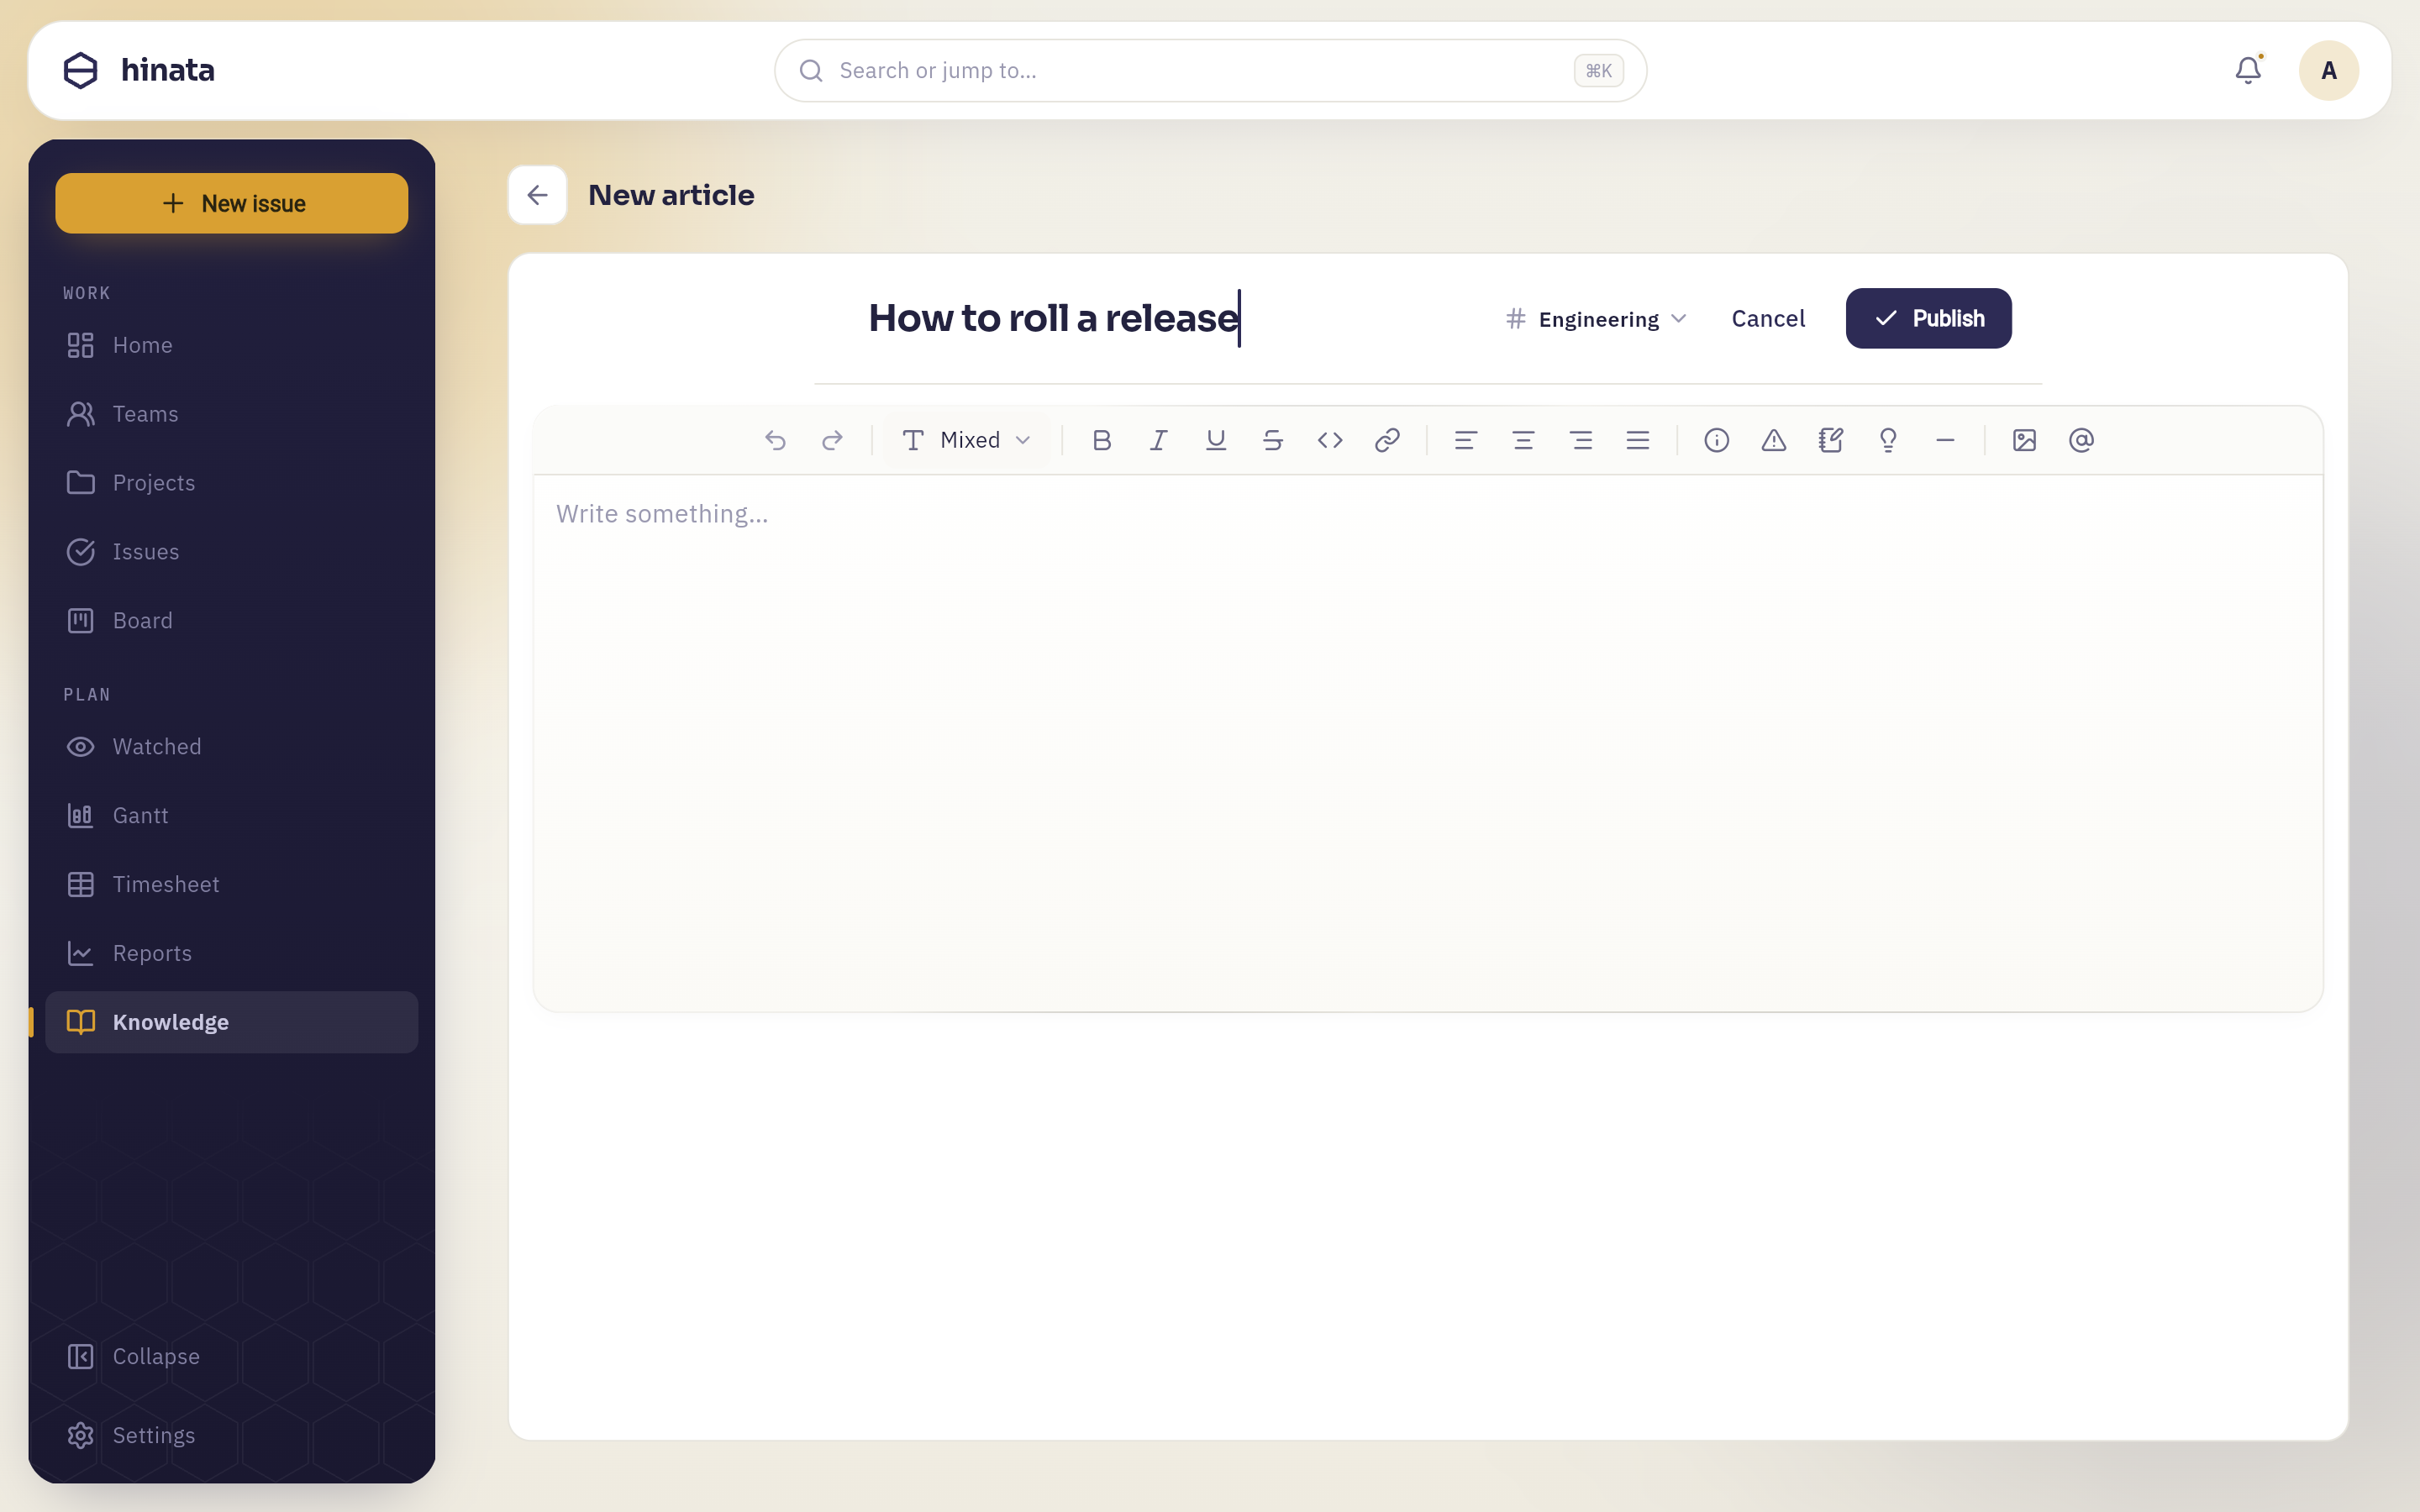 The title sits above the toolbar; the space picker beside it decides which shelf the article lands on, and can be changed later at any time. The button on the right reads Publish on a new page and Save on one you are editing.
Type the title first: it becomes the page's heading, the row in the tree, and the thing everyone will search for later, so it is worth a moment's thought. "Release checklist & version gating" is findable. "Notes" is not.
There is no separate draft state to remember — an article is either written or it is not.
Start it as a sub-page
If the article belongs under an existing one, do not create it from the home screen. Hover the parent's row in the tree and press the + that appears — Add sub-page. It is created in the right place, in the right space, with no tidying afterwards.
A first page, start to finish#
If you have never written one, this is the whole loop in six steps:
- Open Knowledge in the sidebar and press New article.
- Title it for the question it answers — "How to roll a release", not "Release".
- Pick the space it belongs in from the dropdown next to the title.
- Write the body. Use Heading 2 for each stage, a numbered list for the steps inside a stage, and a Warning panel for the one thing that goes wrong if you skip it.
- Type @ where you mention the ticket this came out of, and pick it from the list.
- Press Publish.
That page is now searchable by title and by the words inside it, it appears in Recently updated for the team, and the issue you linked now shows this article under Documented in. Two minutes of writing, permanently attached to the work.
The editor#
The body is a rich-text editor: what you type is what the page will look like, so there is no markup to learn and no preview pane to flip to.
Above the text sits the toolbar, in the order you reach for things:
| Group | Buttons |
|---|---|
| History | Undo, Redo |
| Text style | A dropdown: Body text, Heading 1–3, Quote, Bullet list, Numbered list, Task list, Code block |
| Formatting | Bold, Italic, Underline, Strikethrough, Inline code, Link |
| Alignment | Left, Centre, Right, Justify |
| Blocks | Info panel, Warning, Note, Tip, Divider |
| Insert | Insert image, Mention / link (@) |
A few of these are worth knowing about specifically.
Text style is a dropdown, not a row of toggles, because a line can only be one of those things at a time.
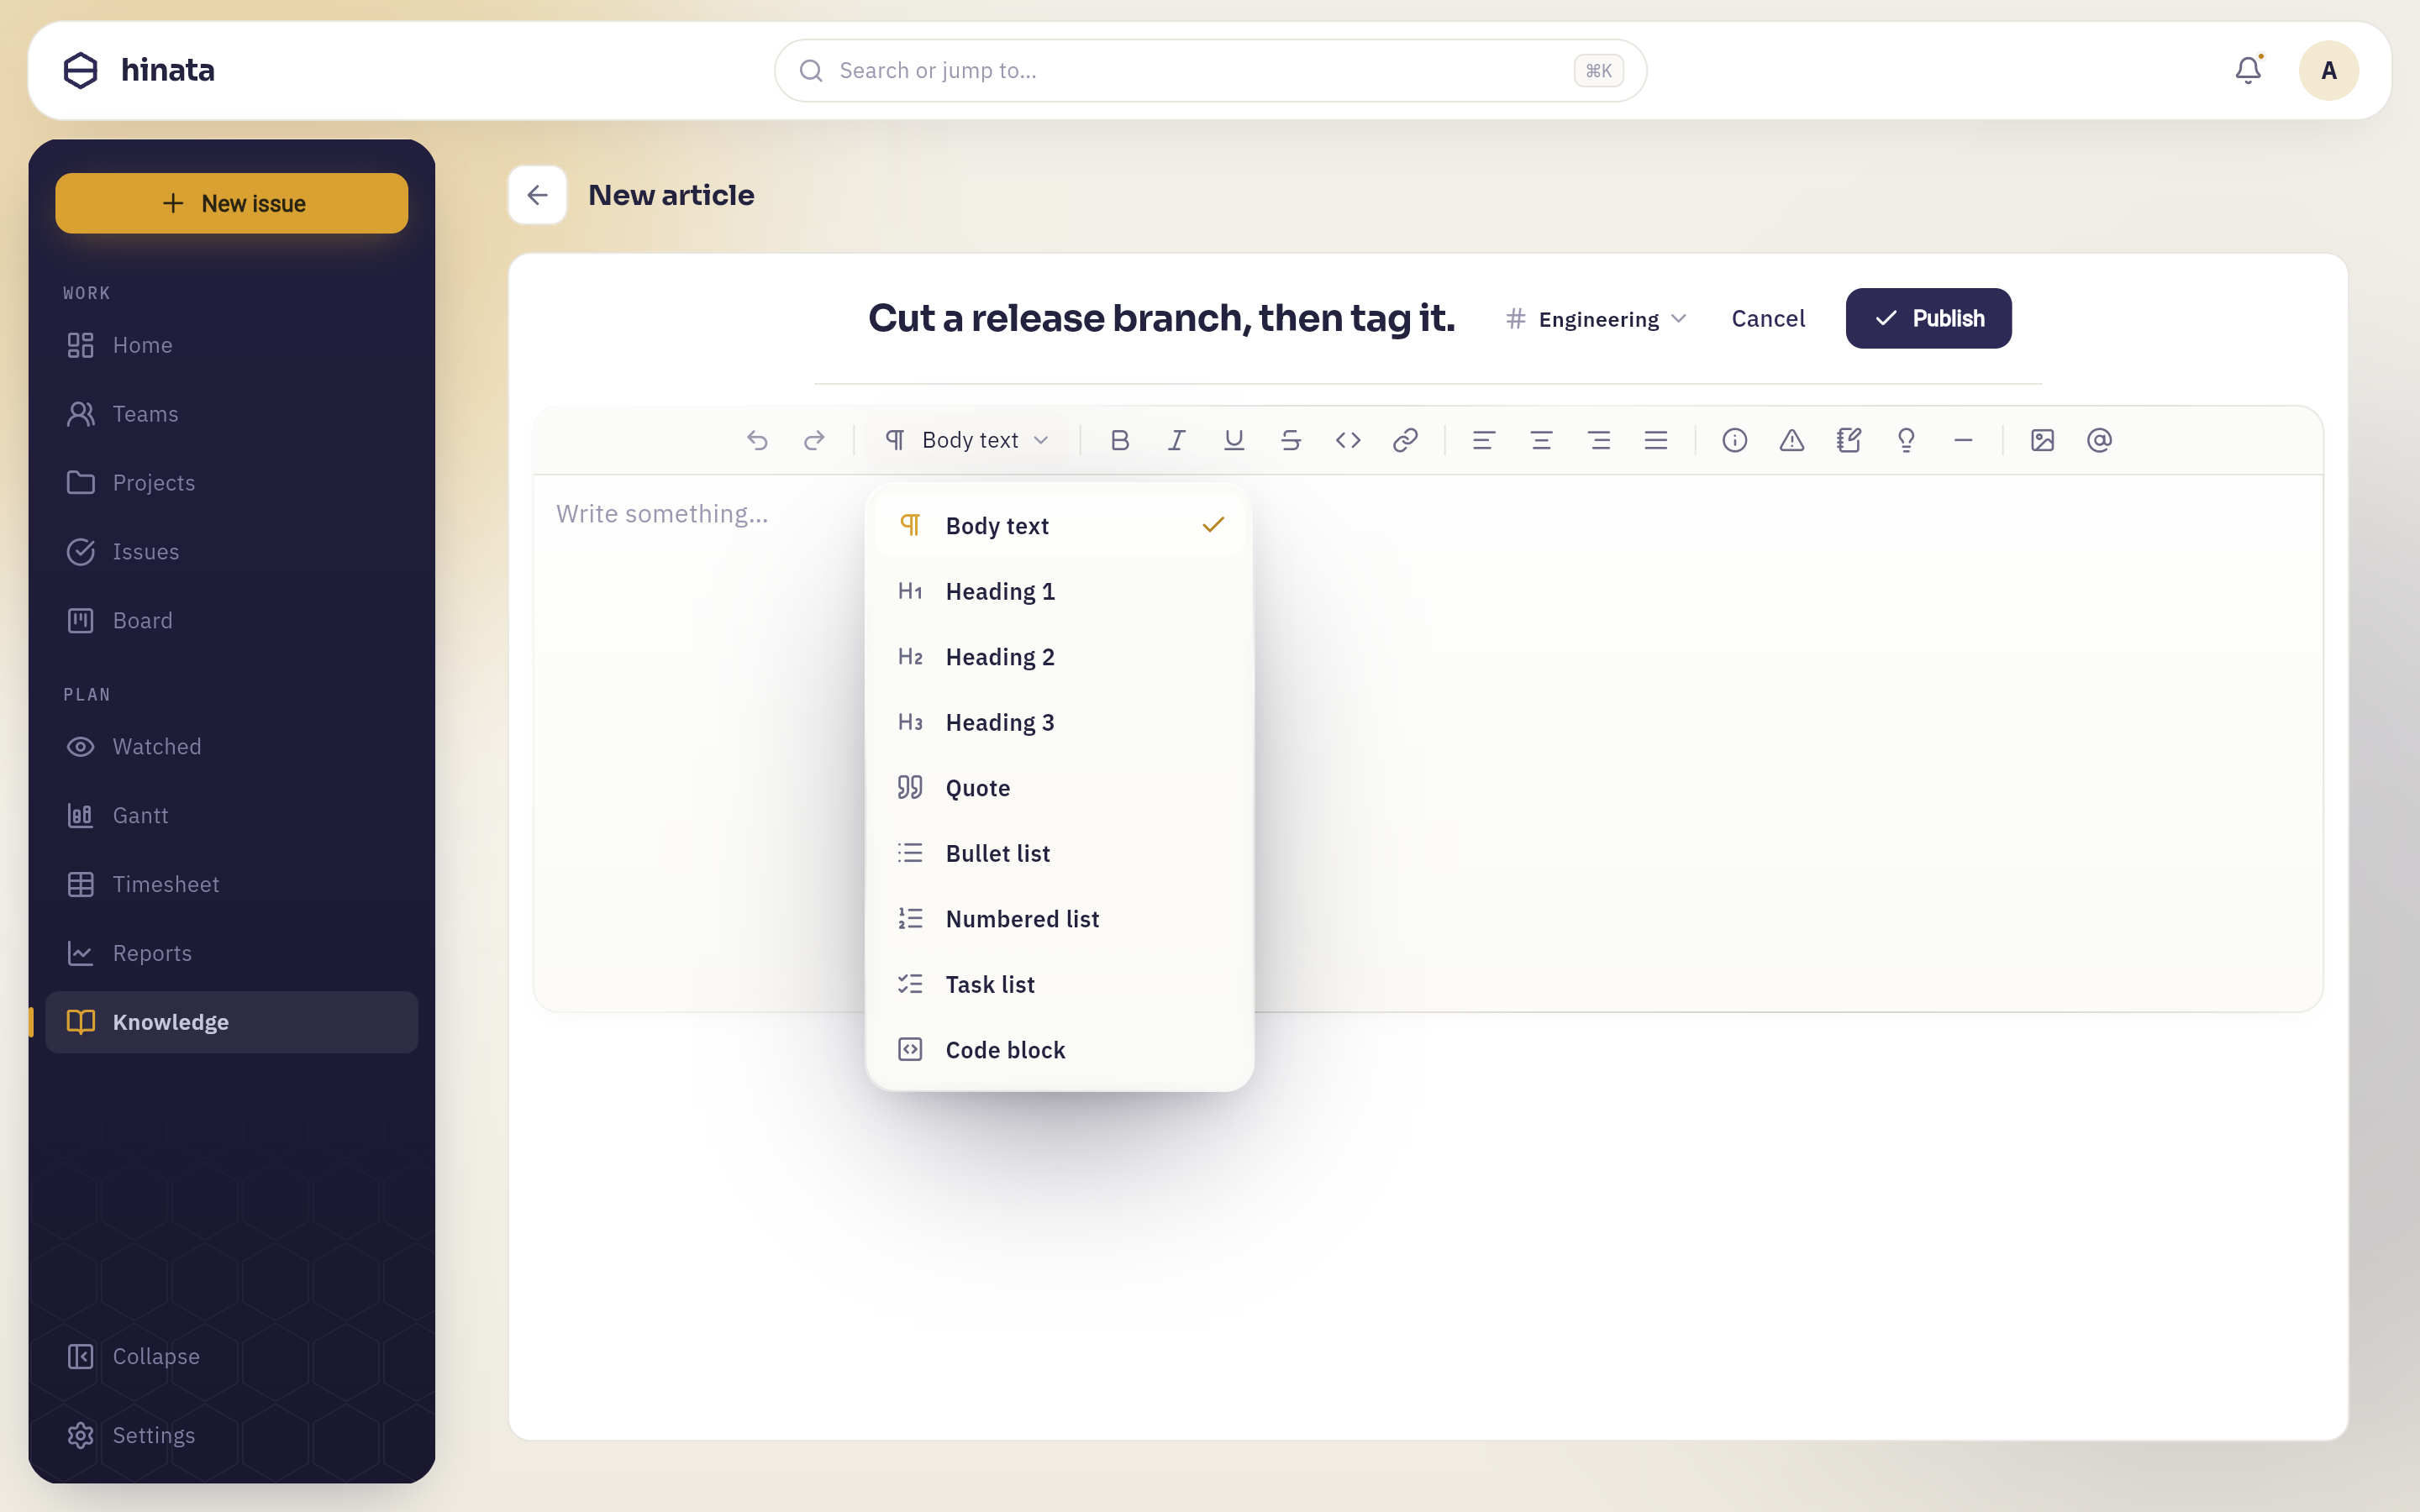 The nine shapes a line can take, with a tick on the one the cursor is in. The button carries that name too, and reads Mixed where a selection spans several of them.
The four coloured panels — Info, Warning, Note and Tip — are the fastest way to make a page skimmable. Put the one sentence that saves someone an outage in a Warning and it will be read; leave it in the fourth paragraph and it will not.
Task lists are real checkboxes. They are for checklists that are followed, not tracked — if the items need owners and dates, they want to be issues instead.
Code blocks carry a language, so a shell snippet and a JSON payload are coloured differently and are easy to tell apart at a glance.
Select text and the tools come to you
Highlight a phrase and a small glass toolbar appears above it with the formatting you are most likely to want, including the link editor. The address is typed right over the words being linked, so you can still see what you are linking while you type where it goes.
Keyboard shortcuts#
On a desktop the usual ones work, so your hands never have to leave the text:
| Shortcut | Does |
|---|---|
| ⌘B / Ctrl+B | Bold |
| ⌘I / Ctrl+I | Italic |
| ⌘U / Ctrl+U | Underline |
| ⌘Z / Ctrl+Z | Undo |
| ⇧⌘Z / Ctrl+Y | Redo |
Everything else lives on the toolbar. There is no shortcut for the coloured panels or for @ — but @ is a character you type anyway, which is the point of choosing it.
Links, images and dividers#
Links are added from the toolbar or the selection toolbar. Type or paste the address; Remove link takes it off again. Addresses that are not safe to follow are rejected rather than silently stored.
Images are uploaded from your device with the image button and land where the cursor is. Drag the handles at their corners to resize, and add a caption underneath if the picture needs one. PNG, JPEG, GIF and WebP files are accepted — SVG is not, on purpose, because an SVG can carry code. How large an image may be is set by whoever runs your server; see Object storage if that is you.
Dividers separate sections of a long page. Use them sparingly — headings do the job better and feed the outline.
Saving an empty page over a full one is blocked
If something goes wrong while loading an article, the editor refuses to save an empty body over content that already exists and tells you why. It is the one action here that could destroy a page of writing with a single click, so it is made impossible rather than merely unlikely.
Smart links: @ is the important key#
Type @ anywhere in an article — or press the @ button at the end of the toolbar. Pick a candidate and a chip is inserted: not text that looks like a reference, but a live link.
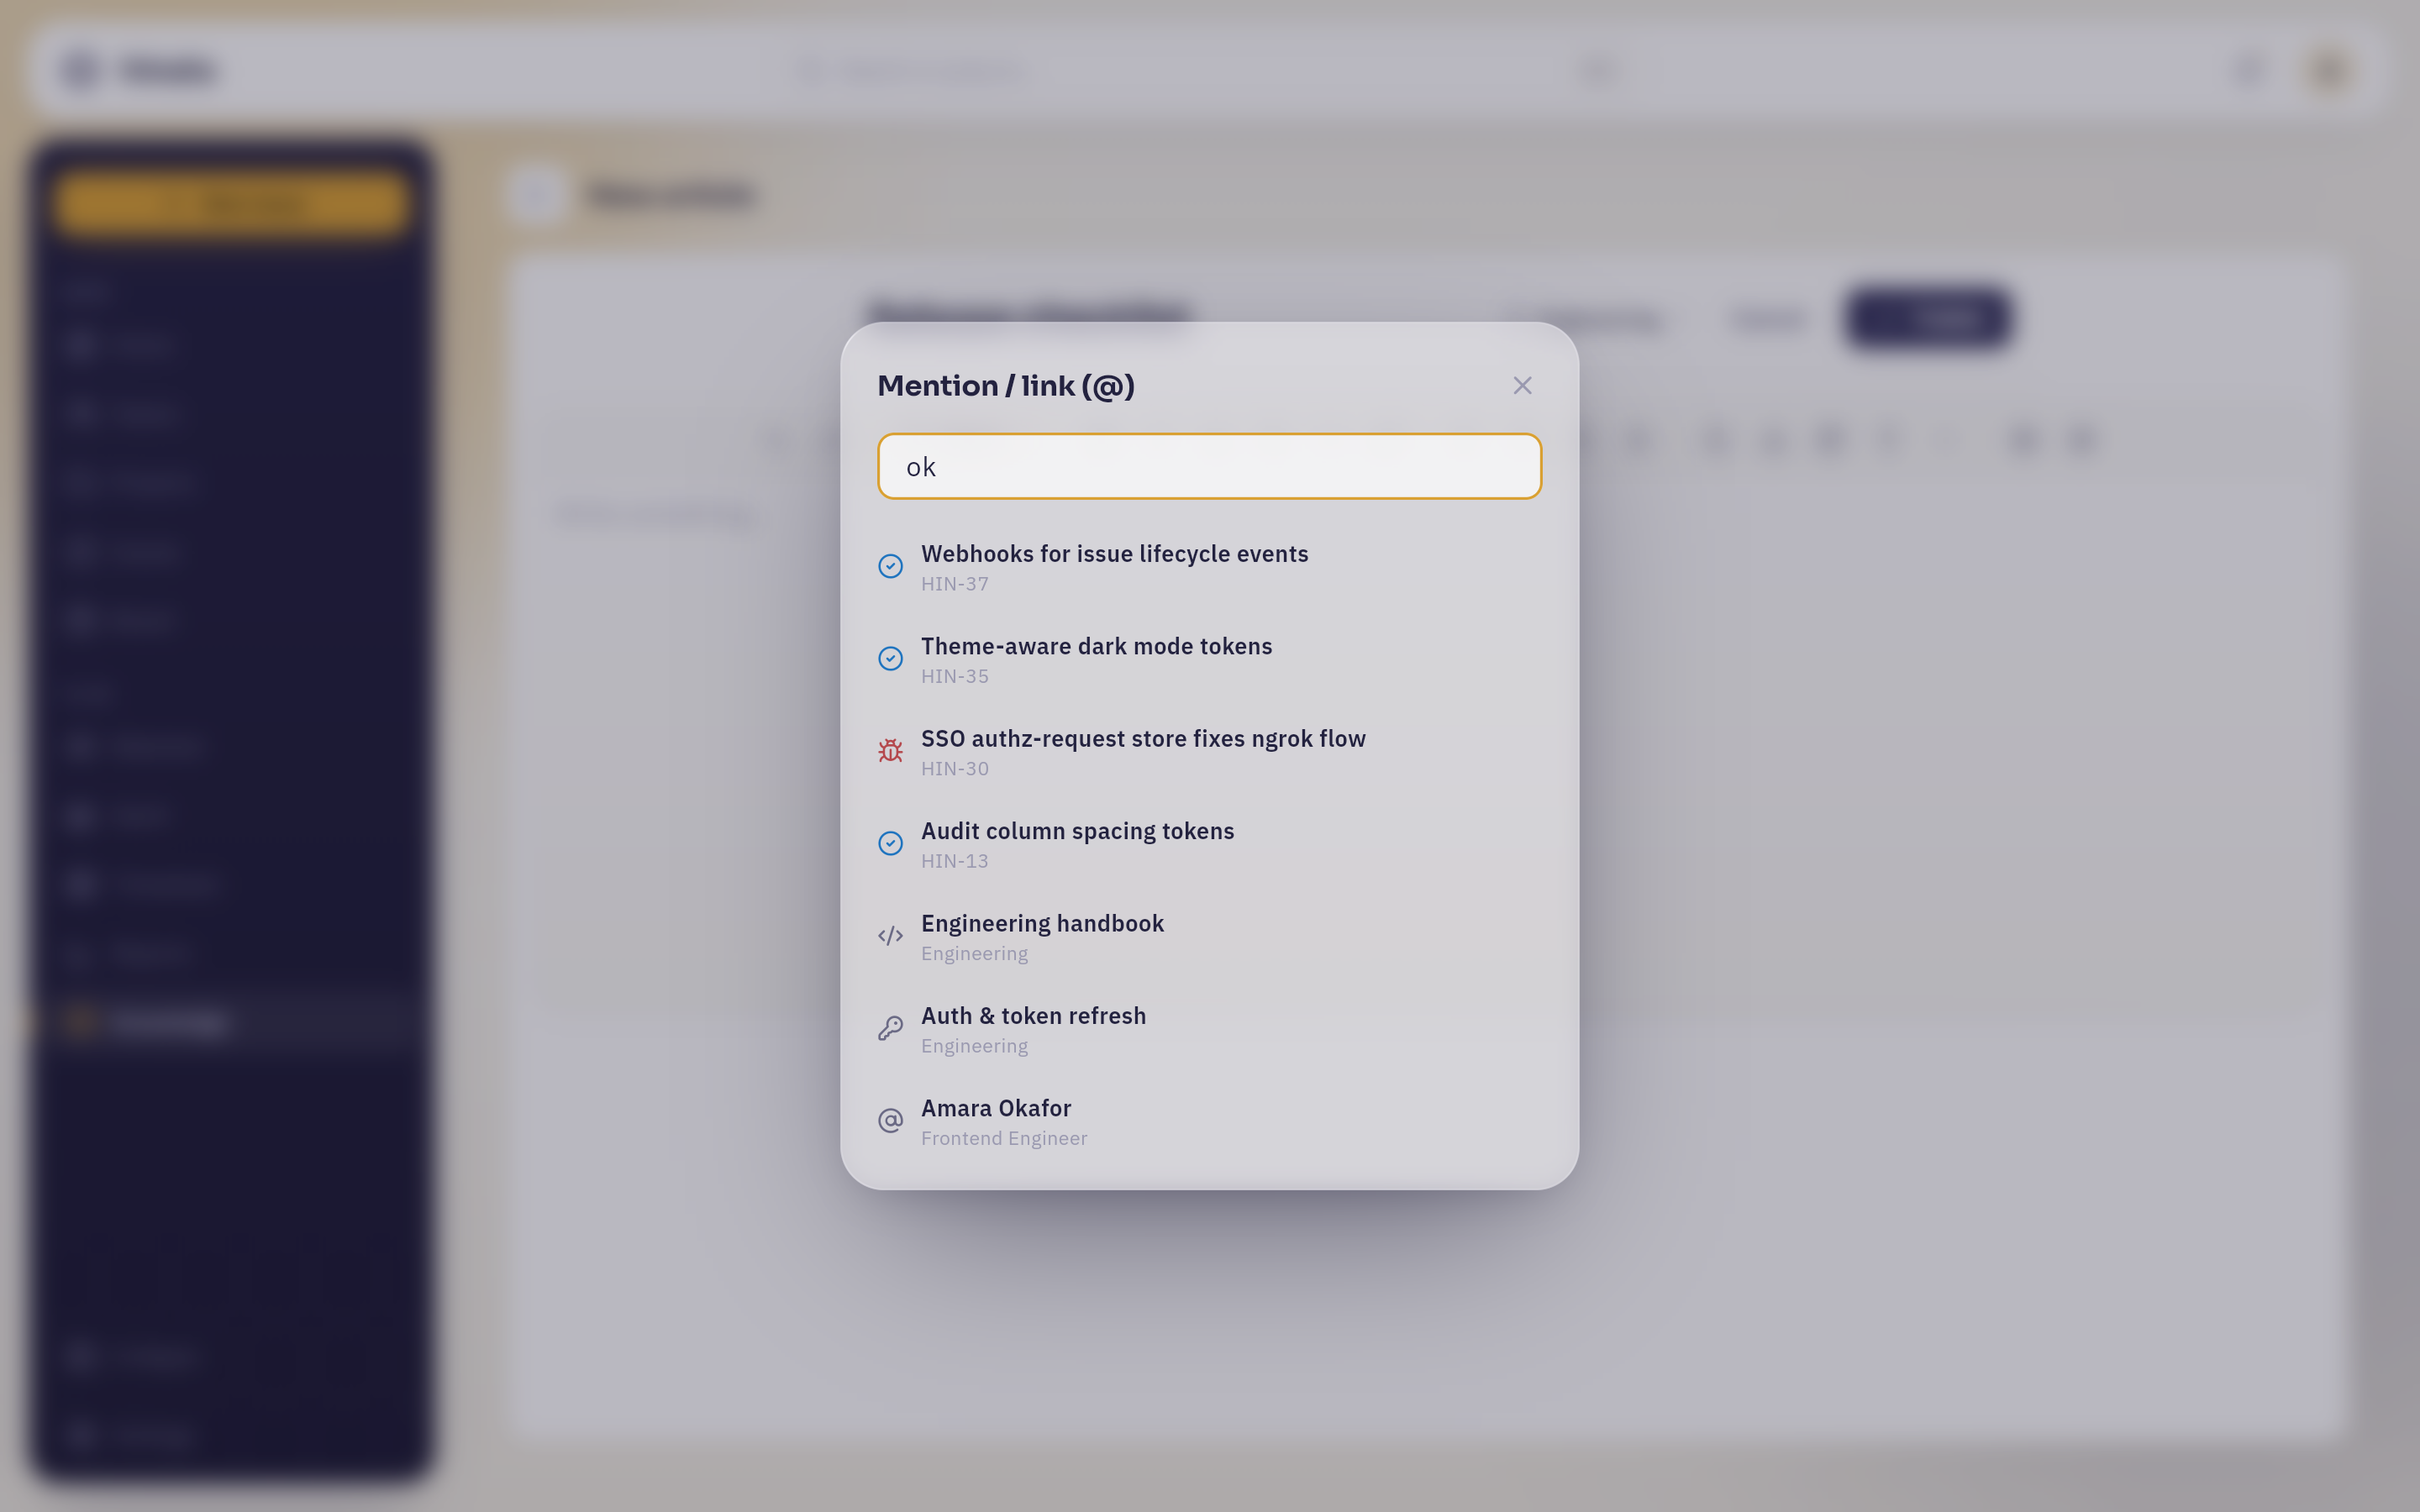 One picker across issues, articles and people, narrowing as you type. Every row names its kind with a glyph and carries the issue key or the article's space underneath. Two letters reach all three kinds here:
 ok finds four issues, two articles and Amara Okafor.
That distinction is the whole point:
- An issue chip shows the issue's type, its key and its real title, and it opens the issue when clicked. Hover it on a desktop, or long-press on a phone, and a preview card shows its status, priority and assignee without leaving the page.
- An article chip links to another page and shows its icon and title.
- A person chip shows an avatar and their first name, so "ask @Lena" stays meaningful when Lena's job title changes.
If a chip's target disappears, the chip says so instead of pretending — a broken link is drawn in red rather than quietly becoming ordinary text.
Typing HIN-42 by hand is just text
Only chips inserted with @ count as links. Plain characters look similar and behave completely differently: they will not open anything, they will not appear in Linked issues, and the issue will never know it is documented. One keystroke is the whole difference.
Documentation that knows what it describes#
Because chips are links, Hinata can show the connection from both ends — and this is what turns a wiki into something the team trusts.
- At the foot of an article, Linked issues lists every issue the page mentions, each as a card with its current status. A runbook shows you the state of the work it describes without your having to go looking.
- On an issue, Documented in lists every article that links to it. Someone landing on a ticket cold can find the page explaining the subsystem it belongs to.
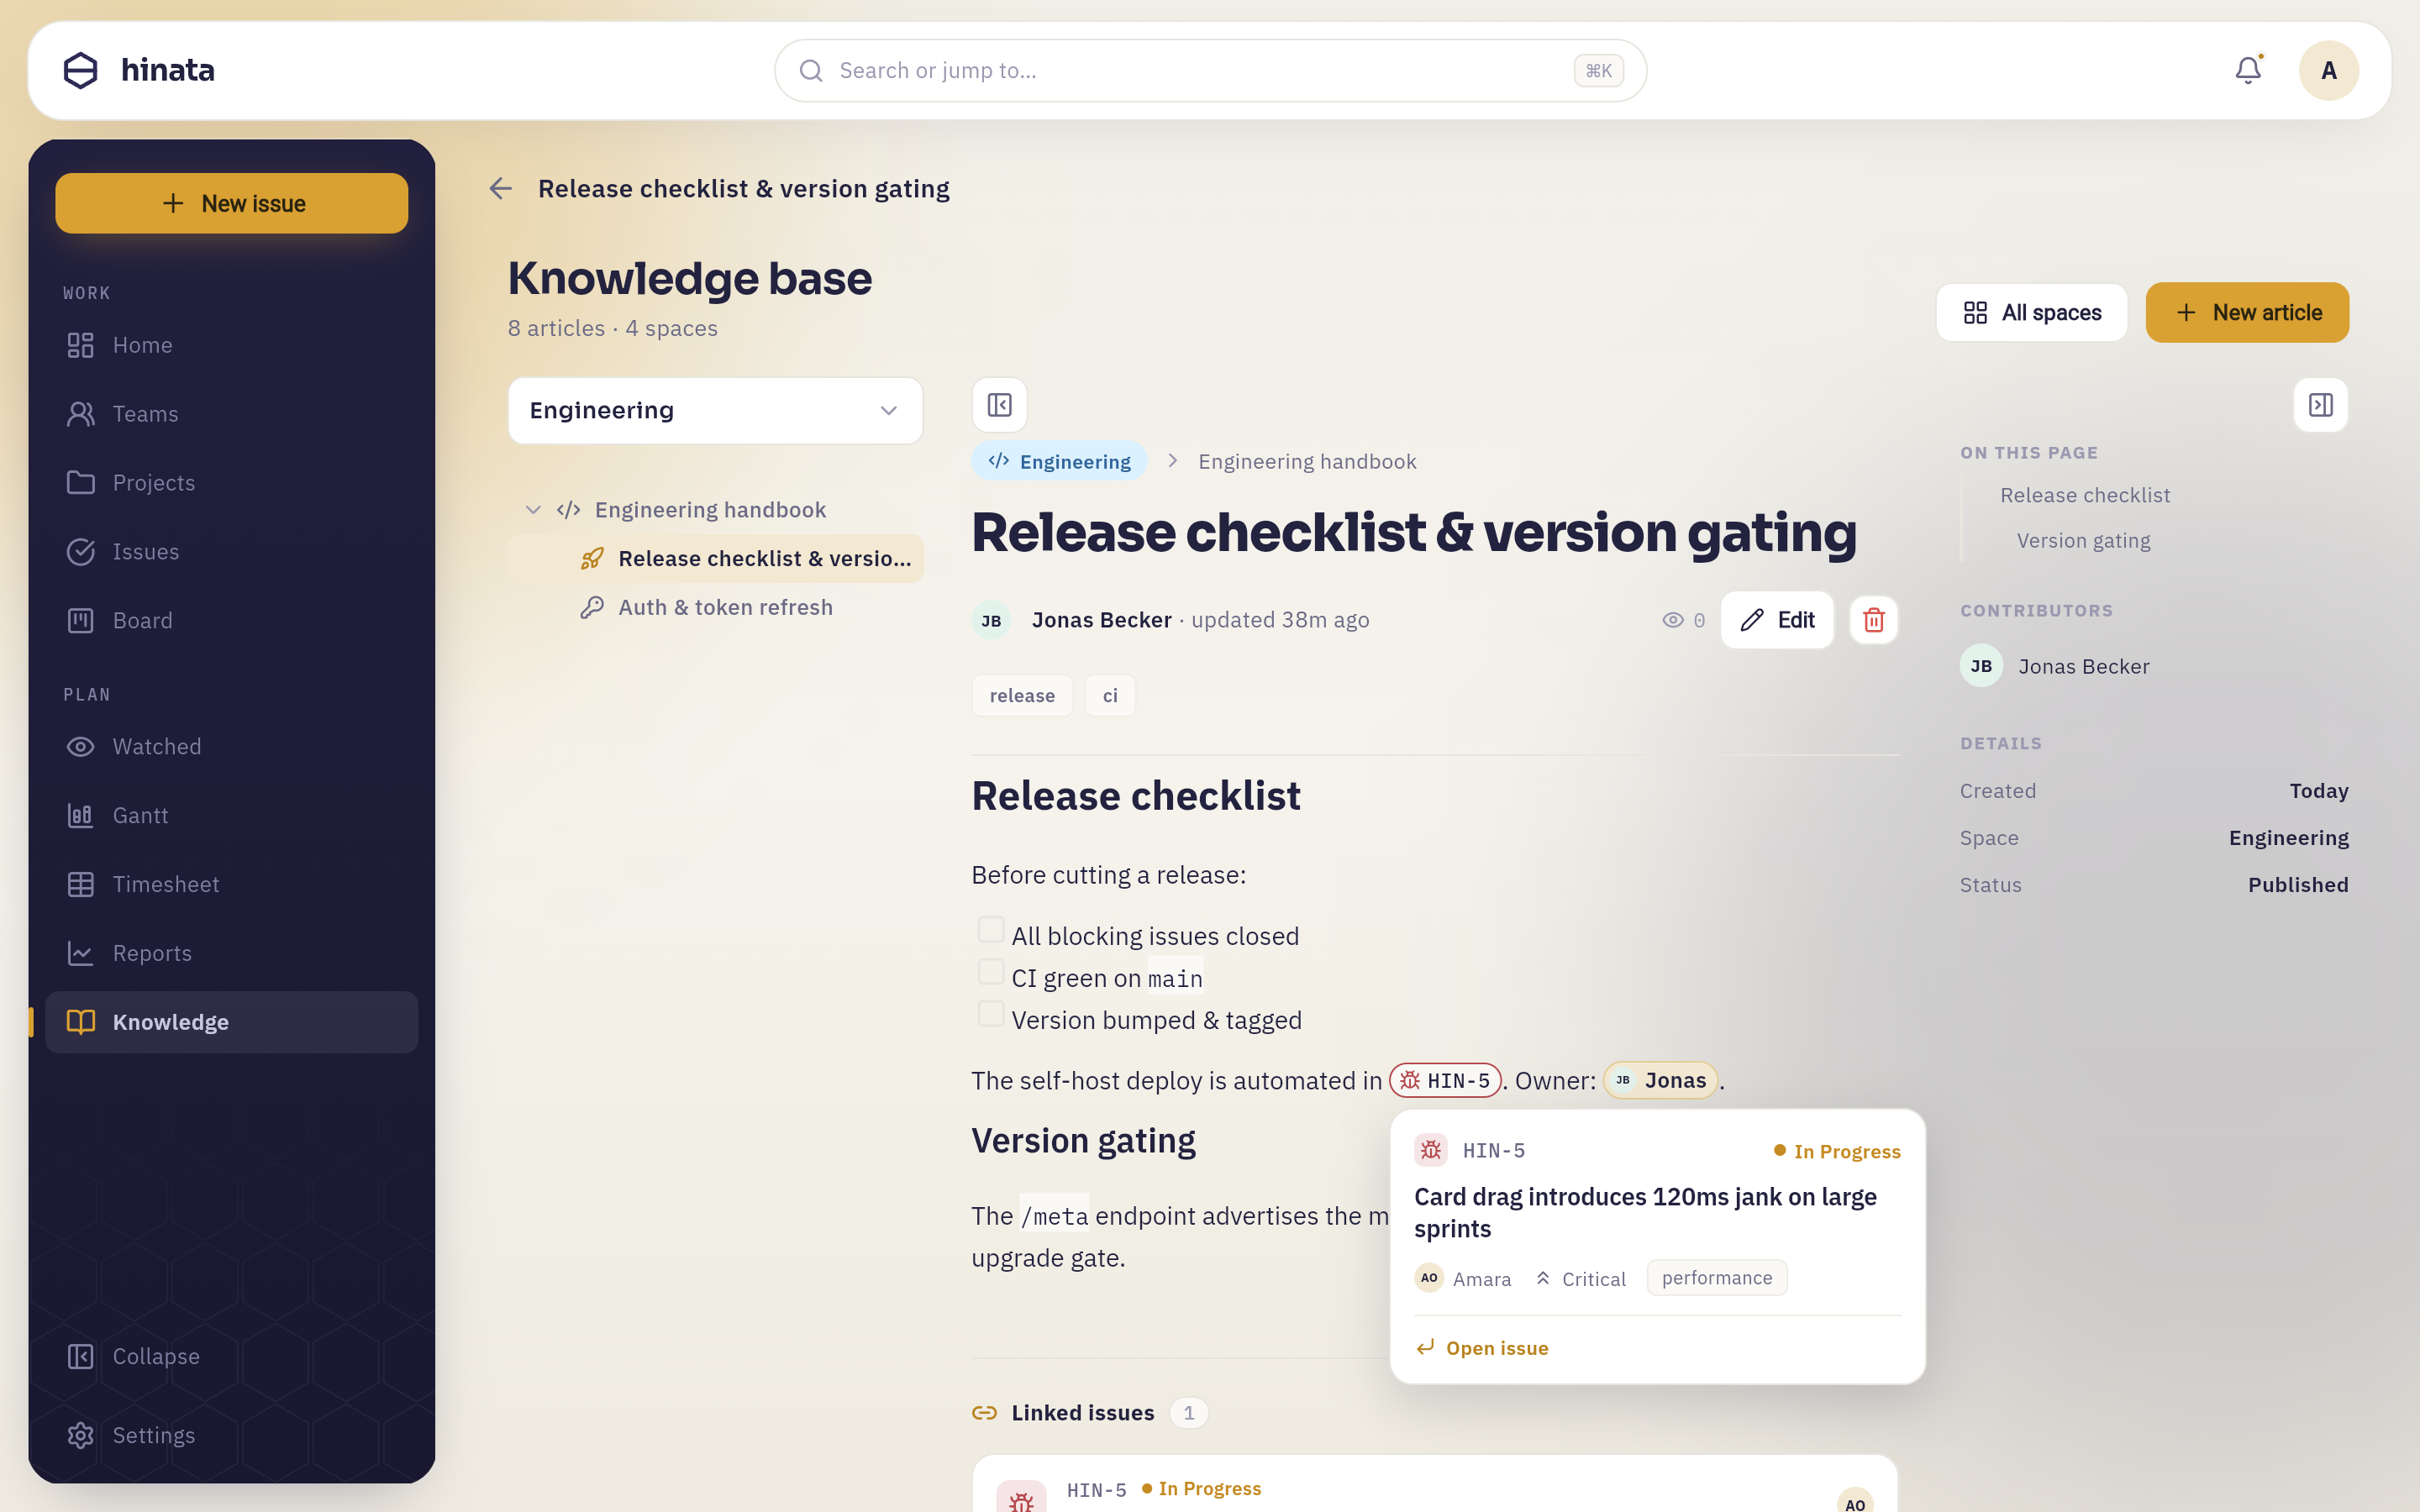 Two chips in one sentence of ordinary prose — an issue and a person. Hovering the issue chip opens a preview card with the issue's status, title, assignee, priority and label, and Open issue at its foot. The same issue is listed once more under Linked issues at the end of the page, without anyone having put it there.
Neither list is maintained by hand. Both are derived from the chips in the text, so they cannot drift out of date — write the link once and the relationship exists in both directions, forever.
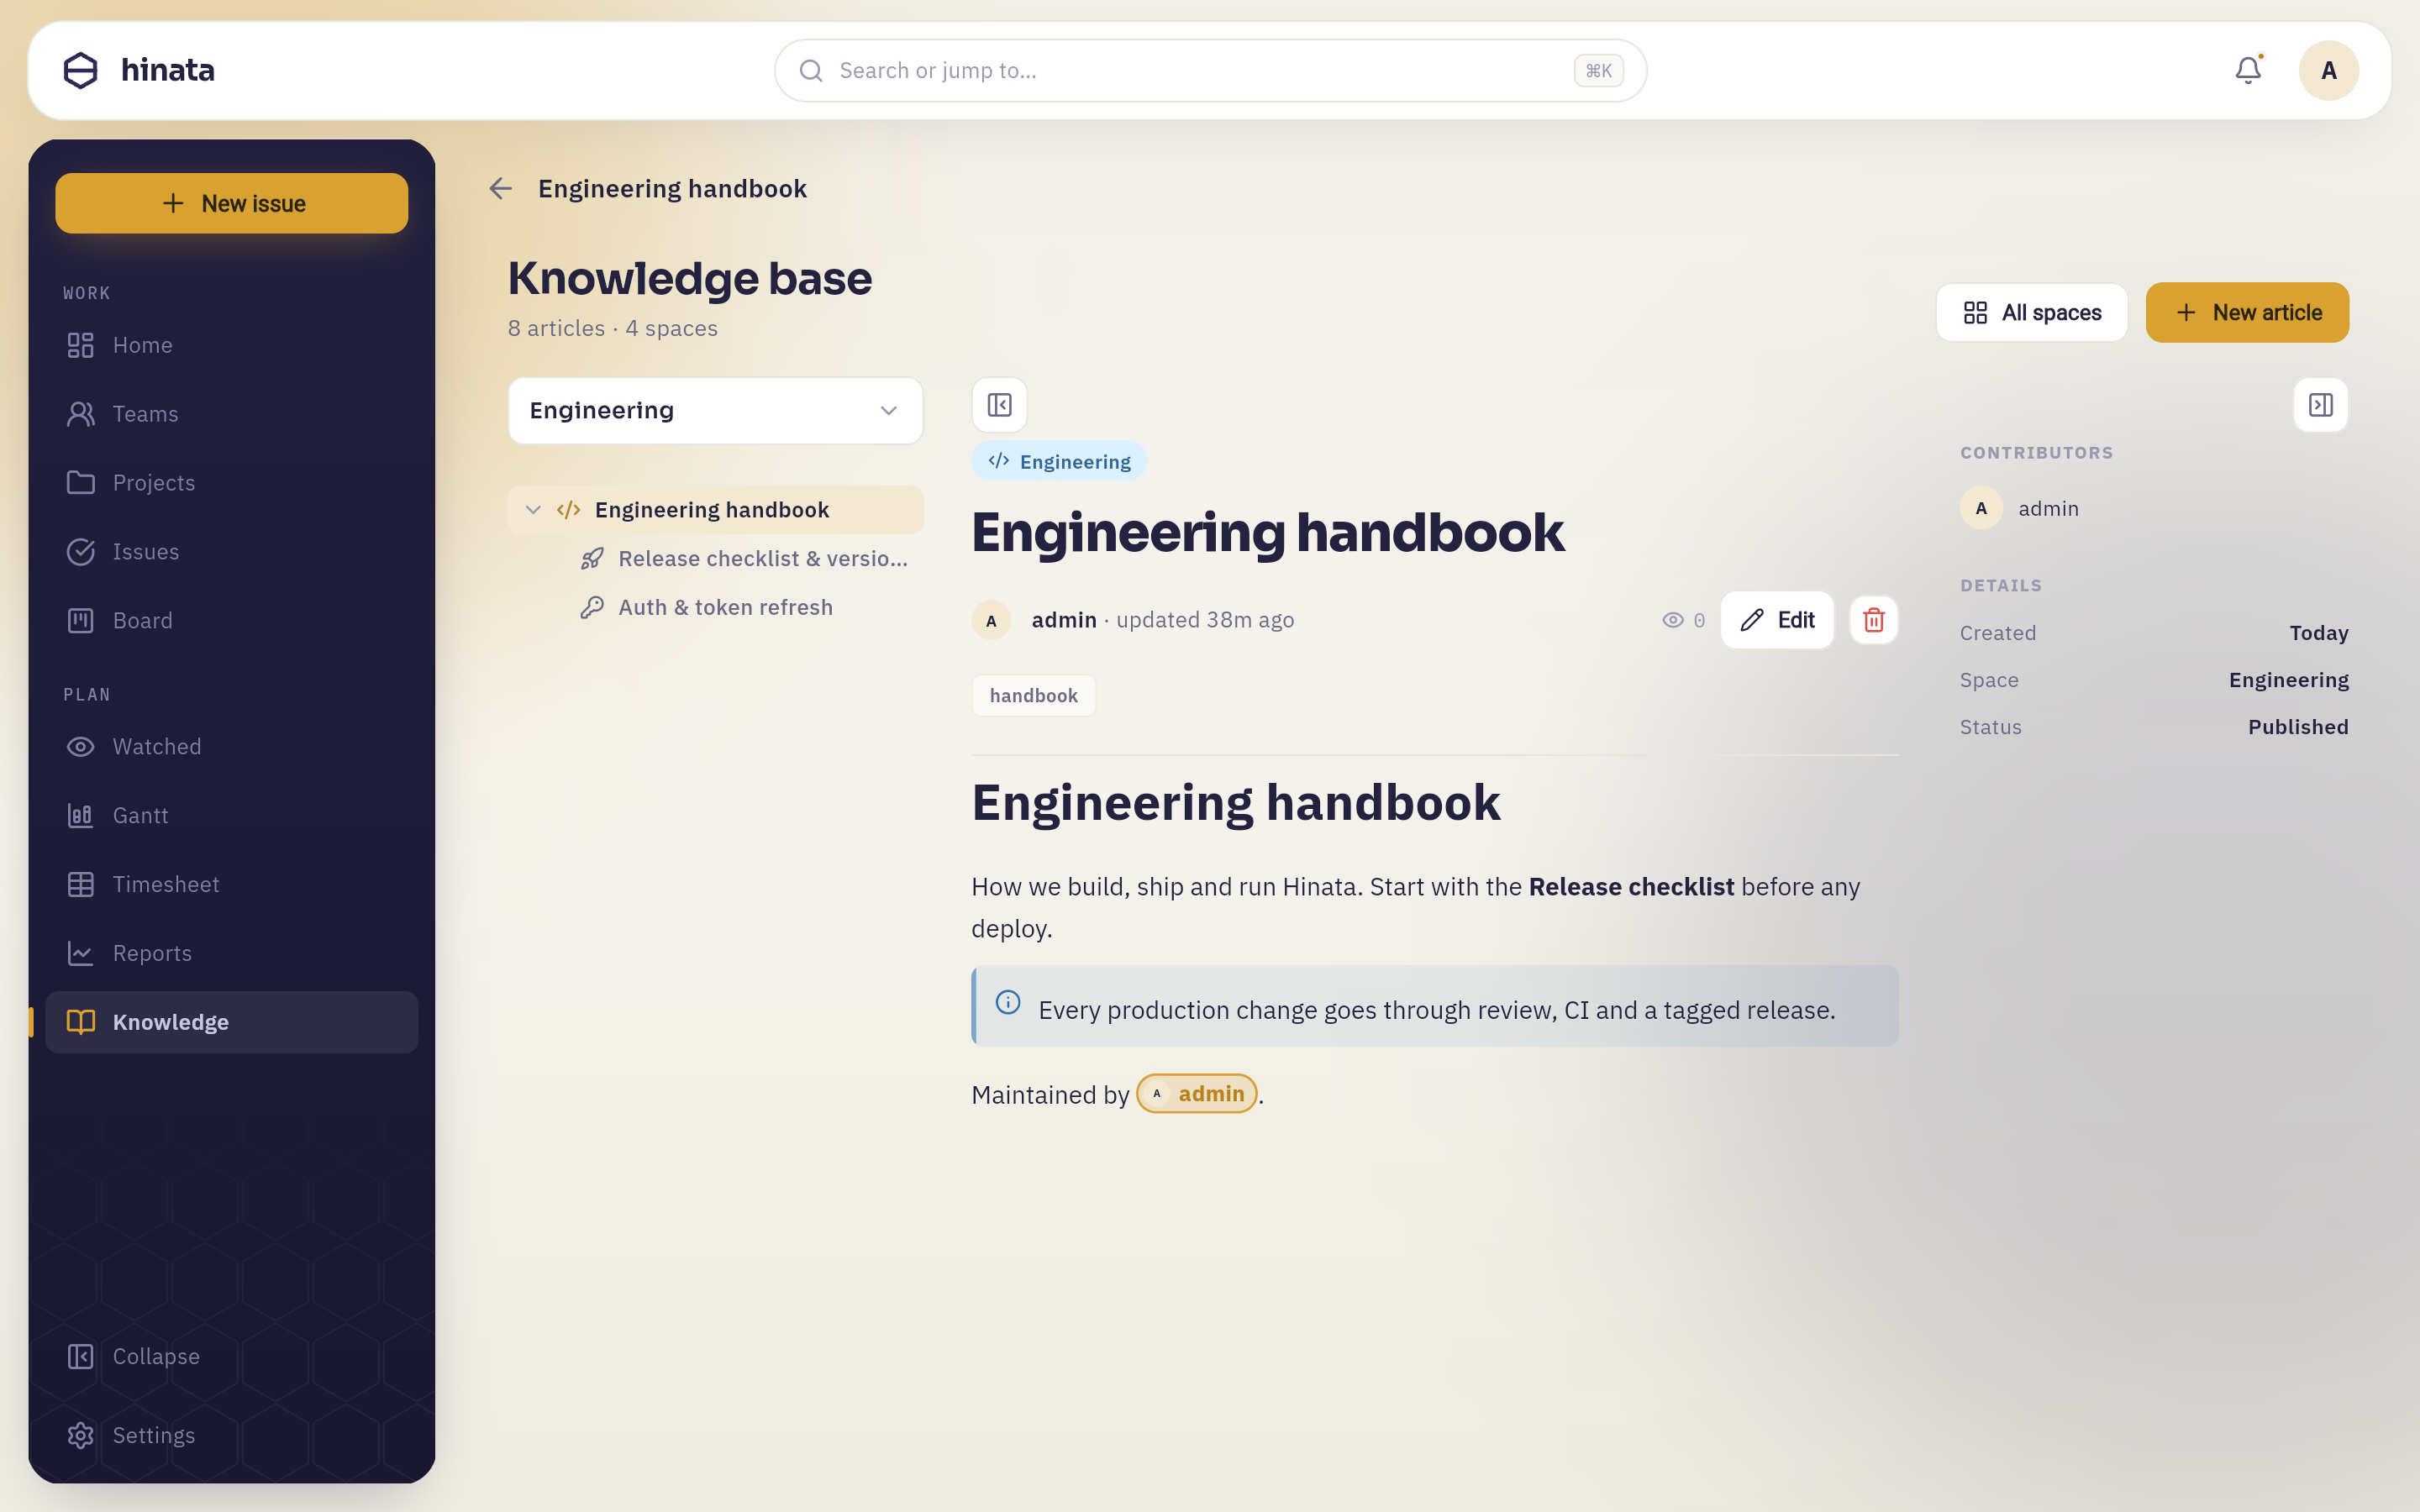 The article view: the space picker and page tree on the left, the article with its space chip, byline, labels and body in the centre — note the Info panel and the inline person chip — and Contributors plus Details on the right. Edit and the delete button sit next to the byline.
Finding your way around an article#
The article view has three columns, and both side columns can be folded away with the small toggles on the inner edges when you want to read full-width.
On the left is the space picker and the page tree. The tree shows the whole nesting for the current space; the article you are reading is highlighted, and its sub-pages hang beneath it.
In the middle is the article: its space chip, title, author and when it was last updated, its labels, and the body.
On the right is the aside:
- On this page — an outline built from the headings, appearing only when the article has more than one. Clicking a heading jumps to it.
- Contributors — the people credited on the page.
- Related articles — other pages this one links to.
- Details — when it was created, which space it is in, and its status.
On a phone, the tree moves into a drawer you open when you need it, so the article itself gets the full width.
Writing on a phone#
Everything works on a phone, with three sensible differences:
- The toolbar scrolls sideways. Undo and Redo sit first because there is no keyboard shortcut for them on a touch device, and they are what you reach for fastest.
- The page tree lives in a drawer, so the article gets the full width; open it when you need to move between pages.
- Long-press a chip instead of hovering it to see the preview card.
Reading is comfortable on a phone; writing a long page is not, on any device. Phones are for fixing the paragraph you noticed was wrong on the train. See On your phone.
Reorganising: drag, nest, move#
The tree is not decoration — it is the editing surface for structure:
- Drag a page onto another page to nest it underneath. Its own sub-pages travel with it; you never have to reattach a subtree by hand.
- Drop it on the root zone at the top of the tree to pull it back out to the top level.
- To move a page to a different space, open it, press Edit and change the space in the header.
Hovering a row reveals two controls at its right edge: a + for Add sub-page, and the menu below.
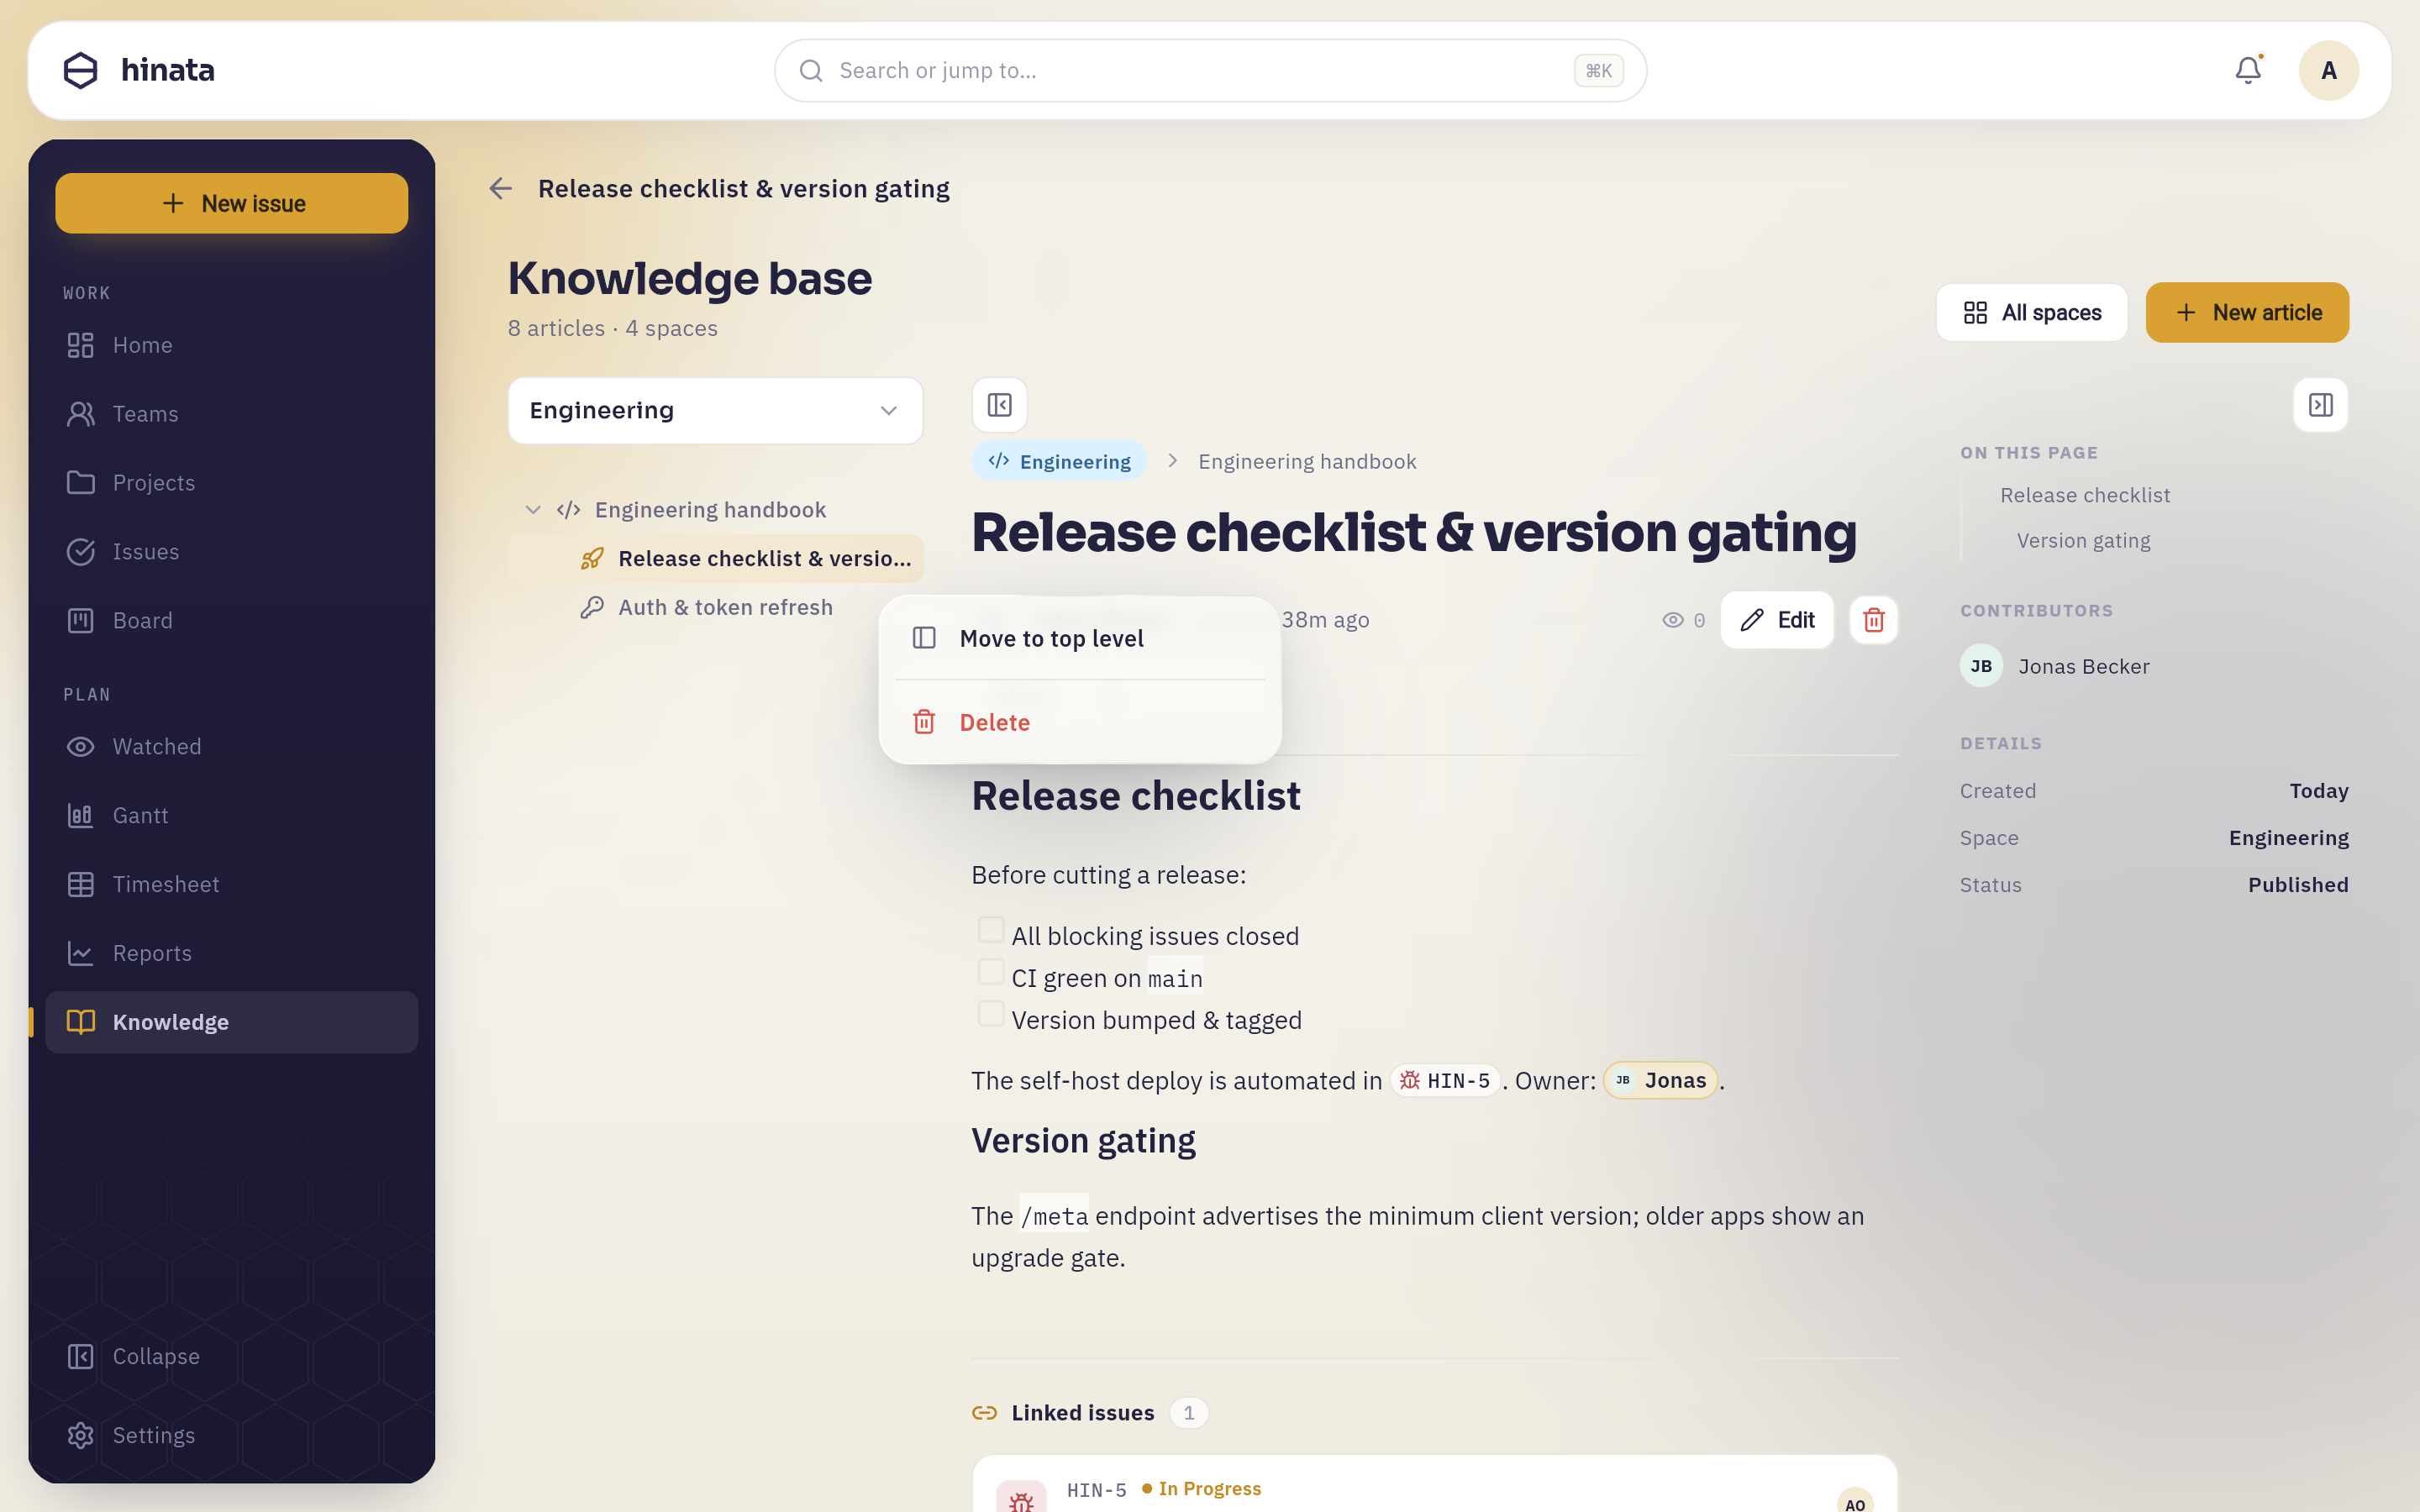 The row's own menu. Move to top level un-nests the page without dragging it anywhere, and Delete is the only way to remove a page from the tree — on a page that still has sub-pages that row reads Delete (move sub-pages first) and does nothing.
Deleting is permanent, and parents are protected
Delete asks for confirmation and names the article, because there is no undo and no wastebasket. A page that has sub-pages cannot be deleted at all until they are moved somewhere else — the menu says so rather than offering an action that would orphan them.
Who can see what — and who can change it#
An article's visibility follows the scope it was created in:
| Scope | Who can see it |
|---|---|
| Global | Everyone with an account on your server |
| Project | Everyone who has access to that project |
| Team | Members of that team |
Articles written in the app are global by default — organisation-wide. Project- and team-scoped articles come from integrations that create them with a scope, and they follow exactly the access you already have to that project or team: if a project is invisible to you, so are its pages, and they do not appear in search or in any list. Administrators see everything. Access to projects itself comes from membership and from teams — see Projects and teams.
Anyone who can read a page can edit or delete it
There is no per-article permission and no read-only mode. This is a wiki: the same access that lets you open a page lets you improve it — and lets you remove it. Trust the team, and lean on the fact that structure protects you where permissions do not (a parent page cannot be deleted while it has children).
Searching the knowledge base#
Two searches reach your articles, and they are good at different things.
The search field on the knowledge home matches article titles, space names and labels. It is the one to use when you are browsing your own documentation and half-remember a title.
The ⌘K palette additionally searches the text inside articles, and it searches everything else at the same time. It is the one to use when you remember a sentence but not which page it was on. See Finding things.
Labels help both. An article that carries them shows them as chips under its title, and the home search and the palette both match them, so a consistent label like runbook makes a whole category retrievable in one query. The editor has no label field today, so labels usually arrive from whatever created the article rather than from your keyboard.
What belongs here, and what belongs in an issue#
The two halves of Hinata answer different questions, and putting something in the wrong one is the most common way documentation goes stale.
| Write an article when… | Write an issue when… |
|---|---|
| It stays true after the work is done | It is done at some point, and then it is over |
| The reader is someone who arrives later | The reader is someone doing it now |
| It describes how a thing works | It describes a change to be made |
| Nobody needs to be assigned to it | Somebody needs to own it and finish it |
A useful test: if the page would need a status, it is an issue. If it would need a last reviewed date, it is an article.
Keeping a page honest#
An article carries its own small audit trail. The byline says who wrote it and how long ago it was last updated; Contributors in the aside credits its author; Details records when it was created.
There is no revision history and no way to restore an earlier version of an article, so two habits are worth having. Edit in place rather than replacing wholesale — the guard against saving an empty page will catch a catastrophe, but not a well-meant rewrite. And when a page is superseded rather than wrong, say so at the top and link the page that replaces it instead of deleting it; a link that leads somewhere beats a link that leads nowhere.
The Recently updated list on the home screen is the closest thing the knowledge base has to a heartbeat. If nothing on it has changed in months, the documentation has stopped tracking reality — and that is usually visible long before anyone gets burned by it.
Habits that keep a knowledge base alive#
- One page, one subject. When a page needs two headings that could each be a title, it is two pages, and one should be a sub-page of the other.
- Link to the issue instead of retelling it. An
@chip stays correct as the work moves; a paragraph summarising the ticket is wrong within a week. - Write the warning first. The sentence a reader most needs belongs in a coloured panel near the top, not at the end of a wall of text.
- Fix what you notice. You can already edit it. A wiki decays through politeness far more often than through vandalism.
- Let the outline do the navigating. Real headings give you the On this page list, and headings are what someone skimming reads first anyway.
Next steps#
- Attach documentation to the work it describes in Working with issues.
- Learn the fastest ways back to a page in Finding things.
- See how project and team access is granted in Projects and teams.